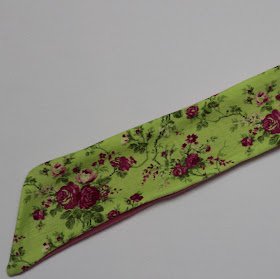
I've always felt that neck is the most exposed part of our body. Most clothing items leave it exposed and the few that cover it ( like turtlenecks) provide insufficient insulation. A scarf is good for adults but way too dangerous for little ones. I always wanted to make a buttoned scarflette ( like this ) for my daughter but I had another consideration. Her skin is way too sensitive for poly materials like fleece, acrylic wool..I'm pretty sure she will have severe eczema the day I make her wear any such thing next to her skin.
Now that cold weather is here, I was forced into finding a solution to this scarf issue. Turns out, the solution is simple. Line the scarf with a cotton knit on one side and make sure to place that side on her skin. Voila!
Do you want to make one for your little one...here's how to do it.
Supplies:
Fleece scrap:
Coordinating cotton knit:
Preparing the pattern:
The best way to do this is to prepare a pattern beforehand on a newspaper, wrapping paper or any large piece of paper. Doing this small extra step will save you a lot of time later on. Also, once you have a pattern you will feel much more confident making more of these.
For my 2 year old I cut a paper strip of 12.5 inches X 5 inches. Then mark on one 12.5 inch side 3 inches from a corner. Now join the other corner to this mark. Cut the rest of the triangle. This is your pattern.
Note: If you're making it for a different aged child, I would suggest cutting a scrap piece of fabric with this pattern and wrapping around child's neck. It shouldn't be long enough to go around her neck twice. However it should be long enough so you have about 2 inches on each side after wrapping it around the neck.
Cut one piece each from fleece and knit from the pattern. Make sure you cut on fold as shown in the diagram above.
Lay both the fabrics on top of each other ( right sides together).
Sew all around the edge, except a 2 inch opening to turn out
Snip corners.
Turn inside out.
I didn't top-stitch it because the top-stitching may make it stiffer and I wanted it super comfy for the kids.
Optional: bunting applique
Cut three-four small triangles.
Place them in a slanting line going opposite to the slant in scarf. Sew slowly around the edges of each triangle. Done.
Sewing the button:
Put it on the little one and mark a place for button and button-hole.
Sew the button on one side and button hole on the other. Make sure you sew the button onto fleece side.
And done!
These are so easy and quick to make. I made many for my daughter and a couple for gifts. What would you do? Keep or give away?


What a super cute scraf! Thanks for linking up with FiF. Have a fabulous weekend!
ReplyDelete~Kimberlee, The Spunky Diva
This scarf came out so nice!! Thanks for sharing at my party! Have a great weekend :)
ReplyDeleteThis is adorable. I love your backing fabric. Thanks for linking up to Blissful and Domestic
ReplyDeletehttp://blissfulanddomestic.blogspot.com/2012/03/feature-friday-linky-party_08.html
How adorable! I love the little embellishments. Thanks for sharing at Manic Monday!
ReplyDelete-Melissa
Thanks so much for sharing this at Made for You Monday! I pinned it for future reference!
ReplyDeletethis is fantastic!!
ReplyDeletethanks for sharing on Serenity Saturday!
Can't wait to see what you link up later today!
Natasha xxx