Saturday, February 25, 2012

More free dress sewing patterns roundup

Dress Sewing Patterns Roundup


A lot of you seemed to like the dress patterns roundup that I did last time around, so I thought I will do another roundup of more dresses that I came across. The idea behind this roundup is not only to bring you pretty dress patterns to make but also to introduce you to some cool sewing blogs which have a wealth of great patterns for you to choose from.
So here is this week's free dress sewing patterns roundup.
If you have stumbled upon something on the internet that you think will be a great addition to the list, do let us know in comments.


Pin It

Friday, February 24, 2012

Sew many scarflettes

Scarflettes Sewing tutorials

I got a little crazy making these kiddie scarflettes ( pattern and tutorial here), Since I also got some orders that added to the frenzy too. And I don't see it stopping anytime soon, coz I just got turquoise fleece fabric and have a couple of ideas I would really like to try out. I will keep you posted( whether you like it or not).

Pin It

Thursday, February 23, 2012

Sewing tutorial: Teeny tiny scarflette

How to make a kids Scarf


I've always felt that neck is the most exposed part of our body. Most clothing items leave it exposed and the few that cover it ( like turtlenecks) provide insufficient insulation. A scarf is good for adults but way too dangerous for little ones. I always wanted to make a buttoned scarflette ( like this ) for my daughter but I had another consideration. Her skin is way too sensitive for poly materials like fleece, acrylic wool..I'm pretty sure she will have severe eczema the day I make her wear any such thing next to her skin.
Now that cold weather is here, I was forced into finding a solution to this scarf issue. Turns out, the solution is simple. Line the scarf with a cotton knit on one side and make sure to place that side on her skin. Voila!

Do you want to make one for your little one...here's how to do it.


Supplies:

Fleece scrap:
Coordinating cotton knit:


Preparing the pattern:

The best way to do this is to prepare a pattern beforehand on a newspaper, wrapping paper or any large piece of paper. Doing this small extra step will save you a lot of time later on. Also, once you have a pattern you will feel much more confident making more of these.

For my 2 year old I cut a paper strip of 12.5 inches X 5 inches. Then  mark on one 12.5 inch side 3 inches from a corner. Now join the other corner to this mark. Cut the rest of the triangle. This is your pattern.

Note: If you're making it for a different aged child, I would suggest cutting a scrap piece of fabric with this pattern and wrapping around child's neck. It shouldn't be long enough to go around her neck twice. However it should be long enough so you have about 2 inches on each side after wrapping it around the neck.


Cut one piece each from fleece and knit from the pattern. Make sure you cut on fold as shown in the diagram above.

Lay both the fabrics on top of each other ( right sides together).


Sew all around the edge, except a 2 inch opening to turn out


Snip corners.

Turn inside out.

I didn't top-stitch it because the top-stitching may make it stiffer and I wanted it super comfy for the kids.

Optional: bunting applique


Cut three-four small triangles.


 Place them in a slanting line going opposite to the slant in scarf. Sew slowly around the edges of each triangle. Done.


Sewing the button:

Put it on the little one and mark a place for button and button-hole.


Sew the button on one side and button hole on the other. Make sure you sew the button onto fleece side.


And done!


These are so easy and quick to make. I made many for my daughter and a couple for gifts. What would you do? Keep or give away?

Pin It


Pin It

Wednesday, February 22, 2012

Amelia's garden baby hat

Blooms And Bugs Studio: Amelia's Garden Baby Hat


Two close friends celebrated their 10th wedding anniversary ( wow!) yesterday. We were invited for lunch at their place...so no cooking (yaay!). I had to skip it because I was working but the hostess was so thoughtful to send hubby with dinner for both of us...so no cooking in the evening ( Gotta love that!). Since I had some free time on my hands, I spent it making this baby hat with earflaps.

 Made with my favorite hat pattern from "From An Igloo". You may remember the Dino hats I made earlier with this pattern. This time I added straps to tie it at the neck and made a girly version.

I love the flowers at the front. Here's a close up.

For sale now at my etsy shop.


Pin It

Tuesday, February 21, 2012

New item in the shop: Lavender Fields Jumper

Blooms And Bugs Studio: Lavender Fields Jumper Sewing tutorial

I have been sewing like crazy for the spring summer collection for my etsy shop. I'm going through my stash of Moda Fabric (Love!) and adding new items to the shop almost daily.

Here's the latest addition to the store. Lavender Fields Jumper in size 6- 12 months. Its made from Kate Spain's Good Fortune Collection. I was actually putting together some other combination when I found this fabric in my stash. It had such a springy-summery vibe that I dropped everything else and used it up to make this sweet little jumper.

Know a little girl who would like to wear this?


Pin It

Sunday, February 19, 2012

Sewing patterns roundup - Top 10 free pants patterns

Free Pants sewing Tutorials Roundup Pants sew pattern roundup


I have scoured the internet to come up with the best pants sewing patterns and tutorials. And I learned something - Good pants patterns are extremely difficult to find. Especially the ones that don't have flowers or ruffles on them. Still, there are people who write patterns and tutorials for things a little guy can wear. Here's my list of 10 pants sewing patterns for guys ( and girls). Let me know what you think...and any pants I left out...in comments.

Pin It

Thursday, February 16, 2012

Sewing tutorial blind hemming to reduce pants length

Sewing Tutorial: Reduce Pants length with blind Hemming
Pant altering tutorial


I feel a big sense of accomplishment whenever I learn a new sewing technique. This week while altering a pair of pants, I was forced into learning how to do blind hemming. Since I couldn't figure it out on my own, I resorted to this awesome blind hem tutorial from Ashley of Make it and Love it. Once I went through her tutorial...it was all pretty easy. All it took was 10 mins to hem a pair of pants. Now I have a nice well fitting pair of pants that cost me lesser than 10 bucks...can't beat that.

Here's a mini tutorial for altering the pant lengths using blind hemming.

Pant altering tutorial 1. fold pants to right length

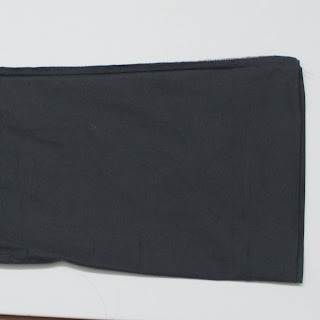
Wear your pants and find out what length you would like them to be. Wearing them is crucial as it is difficult to judge a flattering length without trying them on. Also wear the shoes you're going to wear with them for more precise fitting. Here I should point out that the method I'm going to show will work only if your pants are straight cut/or are flared ever so slightly...for bootcut pants you will need to adjust the width too ( which I'm not covering in this tutorial). In the above pic I'm showing one of the legs of the pants which has been folded to an appropriate length.

Reducing pants length by sewing


Now fold the pants hem back on the right side, up to the point where you folded earlier. Iron it well to make a nice crease at this point.


Setting up the sewing machine

Sewing machine setting for hemming pants
Now lets get the sewing machine ready for the job by removing the detachable part of the sewing platform. Most machines have this part that can be just pulled out. This will make the sewing platform narrower and help us hem the pants easily. ( Please refer to your machine manual on how to correctly do this, the mechanism differs on different machines but most model have this option)


Blind hem stitch setting on sewing machine
Choose the Blind Hem stitch type on your machine. On my machine ( Babylock Ellageo) the top 2 stitch types (2-01 and 2-02) are for Blind hemming. Sorry about the crappy picture.

sewing pattern: Fix your pants

Lets get back to the pants now. Now turn them inside out. Now that you can see the fold turn the fold outwards such that only a small portion (2-3 mm) of the fold is visible. If you closely look at the right end of the pants above, you would see the fold peeking out. Thats what you want to do.

sewing pattern: Fix your pants length
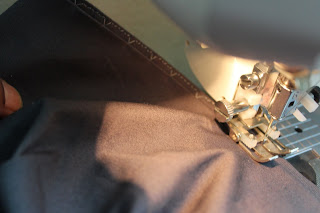
Now set your machine on the slowest speed and start sewing. What you want to do here is sew on the small sliver of the fold that is peeking out, but let the 'spike' graze at the layer above.

Blind hemming on pants
Here's a picture of my sewing to illustrate what I meant. See those peaks that barely touch the upper layer. That 'grazing' is what will hold the two layers together. This is where your finesse will be tested, if you let the peaks fall too much on the upper layer, they will show up on the outside...if you try to stay too far then they might not graze the upper layer, which would mean no hemming :( . It may take a couple tries to get the distance just right. Using sewing foot as guide will definitely help.

Sewing tutorial: Pants with blind hem

Here are the hems on my pants, all done. What? You can't see any hem? That my friend...is the whole point.


Here I'm with my brand new pants. ( The jeans was done differently but I still had to use blind hemming to finish them)


Pin It

Tuesday, February 14, 2012

From Blooms And Bugs studio...more Belle skirts


Blooms And Bugs Studio: Belle Layered Skirts

Now that I have been paying a little more attention to my etsy shop, I see that the orders are also trickling in.
This is the second order of this Belle Layered skirt, it was a record of sorts. This skirt got sold within 5 minutes of my listing it..Yaay! It got shipped yesterday.

Along with this...

all wrapped up.
I'm now paying attention to what my customers are telling me and making some more combos of these skirts.

Pin It

Friday, February 10, 2012

So Sweet Headband Tutorial

Headband Sewing Tutorial: So Sweet headband
I posted this tutorial as a guest post over at Train To Crazy. Re-posting it here in case you missed it first time around.


I made this So Sweet Headband for my daughter for the Valentines Day. Here's what you need to make one for your sweetie:

Supplies:

  • 1/4 inch wide red elastic - 12.5 inches
  • Hot pink felt - 3 inch square ( cut a heart shape from this, the heart I cut was about 2 inches)
  • White Felt - 4 inch square ( cut a heart shape bigger than the pink one from this, the heart I cut was about 2.5 inches )
  • Small white button - 1
  • Threads - Red and White


1.

Sew both the ends of elastic together by overlapping them half an inch. Reinforce his seam by sewing multiple times. I used a very narrow and small zigzag for extra strength. Don't worry if it looks shabby at this point, it will be concealed later on.


2.


Place the bigger white heart beneath the joint in the headband.


3.


Place the smaller pink heart over the headband such that the joint gets sandwiched between the two hearts.

4.


Place a small white button on top of all the layers such that it sits on the headband. Hand-sew the button in place by inserting the thread through all the layers and going from one hole to the other multiple times.


5.
Sew running stitches with white thread along the boundary of smaller heart.


6.


Sew running stitches with Red/Pink thread along the boundary of bigger heart.

7.

And you're done! Now go put it on the cutest kid around.


Pin It