Wednesday, August 31, 2011

Far far away

Blooms And Bugs Studio: Selling dresses in Australia


These babies are on their way to Australia. Yes! all the way to Australia. A super sweet Mama from down under bought two of the dresses from my etsy store
 and I added these hair accessories to her order...because...well, who doesn't want to spoil little girls?
Of course! sales from my store make me happy, but what makes me really happy is the fact that somewhere far far away, there's an adorable little girl who is
wearing clothes I made. I think that satisfaction is what makes me get up and work that sewing machine every morning.
What do you look forward to in your day?

Tuesday, August 30, 2011

Link love - Look Ma! I'm the designer of the week

Blooms And Bugs Blog: New Features


Image courtsey Sullivan via MorgueFile


The last week brought with it a lot of recongnition at many reputed blogs. I'm the designer of the week at AllFreeSewing.com. So if you open up today's newsletter from AllFreeSewing, there's a chance that you will come across a line or two about somebody called Anshu...(wink wink) Also my little Carnival dress and Reversible Zen Dress made it to Craft Gossip. I also got invited to guest post at Whip Up where I shared a newborn hat tutorial.
Thanks a lot for spreading the word about my little blog. It is very encouraging to see all the pins of my tutorials, so many readers liking my posts and so many of you taking time to stop by and comment. Makes the whole process of crafting, writing tutorials, taking pictures so worth it.

Something tells me that this coming week is going to be awesome as well...Stay Tuned.

Monday, August 29, 2011

Sew Easy - Part 8 - The Java Beans Dress

Easy Sewing Tutorial: Round yoke dress pattern
Java Beans Dress Sewing Tutorial

You can read the story behind this series and the first part here. Click here to read the secondthirdfourth, fifth (Strawberry Vanilla Dress Pattern), sixth and seventh( Carnival Dress) edition of this series.


This Baby Cord has been sitting in my stash for a few months now. Looking at how much I loved this print in the first place, that was very very unusual, I had to do something about it. So I first made a pair of pants from these. But I still had some more of it. So I created this round yoke dress.
I have an amazing stash of brown/chocolate color quilting cottons, this print seemed to go so well with green brown print, I couldn't help pair these two.


Supplies: For making the dress for a two year old.
2 Fabrics in contrasting colors -
Fabric #1 - quarter yd. - Make sure this fabric has a little body - something like corduroy, denim would work better than quilting cottons.
Fabric #2 - half yd. any lightweight cotton fabric will do.

Buttons - two buttons coordinated with fabric


Measurements:

Measure the child at the shoulders to determine how wide should be the neck of the dress. Lets call this distance NW. It came out to be 4 inches for me.
Measure again starting from the point where neck and shoulder meet to how deep you want the neck to be.
Lets call it ND. It was 3 inches in my case.

Also measure how deep you want the neck to be in the back...lets call it BND.


Construction:

First lets cut out the neck/yoke of the dress:
1.
drafting the yoke of the dress


Fold fabric 1 into 2 along the width, now fold it again about 8 inches from one end Draw the lines as follows. Mark point A at ND inch from corner of the fold. Mark point E at ND+5 inches.
Mark point B at NW/2 inch from corner along the width. Mark point F at NW/2+5 inches.
Draw straight lines from A and B which meet at C.

Draw straight lines from E and F which meet at G.
You get two rectangles, one inside the other.

Note - If my pics look out of proportion, that's because I just took NW+3, and ND+3 for the outer rectangle...However, after finishing the dress I realized that a little wider yoke would work much better. So that's why I'm going with 5 inches, instead of 3.

2.

drafting the yoke of the dress


Now using those rectangles as guide, mark neckline at the inner rectangle and  yoke at the outer rectangle.

3.

cut out yoke

Cut Along the curve, and unfold once. If the fabric is joined at the shoulders, cut it apart.


4.
Repeat the same for back neck and yoke, just replace ND by BND.
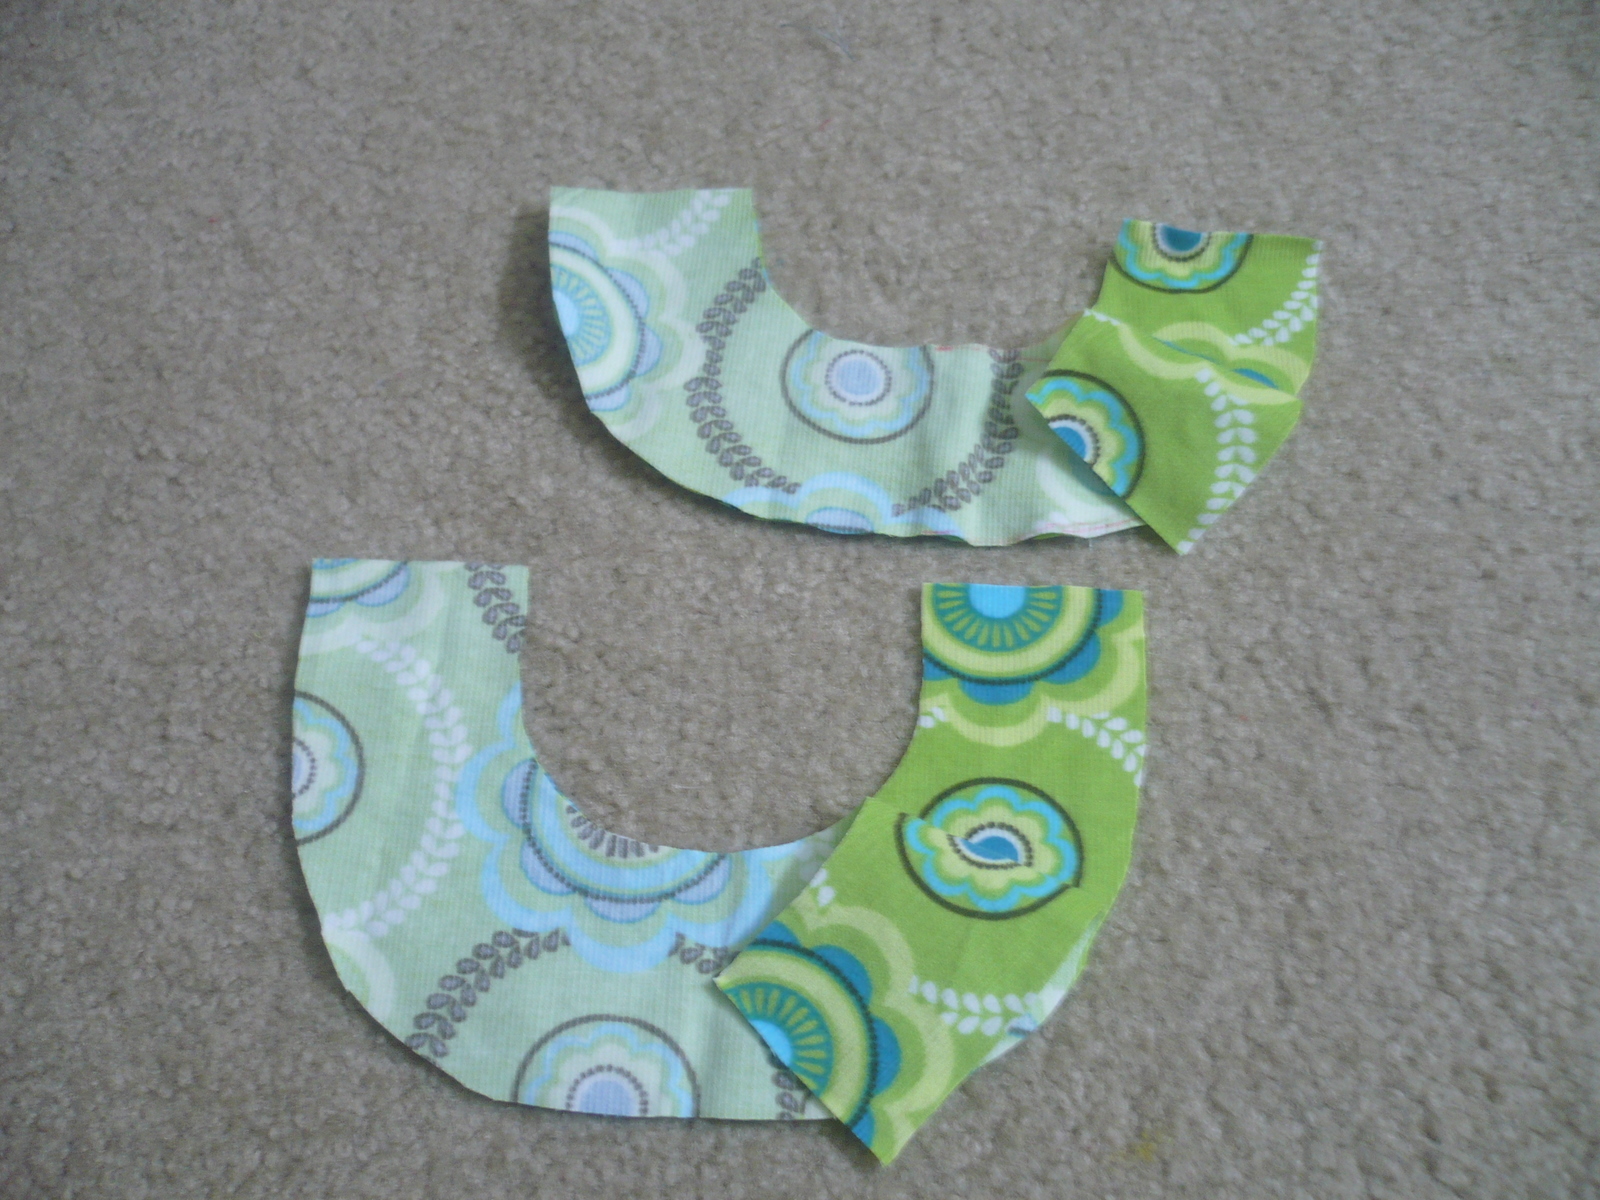


5.


Here are both the neck pieces and their linings.


6.
 Now sew along the shoulders and neck line ( inner semi circle).

7.
Snip notches along the curve. Take care of not cutting into the seam

8.
Turn out, Iron.

9.
Do the same for back neck piece.

Now lets work on the skirt.


10.

Sew along the length to make a tube.


11.


Turn out and fold along the length, such that the seam falls on the fold. In the pic above, the seam is towards the left hand side. Now cut out a curve of about 2 inches radius from the other end ( that is, not on fold)
This is the cut for the armholes.

Note: This will become only part of the armholes, not the complete armhole because part of it will come from the yoke, where it doesn't get attached to the skirt. To further understand read on a few more steps.

12.
unfold. Here's what it looks like.

13.
Now turn the tube inside out once again, so that wrong side is outside. Now take a piece of fabric 2 and place it beneath the armhole such that right sides are together. Now sew along the curve.

14.


Cut out the extra part from the binding fabric.


15.

Cut the extra fabric along the curve such that you're left with a 1.5 inch wide strip parallel to the curve. Snip the seam allowance along the curve. This helps in turning the fabric easily along the curve.


16.
Turn the extra fabric inside.

17.

preparing the armholes

Fold the strip inside and sew. I chose to sew it inside by hand hemming...just because I sometimes feel like hand-sewing. You could either hand-sew the binding at armhole, or you could just use machine sewing.
Repeat the same for the other armhole.

18.
Now sew two parallel seams along the edge of the fabric starting from one end of armhole to another on. Pull the bobbin thread to gather the fabric.
 Repeat with the other side of the fabric from one armhole to another.

If it has the seam in the middle then its the back of the skirt, if it doesn't then its the front.
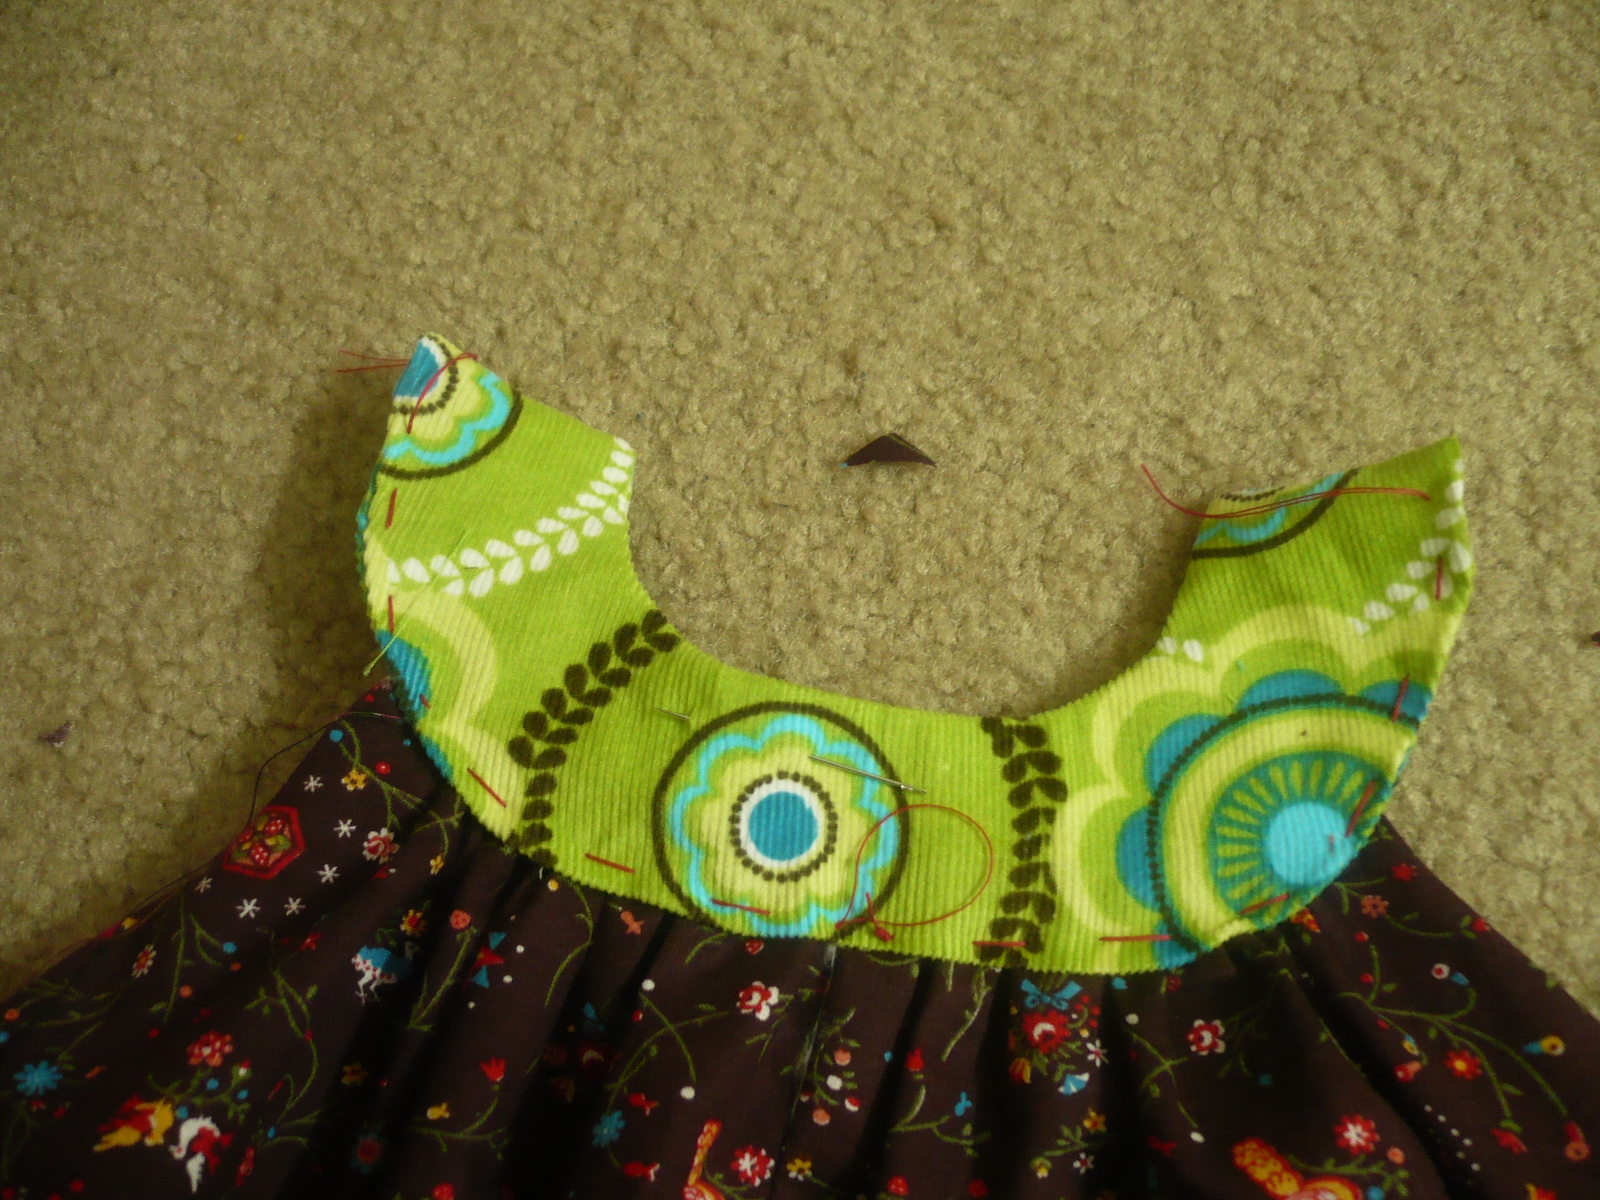
19.

sewing the yoke to the dress


Now adjust the gathers such that they cover the yoke except for 2-2.5 inches on either side.
Now sandwich the gathered skirt between the two layers of the yoke, make sure it is fitting evenly between the two ends. Now fold in the edges of the yoke from both layers and sew some running stitches to hold it in place. See picture, there are running stitches done in red on the outer edge of yoke.

Note: You can always use some pins to hold all the three layers together, but I have a certain phobia of pins. I avoid them as much as I can, especially on baby clothes. Its my worst nightmare that I would leave a pin in the finished garment and it will poke a little one...ouch! So you could use the pins but I'm more comfortable with big running stitches.

Note: The 2-2.5 inch that you leave on the sides will become the armholes that I had been referring to in step 11. 

20.
sewing the yoke to the dress


Now sew on along those running stitches as close to the edge as you can. You can't really see my seam here because its been done with a green thread. Just know that there's a seam along those red stitches. OK?
Pull out the running stitches.


button closures on the yoke

Now sew two coordinating buttons on the front shoulders and make two buttonholes on the back shoulders. You can use any other closures like, hook-eye, Velcro tabs or snaps here. I just love the button look that's why I went with buttons.
Hem the dress by folding once and sewing and then folding again and sewing. And you're done!
To be honest, I'm not completely satisfied with the proportions of the dress. I think I should have made the yoke wider so that the bodice wouldn't get overwhelmed by the skirt. Oh well! However, I did include the measurements for a wider bodice in the instructions, so yours will look better than mine.


round yoke dress sewing pattern


Somehow an elephant stumbled upon my Java Beans dress before my toddler could...

java beans dress sewing tutorial


java beans dress sewing tutorial


I know, I know, I need better props...but he's so cute!

Saturday, August 27, 2011

I'm at Whip Up + Newborn hat tutorial

Knotted hat sewing tutorial


I'm really excited today. Isn't being on Whip Up means you have arrived in crafting world? well I don't know about you but I do feel like I can now hang my shoes, take a flight to Hawaii and spend rest of my life on the beach, soaking in the sun and doing...umm..nothing. Ohh wait! I still have bills to pay :( And a little one to raise. Alright, I will just eat a chocolate to celebrate, or sew something, or both.

newborn hat tutorial


Here's a link to my guest post where I show you how to make a knotted newborn hat.


Thursday, August 25, 2011

Bottoms Up - A new series


While I was busy sewing up gifts and writing tutorials my little munchkin was growing up like a weed. When I found a moment to take stock of her wardrobe, I found that every pair of pants came a few inches too short.Whoa! when did that happen? Probably its because she still fits in those pants at the waist. Its the same size as it was one year ago. Anyhow, I revised my go to pants pattern to accommodate her growth spurt ( I still can't believe that it is the template for my itty bitty baby), and went to town,cutting, sewing, ironing...and a couple days later her stock of pants was replenished.

While doing all this sweat shop sewing, I realized that I can't be alone in this...so I thought of doing this new  weekly series, where we will focus on just the bottoms, like pants, leggings...maybe one or two skirts for little ones.
I'll be starting out with the most basic pants pattern, you must have seen it bazillion times around the blogosphere, I still decided to keep it here for the sake of completeness. Along the way, I'll give you some of embellishment ideas ( and how to do them ) for these basics. I hope you will find it useful, as well as enjoyable.

So lets get started with the basic pants for a skinny mini butt. You can find a lot of patterns for these basic pants all over the blogosphere. For the sake of completeness, I'll also upload the one I have been using for my skinny toddler. These work for us but you may need to alter the pattern a bit to suit your baby's length and
waist. Or you can take up any basic pants pattern and start. I'll start with the basic pattern and show how to
go about creating a bunch of variations of it.

So download/get a pants pattern you feel comfortable with and lets start.

Supplies:

Basic pants for a 2 yr old

1 yd fabric - For pants use fabrics that are a little heavy like - quilting weight cottons, baby corduroy, denim of course.

Elastic - I used 17 inches of  5/8 inch wide elastic. But the best way to measure is to place it around your child's waist and see what length of elastic is most comfortable for him/her.

Optional - A narrow ribbon for embellishing 1.5 yds.

Basic sewing supplies - scissor, thread in matching color, pen for tracing out the pattern.

Cutting:

1.
cutting out basic pants

Lay your fabric straight, then fold it lengthwise, then fold it one more time.

2.
basic pants sewing tutorial

 Now place your pattern on the fold such that the straight line aligns with the fold.

3.


Trace the pattern and cut out.
Sew Easy tip: Try to place your pattern about an inch above the raw edge of the fabric. This will give you some margin, in case the fabric is not cut straight.

4.
sewing basic pants

 Now sew the inseams of both legs of the pant separately. Right sides together.

5.

Now turn out one of the legs.

6.

Insert one leg inside the other, such that the crotch areas align.

7.

Sew along the edges of crotch area, go over the lowest part a couple times, as this is the most stressed area of the pants and you don't want seams to unravel. Also serge if you can.

8. Turn the pants inside out.

9. Now lets make the waistband.

10.

Fold the waist quarter inch inside and sew.

11

. Fold it one more time about an inch this time. Sew, but make sure you leave about an inch of opening.

12.

Using a safety pin, insert the elastic piece inside this opening.

13.

 When the elastic comes out, Join both ends of elastic by sewing together. I use stitch num 1.14 as recommended by my machine manual. If you don't have this stitch , use zig zag stitch instead. Just make sure you go over the elastic at least 3-4 times.

14. Sew the opening shut.

At this point I highly recommend trying the pants on the child, to get a sense of the fit. The elastic at the waist should be snug but comfortable. Similarly, mark the length where you want the pants to end, and fold the remaining length of pants inside out. That will give us exactly the length we can use to hem the pants.

15. Iron the lengths you have just marked while trying on the pants.

16.

Ideally you should fold quarter inch first and then fold again about half an inch, but thats just a guideline.
     Use the length you have marked to fold the hems twice.

hemming the pants

The basic pants are done. Once you have the template and elastic width and other measurements down, you can easily make one of these in half an hour. (I'm guessing here, I still have to time a basic pant)

Embellishment idea.

For these pants I thought of embellishing these only at the end. so you can skip it if you want.
The idea is very simple though, take a narrow ribbon, and sew it in criss-crossing lines near hem of the pants. I went with a free-style simply because it felt stylish and also because its difficult to sew even rows near the narrow pants opening.
basic pants free pattern

I just cut two equal pieces of ribbon (~25 inches each ) and went around the legs sewing it on criss-crossing lines.


free pants pattern


Pattern pieces are here(page 1) and here (page 2).


Friday, August 19, 2011

Sew Easy - Part 7: Carnival Dress

Sew Easy tutorial: Knotted knit dress

You can read the story behind this series and the first part here. Click here to read the secondthirdfourth , fifth  and sixth edition of this series.

After having many tutorials with woven fabrics, I think its time we go back to knits and up-cycle some more T-shirts. With that in mind, I made this Carnival Dress. I named it so, because all the strips reminded me of the buntings and other festive decorations. I love how blue and yellow look so happy together. It is mostly a cut easy project, instead of sew easy. Interested in making one of your own? Lets do it.

Supplies:
2 T shirts in co-ordinating colors, same colors will also work
Basic sewing supplies - scissor, thread matching with the Tshirts

Measurements - Measure your child from shoulder to the desired length of the dress, lets call it L
               Measure your child all around the chest and add 4 inches to it, then divide it all by 2. Lets call it W.


1. First cut one of the shirts to L length, measuring from hem upwards.  Basically we want to reuse the Tshirt hem as our dress hem. Ok?


2. Now place this on top of the other and decide how much overlap do you want between the two. And starting from bottom cut that much. So we can reuse the hem from second T as well.

3. Now insert one Tshirt into another such that their raw sides align. Look at the picture.


4 . Now start cutting 3 inches long slits, one inches apart from raw ends on all four layers.

Keep cutting until you reach W width from one end.

When you reach W, instead of cutting a slit, keep cutting upto the hem. To get a Four layered piece of length L and width W.


5.


Now start Knotting these slits with one strip from Tshirt 1 and one strip from Tshirt 2 right behind it. Pull the strips a bit while tying the knot, this will cause the fabric to bunch up a little, which will give us a little gathered look. Tie the knot one more time to secure. 
Just leave 4 sets of strips 2-3 inches apart in the center. Dont tie them, because they will become the shoulder straps of the dress.
 Keep tying the knots with the other strips at the back as well, when you reach near the center of the back, leave 2 sets of strips then tie the center strips and then again leave 2 sets of strips.


6.
This is how it will look after tying all the knots. I have knotted the front and back shoulder ties together, but I recommend doing it at the very end.


7.


Now lets sew together the side of the dress thats still open.


Pull apart both the layers, taking care not to stretch the knots too much. Now sew each layer, right sides together.
Settle them back in place.


8.
Now take a look at all the hanging strips and see if you like them as is. Maybe they need a haircut. Cut them to a length you like.
At the end, mine were about 1.5 - 2 inches long.


Neckline at the front...and the reason why I shouldn't cut my toddler's hair :D


This is how mine looked from the back, after cutting the strips to a smaller length.


9. Now sew a seam along the neckline ( and back) as close to the knots as you can get. This will help the strips stay in place.


10.


Now slip it on the child and tie the shoulder ties. This may take a couple minutes, so bribe with candy.

Enjoy your carnival dress!