Showing posts with label Tutorial. Show all posts

Thursday, November 1, 2012

Fall Wardrobe Revamp: Too Big Sweater to Pretty Top


We are kicking off Fall Wardrobe Revamp 2012 with this first refashion. Here are the other bloggers who will be joining in the fun:

Palak from Make It Handmade
Rikka from Ricochet and Away
Kassi and Kaylie from Truly Lovely

Every thursday in Novemeber, I'm going to post a refashion or accessory tutorial that will help you revamp your wardrobe for the fall. In addition, I'll also be doing roundups of refashions and accessories that are just perfect for the fall. This month's Friday Features will also feature winter accessories and clever refashions for fall and winter. Palak and Rikka will also post Wardrobe revamp tutorials on their respective blogs. So are you ready to add some fall magic to your wardrobe? Grab our button and rev up that sewing machine.


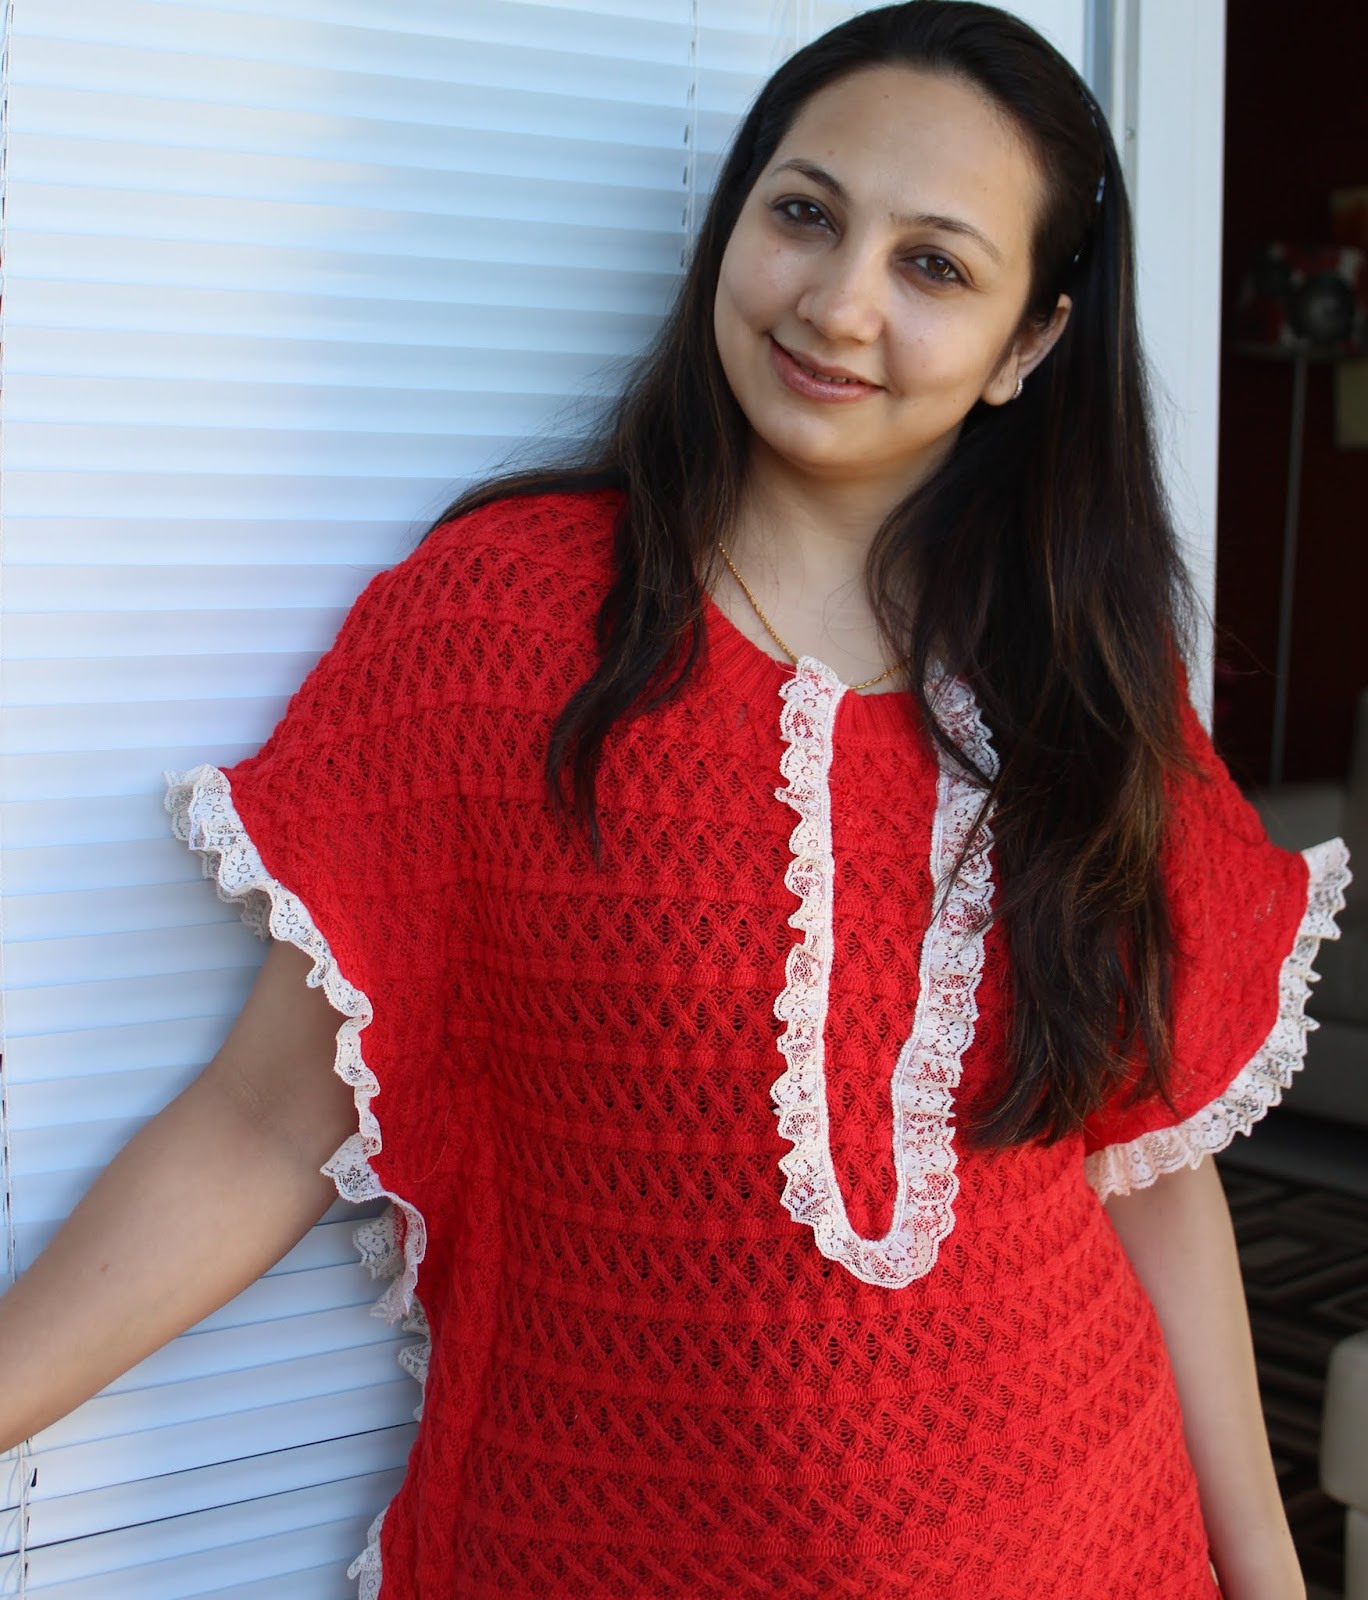
In all honesty, I never cared too much for orange growing up. It was just too flashy, too 'out there' for my taste. Then something changed last year and I started loving this particular shade of orange, the one that is between red and orange. I don't know if it was the leaves turning colors or the bloggers falling head over heels for orange. Whatever it was I just started loving orange and hoarding orange-y things like crazy. I bought this sweater during a sale at Old Navy. Even in clearance it was priced a bit higher for my liking, I almost put it back, but then the texture and the color called my name and it came home with me.
Now finally I made something out of it that I would like to share with you all. It is very similar to the Kaftan Top I made earlier but much simpler.

Supplies: 
A too big sweater. It has to be really big. If you wear a size M, buy an XL for this refashion.
Ruffled lace or any other pretty trims ( pom-poms would also look good with this style)

Estimated time:
1 hour

Construction: 

Cut out both the layers of the sweater.

Sew  about an inch below the shoulders. This would fix the too low neckline and also remove an inch from the length.


Try the sweater on and mark how much you would like to take in. In this refashion, we are not taking in the sweater, instead we are keeping the excess out, hanging off the body of the sweater. So mark the silhouette you want with safety pins on both sides. Take out the sweater and sew a seam along the pins.

Now hack off the sides starting at the shoulders to give it a nice bat sleeve like silhouette. Basically you draw a slanted line starting just before the sleeve edge and ending at the hem of the sweater. I also made it a little curvy.

Now take a pretty trim, I used this pre-ruffled lace to finish the edges. Sew it such that it is sitting on the inside edge of the sweater, right sides together. Start at the bottom of the bat sleeves and go all the way to the other side.

Now fold the lace outwards and top-stitch. Repeat on the other side.

I realized that the center of the sweater was looking too plain and needed some pep, so I hand basted the lace in a U shape at the center and finished it by machine sewing. fold the end s of the lace on the inside.

sweater refashion tutorial by Blooms And Bugs

Now find a pretty model, a beautiful location and click away...Ok that was me. You find some pretty jewelry, cute shoes and have fun :)


Pin It

Friday, January 6, 2012

Dec Roses Scarf Tutorial

Ruffled Scarf Sewing Tutorial


Winter means a lot of accessories, and among all those...scarves is my favorite. They can perk up any plain outfit, come in bazzillion styles and colors and are so easy to make. And if something is easy to make, I have to make it. So I did. This super soft bunch of ruffles. I love it and I thought you would like it too so I'm sharing with you how to make one.


Supplies:

Knit Jersey Fabric : 15 inches ( length) x 60 inches ( width)
Elastic thread
Matching thread


Construction:

1. Cut two strips from the fabric of 7.5 inches X 60 inches. If your fabric is not 60 inches wide than just cut multiple strips to make that length. Don't worry about cutting the strips evenly, since it will all get ruffled eventually a little variation in width won't be noticeable and most probably look good.

2.


Now take one strip and shir it in the center. To do this you need to fill your bobbin with elastic thread and use the regular matching thread on top. I did two rows but since all the fabrics shir differently you will need to vary the number of rows based on when you get a decent ruffle in the fabric. If you don't have any experience with shirring here's an excellent shirring tutorial to jumpstart you.

If you cut two smaller strips instead of a 60 inch wide single you need to join them before you shir. The good news is that you don't need to do anything special for that. Just overlap the two strips 1 inch and continue shirring like it was a continuous piece. Because the final piece would be very ruffled, the join would be invisible. Since the knits don't fray, it would be okay in the wash too.

3.
Repeat the above step for both the strips.

4.


Now place one strip over the other ( Wrong sides together). The wrong side is where the white elastic thread is showing. Our goal is to hide this thread, so it doesn't show up whatever way you wear your scarf.

5.

Sew a seam of half inch at the starting point ( shown by the arrow), go back and forth 2-3 times. Trim the extra thread.

6.

Sew a half inch seam every 5 inches. Go back and forth like you did in step 5. Trim any excess thread. What these small 'tacks' do is hold the two layers together so the elastic thread won't show. But sewing these only at the intervals would maintain the stretch in the scarf that was given to it by shirring.
7.


Sometimes, due to unpredictable nature of shirring, your strips may turn out to be different lengths. If that happens, just turn the extra part from the longer strip over the smaller ( As I did in the image above - look right above the arrow) and sew a tack at this point.

8.

The scarf is ready! wear it, gift it, show it off!

Variations:

You could do a number of things with this basic idea. Here're a couple that I could think of.

1. Use strips of different widths

2. Cut fringes after shirring

3. Use different colors for both the strips

4. Use 4 strips instead of 2 and shir 2 layers together.

5. Join different colored small strips instead of making a single long one


I may try some of these ideas myself at some point...but for now, ball is in your court. Go wild!


Pin It

Wednesday, November 23, 2011

Bottoms up part 5: Lilly Frilly ruffle pants tutorial

Ruffle pants sewing tutorial


Here's the story behind the series, the second part of the series is here, third part of the series is here, go here for the part 4.                                          

The following post has been published as a guest post on craftsy blog, I am republishing it here now.
These are a very quick and easy refashion and a great way to jazz up a plain boring pair of baby pants or leggings. This technique is also an easy way to increase the length of pants that fit well at the waist but are a couple of inches too short. This will also come in handy if you want to make pants coordinated with a dress, but don't have the time/skill to sew the whole thing yourself. You could just add a ruffle at the bottom and may be a couple of embellishments and just like that! matching pants!

Supplies:

1 baby pants that fit well at the waist ( length doesn't matter here, because we can always cut them to the right length, or add ruffles to increase the length)
5 inchesX full fabric width of coordinating woven fabric

Instructions:
Here's a quick rundown of how I did it.
Cut two strips of 2.5 inches X width of the fabric. I used a precut jelly roll strip from Moda's "Meadow Friends" line by Deb Strain. Hem along one long edge of these strips.


Along the other long edge, sew a seam after setting your machine's tension to highest and stitch length to maximum. This will ruffle up the strips.

Take the pants and cut off the cuffs about 1 inch above the hemline. This is where you adjust the length of the pants if they're too short or too long. If they are too long, cut them to a length where they are about 1 inch shorter than the perfect length. If they're too small, then cut them as close to the hem as possible.


Place the ruffle on this new raw edge of pants such that the ruffle and pant are right sides together and their raw edges line up. Sew a seam along this raw edge to attach the ruffle to the pants. Serge or sew a zig-zag stitch at the edge to finish it.


Turn out the ruffle, top-stitch as close to the edge as you can. For a better finish top-stitch one more time, this time 1/4 inch away from the edge. ( you could also use twin needle to do both the seams at once)

Adding the bow in the front:


Cut a 9 inch long piece from the jelly roll.


Fold it in half along the length with right sides together. Sew along the raw ends to make a tube.

Now rotate the seam such that it falls in the center of back if you iron the tube flat.

Now sew a seam along the bottom of this tube.
Sew another seam at the top of this tube but leave a gap of 1 inch at the center of this seam. This gap will be used to turn the whole thing out. I have left the gap where the green seam ripper is placed.


Now snip the corners to get this rectangle to turn smoothly.
Now turn out. Use a pencil or corner turner to poke the corners out.
Iron flat.


Sew over the opening you had left earlier to close it fully.


Now fold it like an accordion in the center. I made three folds in mine, with the center fold being a little bigger then the ones on the sides.

Now cut a ribbon or twill tape about 3 inches long. Wrap it over the accordion folds you just made. If needed use a pin to hold everything together.

Now hand-sew the ribbon at the back of the bow. Cut off excess ribbon.

The bow is ready. Now place it at the center of the front of pants and again hand sew it to attach it to the pants. Make sure you sew multiple stitches for added strength.


Ruffled pants are ready! Make one,


Make two. Make Many! enjoy!

Another embellishment idea:

Appliques:

Cut hearts from the fabric in various sizes.


Arrange them in any manner you want.
Hand sew along the edge. The stitch I have used makes sure that the edges are covered so they don't fray. If you want to be doubly sure, use fray check.

Look! A sweet little heart. Now do the same for other pieces.

You could applique whatever shape you like. If your ruffle fabric has some interesting print, you could even cut that and applique it.


Ta da! Sew Unique, Sew creative, Sew you!

Pin It