Supplies for this tutorial were sponsored by KissyFaceCreations
on Etsy. I approached the owner Karla for sponsorship because I found
their prices to be most reasonable among all the sellers of crochet band
I found on etsy and ebay. She also had a much better selection of sizes and colors for these crochet elastic bands. During our communication I found Karla to be
very responsive and prompt in shipping out the supplies. The quality of
items was very good too. Karla emailed to let me know that she is
getting a big shipment of crochet elastic bands and is well stocked with
tulle and other Tutu making supplies so she could cater to the
Halloween costume makers. I highly recommend Karla and her shops KissyFaceCreations and KKSupplies.
 Photo by Ami Mathur Photography
I made the costume for my daughter originally but she is just too rambunctious to sit and pose for me. So I asked this little girl's parents if I their princess could pose for me. It was a delight to dress her up and get her pics, she is just a photographer's dream, and look at those cute dimples.


Supplies:
4 to 6 hours depending on the costume and embellishments chosen.
Cost:
$20 Approximately
Measurements:
Fold the waistband in half and try on the child. It should be a snug fit but not uncomfortable. Now measure from the waistband end to the desired length of the dress. ( you have to keep in mind the costume you are making for determining this. mermaid costume will hit right at the toe, princess dress could fall anywhere below the knee to the ankle a fairy dress like Tinkerbell would be short and stay above knees, the ballerina dress would be even shorter staying on the thighs, so take measurements accordingly). Lets call this length L
Construction:
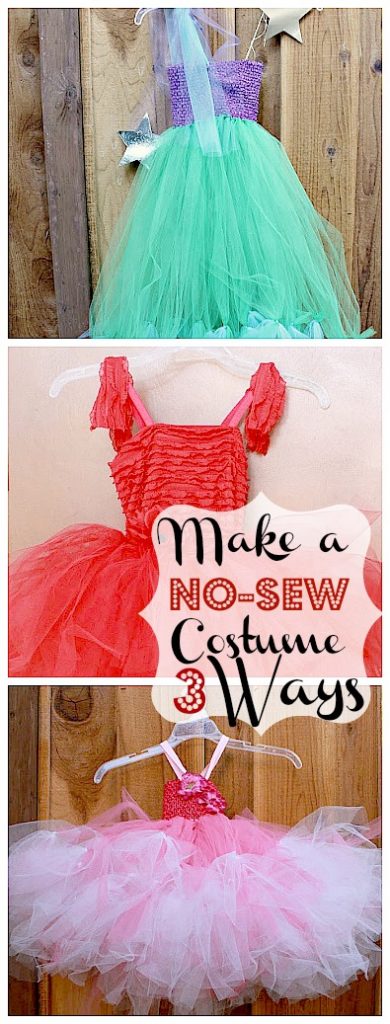
Making the Tutu and Pettiskirt
Most important first step: Put on your favorite TV show or at least your favorite music. You are going to be cutting and tying tulle for a while here, so you want to be entertained during the time. Do not skip this step if you want to complete the costume before this year's Halloween.

Take the 100 yard tulle roll and cut out strips of length L1 = (L+1) * 2 inches.
 Keep cutting until you finish the roll, or have at least 30-40 strips cut.
 Now fold the strip in half and thread it from one of the crochet holes at the edge of waistband. Thread the folded end inside out as shown in the picture above.
 Now pull the loop down and thread the other ends of tulle strip in this loop as shown above.
 Gently tug the raw ends to make a knot.
 Now leave the next hole and thread tulle into the one next to it. Tie the knot the same way you did earlier.
 Keep going until you have finished the whole circle. Now fold the waistband in half as shown above.
 This is the most basic costume construction that has to be done for any costume you want to make. Now begins the fun part - turning this plain tutu dress into a specific costume.

For mermaid costume, I decided to make a fish-tail with turquoise color. To do this we have to divide the tulle strips in three parts. Two halves in front, one in back. Tie these strips with a rubber to keep them separate. These are not even parts, the back part is slightly bigger then each of the front ones. I will explain the reason later.
 Now cut 10 inch long pieces from turquoise tulle. Cut about 50-60 pieces first.

Untie one of the front parts. Lets start making the fishtail at the front.
Tie the 10 inch Tulle to the strip in the center front about 7-8 inches above the end.
Tie another 10 inch strip at the same point to the other half of this strip. Take the next strip and tie the turquoise tulle about 5 inches above the end. Repeat it for the closest 3 strips to it. For the next strip tie the turquoise tulle about 3 inches above the end. Repeat it for the closest 3 strips.
Untie the other front part and repeat the process that you did for the first half.

Now cut 12 inches long tulle strips. About 16 of them. Untie the back part and start tying the turquoise strips about 3 inches above the end. This will result in the strips hanging off the green tulle. That is fine. We want a fishtail train behind the dress. Having it only in the back will ensure the kid doesn't trip on it and the gradual progression in the front will make it look like a fishtail. Tie 8 strips on both sides in the back.
Now cut 16 tulle strips, 15 inches long each. Tie these in the center about 2-3 inches above the end. If these strips don't cover all the green strips in the back, cut some more 15 inches long strips and tie them too.
These strips not only make the dress full, but they also add a different color at the bottom to make the dress more attractive. In case of mermaid costume they also helped shape the fishtail.
Shoulder Strap


The mermaid costume doesn't require a shoulder strap, but I still added one shoulder strap so it is easier for the child to carry the dress. Here is how to add one.
Take a 10 inch long piece of turquoise Fold Over Elastic and tie it at the top of the dress by threading it through the crochet holes. Secure it with a knot on both sides. Having a shoulder strap gives us something to embellish the dress further, and it will also keep the dress stable, while your little mermaid walks and runs. I like knots better than sewing the elastic , because you could easily adjust the knots if you want to adjust the length of the dress or where the band falls.

Cut out 3 pieces of tulle, each 30 inches long. Center them over the center of fold-over elastic strap and cinch them by tying them with a ribbon scrap. I also added some violet tulle just to add a touch of color.

Take another piece of foldover elastic and thread it through the center of crochet band, start about 4-5 inches below the top, go upto the top and then thread it back 4-5 inches below the top, as shown above. Now you have two both loose ends of the Foldover elastic 4-5 inch below the top edge.
 Pull both ends gently to gather the band and tie a knot to secure both ends.
 Sew/glue a fake flower at the center of the shoulder strap where you tied the ribbon.
Accessories:
 Photo by Ami Mathur Photography
I accessorized the costume with a crown bought from a party supplies store and some bangles in coordinating colors. I also put on my summer spring necklace on her neck. I also took out the pendant of another necklace and used it as a brooch on the bodice.
I also wanted to make her satin princess gloves but I just ran out of time.
 So is it true? Are there really mermaids deep in the sea?


I made the costume for my daughter originally but she is just too rambunctious to sit and pose for me. So I asked this little girl's parents if I their princess could pose for me. It was a delight to dress her up and get her pics, she is just a photographer's dream, and look at those cute dimples.

So here is a tutorial to make a No Sew mermaid costume in less than $20.

Supplies:
- Crochet Elastic Tutu waistband in desired color : Think of these as a bigger version of the crochet elastic headbands. These are a little difficult to find. I got mine from Kissyfacecreations here. The larger one will work well for 4-7 year olds. For smaller kids buy smaller bands. These headbands are very stretchable so one size would fit many.
- 6 inches X 100 yd Tulle Rolls in desired colors: I got mine from here.
- 6 inches x 25 yd : Tulle roll in coordinating color ( optional)
- Coordinating ribbon scraps
- Fake flower in coordinating colors
- Fold-over-elastic
4 to 6 hours depending on the costume and embellishments chosen.
Cost:
$20 Approximately
Measurements:
Fold the waistband in half and try on the child. It should be a snug fit but not uncomfortable. Now measure from the waistband end to the desired length of the dress. ( you have to keep in mind the costume you are making for determining this. mermaid costume will hit right at the toe, princess dress could fall anywhere below the knee to the ankle a fairy dress like Tinkerbell would be short and stay above knees, the ballerina dress would be even shorter staying on the thighs, so take measurements accordingly). Lets call this length L
Construction:
Making the Tutu and Pettiskirt
Most important first step: Put on your favorite TV show or at least your favorite music. You are going to be cutting and tying tulle for a while here, so you want to be entertained during the time. Do not skip this step if you want to complete the costume before this year's Halloween.

Take the 100 yard tulle roll and cut out strips of length L1 = (L+1) * 2 inches.


For mermaid costume, I decided to make a fish-tail with turquoise color. To do this we have to divide the tulle strips in three parts. Two halves in front, one in back. Tie these strips with a rubber to keep them separate. These are not even parts, the back part is slightly bigger then each of the front ones. I will explain the reason later.


Untie one of the front parts. Lets start making the fishtail at the front.
Tie the 10 inch Tulle to the strip in the center front about 7-8 inches above the end.
Tie another 10 inch strip at the same point to the other half of this strip. Take the next strip and tie the turquoise tulle about 5 inches above the end. Repeat it for the closest 3 strips to it. For the next strip tie the turquoise tulle about 3 inches above the end. Repeat it for the closest 3 strips.
Untie the other front part and repeat the process that you did for the first half.

Now cut 12 inches long tulle strips. About 16 of them. Untie the back part and start tying the turquoise strips about 3 inches above the end. This will result in the strips hanging off the green tulle. That is fine. We want a fishtail train behind the dress. Having it only in the back will ensure the kid doesn't trip on it and the gradual progression in the front will make it look like a fishtail. Tie 8 strips on both sides in the back.
Now cut 16 tulle strips, 15 inches long each. Tie these in the center about 2-3 inches above the end. If these strips don't cover all the green strips in the back, cut some more 15 inches long strips and tie them too.
These strips not only make the dress full, but they also add a different color at the bottom to make the dress more attractive. In case of mermaid costume they also helped shape the fishtail.


The mermaid costume doesn't require a shoulder strap, but I still added one shoulder strap so it is easier for the child to carry the dress. Here is how to add one.
Take a 10 inch long piece of turquoise Fold Over Elastic and tie it at the top of the dress by threading it through the crochet holes. Secure it with a knot on both sides. Having a shoulder strap gives us something to embellish the dress further, and it will also keep the dress stable, while your little mermaid walks and runs. I like knots better than sewing the elastic , because you could easily adjust the knots if you want to adjust the length of the dress or where the band falls.


Take another piece of foldover elastic and thread it through the center of crochet band, start about 4-5 inches below the top, go upto the top and then thread it back 4-5 inches below the top, as shown above. Now you have two both loose ends of the Foldover elastic 4-5 inch below the top edge.


Accessories:

I accessorized the costume with a crown bought from a party supplies store and some bangles in coordinating colors. I also put on my summer spring necklace on her neck. I also took out the pendant of another necklace and used it as a brooch on the bodice.
I also wanted to make her satin princess gloves but I just ran out of time.


You better believe it.
 Photo by Ami Mathur Photography
Because one of them is coming to your backyard...soon!
Need more costume ideas? Here is my Ladybug Costume Tutorial. I have also compiled some hubs for costume tutorials. Here is a hub for princess costume sewing tutorials and here is another roundup of Animal Costumes DIY. For even more costume DIYs visit my other blog Sew Pretty Sew Free where I featured Halloween Costumes DIY everyday in September.


Because one of them is coming to your backyard...soon!
 |
| Ladybug Costume Tutorial |