Showing posts with label Sewing. Show all posts

Saturday, April 27, 2013

Dress Set Sewing Tutorials

Sewing Tutorials Roundups: Dress Outfits
red ruffled outfit sewing tutorial
Scarlet Ruffled Dress Set Tutorial: iCandy Handmade at Kojo Designs

Finding dress sewing tutorials is pretty easy on internet. Almost every sewing blog published them sometime or the other. However, finding tutorials for the complete outfit can get a little tricky.
With that in mind I compiled some tutorials which have not just the dress, but also matching accessories, bloomers etc. Here is my hub for dress set sewing tutorials.

Pin It

Thursday, November 1, 2012

Fall Wardrobe Revamp: Too Big Sweater to Pretty Top


We are kicking off Fall Wardrobe Revamp 2012 with this first refashion. Here are the other bloggers who will be joining in the fun:

Palak from Make It Handmade
Rikka from Ricochet and Away
Kassi and Kaylie from Truly Lovely

Every thursday in Novemeber, I'm going to post a refashion or accessory tutorial that will help you revamp your wardrobe for the fall. In addition, I'll also be doing roundups of refashions and accessories that are just perfect for the fall. This month's Friday Features will also feature winter accessories and clever refashions for fall and winter. Palak and Rikka will also post Wardrobe revamp tutorials on their respective blogs. So are you ready to add some fall magic to your wardrobe? Grab our button and rev up that sewing machine.


In all honesty, I never cared too much for orange growing up. It was just too flashy, too 'out there' for my taste. Then something changed last year and I started loving this particular shade of orange, the one that is between red and orange. I don't know if it was the leaves turning colors or the bloggers falling head over heels for orange. Whatever it was I just started loving orange and hoarding orange-y things like crazy. I bought this sweater during a sale at Old Navy. Even in clearance it was priced a bit higher for my liking, I almost put it back, but then the texture and the color called my name and it came home with me.
Now finally I made something out of it that I would like to share with you all. It is very similar to the Kaftan Top I made earlier but much simpler.

Supplies: 
A too big sweater. It has to be really big. If you wear a size M, buy an XL for this refashion.
Ruffled lace or any other pretty trims ( pom-poms would also look good with this style)

Estimated time:
1 hour

Construction: 

Cut out both the layers of the sweater.

Sew  about an inch below the shoulders. This would fix the too low neckline and also remove an inch from the length.


Try the sweater on and mark how much you would like to take in. In this refashion, we are not taking in the sweater, instead we are keeping the excess out, hanging off the body of the sweater. So mark the silhouette you want with safety pins on both sides. Take out the sweater and sew a seam along the pins.

Now hack off the sides starting at the shoulders to give it a nice bat sleeve like silhouette. Basically you draw a slanted line starting just before the sleeve edge and ending at the hem of the sweater. I also made it a little curvy.

Now take a pretty trim, I used this pre-ruffled lace to finish the edges. Sew it such that it is sitting on the inside edge of the sweater, right sides together. Start at the bottom of the bat sleeves and go all the way to the other side.

Now fold the lace outwards and top-stitch. Repeat on the other side.

I realized that the center of the sweater was looking too plain and needed some pep, so I hand basted the lace in a U shape at the center and finished it by machine sewing. fold the end s of the lace on the inside.

sweater refashion tutorial by Blooms And Bugs

Now find a pretty model, a beautiful location and click away...Ok that was me. You find some pretty jewelry, cute shoes and have fun :)


Pin It

Monday, October 15, 2012

Pumpkin Pie Dress


How about some Monday morning dose of cute to brighten up the day?

I didn't keep up with one hour a day of sewing for KCWC fall 2012. But I did pull a couple of marathon ( by my standards) sewing sessions. One of those resulted in this pumpkin pie dress. I mixed and matched many Clothworks Collections ( Suzette, Picnic Pals, Safari Sweet) to come up with this itsy-bitsy number, but I love the net result. Don't you think its just the thing for the fall?


Pin It

Monday, September 24, 2012

Peasant Dress Sewing Pattern and tutorial

Free Sewing Pattern: Peasant Dress

My peasant dress tutorial and free pattern ( 12- 18 months size) is now live at Clothworks blog. Check it out. This one turned out really cute! Made with Organic Cotton Picnic Pals Collection by Alyssa Thomas for Clothworks.

I also went ahead and added a pair of shorts to complete the look. My nina loves the pair! The tutorial for the shorts is work in progress.


Pin It

Sunday, May 6, 2012

Sewing tutorial roundup: Sew many sundresses

Top ten sundresses sewing patterns


Ok, so I went to town again looking for cute sundresses to sew this spring and summer. Check out my hub of dress patterns for spring and summer. Because our little girls always need another dress, don't they?


Pin It

Thursday, December 1, 2011

Coming up in December

Sneak Peek of December

The Tshirt dress and firefly applique pattern both will be published very soon. I may also throw in a brief commentary on how to make the other firefly dress.
Sorry, but I don't have any pics for construction process of this one.


I know quite a few of you have been waiting for this pattern. I even have a mailing list of people who would like to get informed when this pattern goes live. So the wait is almost over, the pattern/tutorial will be live first week of December.


This fleece coat has been made out of a fleece sleeper that was way too short for
 my daughter but fitted well at the waist. I did this easy refashion and turned it into a coat. I'll share the construction details with you soon.


This skirt legging looks like something ideal for spring but I made it in November and I'm thinking that if I share the tutorial this month you would probably be able to make it for your munchkins in spring...do you like to plan your sewing?
 Me too. ( Only they don't get executed)
Excuse the not so clear pic, but this itty-bitty skirt looks super cute in real life. It is made out of corduroy and I think it will look good worn with a pair of tights/leggings even in the cooler months. The toddler seemed to be fascinated with the flower appliques. I have finally decided to pay attention to Mister's suggestions and use some embroidery/appliques on munchkin's clothes.


Actually there are many more tutorials that I have been working on but they may not be ready in December...or maybe they will be...who knows. Keep checking this little nook on the internet to see what I'm up to. I see some giveaways, Sew n Shows and much more on the cards this December.


Pin It

Tuesday, September 6, 2011

Sew Easy - Part 9 - Rosita Layered Skirt


Layered skirt sewing tutorial

You can read the story behind this series and the first part here. Click here to read the secondthirdfourth, fifth, sixth, seventh and eighth edition of this series.
 

Here's a skirt that I made this week. I think its a great fit for Sew Easy series because it takes just 4 straight seams to finish the basic structure of the skirt, and the resulting garment looks really good. These are also a good staple for back to school wardrobe.

Supplies: 
2 Adult size Tshirts of co-ordinating colors
Elastic - 1 inch elastic
Embellishments:
Narrow satin Ribbon - 20 inches
Felt piece of matching color - 2X2 inches


Measurements:
Measure the length you want the skirt to be, add half inch. Lets call it L1
Measure the desired length of the smaller layer, a 3-5 inch smaller layer should work L2.
Measure a comfortable elastic length by tying it around the child's waist.If you can't measure the child,
a good rule of thumb is 3 inches less than waist measurement.


Instructions:


1.
sew a skirt with two tshirts


Lay the Tshirt1 flat and cut length L1 from the bottom.
Lay Tshirt2 flat and cut length L2 from the bottom.


You will get two tubes, one of length L2 and another length L2.


Note: In most cases it would be ok to cut through the entire width of TShirt, A good rule of thumb is that
the Tshirt should be at least 7 inch wider and at most twice the waist of child. If it is too narrow, the skirt
would be tight at the butt and even though Tshirt material is stretchy and it will stretch, it wouldn't look good.
If it is too wide, it will gather too much at the waist and look odd. If your Tshirt width doesn't look right, consider cutting off a portion of it and sewing it on one side with right sides together, or piecing it with another Tshirt.

2.


sewing layers together


Now place L2 tube inside L1 tube, with L2 right side together with L1 wrong side.


3.
rosita layered skirt pattern


Sew along the raw edge.


4.
insert elastic in a skirt


Turn L2 out. Top-stitch as close to the edge as possible.


Now sew another seam 1.5 inches below the top-stitching, leave a 1.5 inch opening.


Now insert an elastic through this opening. Join both ends of elastic. Sew the opening shut.


5.
sewing a rossette on a skirt


Make a fabric flower with Tshirt1 fabric. I made a rolled fabric rosette with a felt circle underneath. Hand-sew it to the skirt, near the elastic casing. If you need instructions on making flowers, this post has a bunch of pointers to make different kinds of flowers.
Cut  the ribbon into 2 strips of 10 inches. Fold the strips into two and hand-sew near the flower.


7.
rosita skirt with headband tutorial


While you're making the flowers, make a couple more with both Tshirt1 and Tshirt2. You can make a nifty coordinated hairband with them.
Rosita Layered skirt tutorial


Your skirt is ready.

Saturday, August 6, 2011

Sew Easy - Part 6: Reversible Zen Dress

Sew Easy Tutorial: Reversible Zen Dress Pattern
Reversible Dress Sewing Tutorial

Reversible Dress Sewing pattern

You can read the story behind this series and the first part 10 min skirt sewing tutorial here. Here are the earlier tutorials - the second part 20 min dress from Tshirt, third part Butterfly Shrug Sewing Tutorial, fourth part  Kaftan Sewing Tutorial for women and fifth edition Strawberry Vanilla Dress of the series.

This week lets make an A-line reversible dress. When I thought about doing this tutorial, I was surprised at why didn't this idea came to me earlier. This dress has very simple cutting, and very simple sewing and yet the finished garment looks something that would take a lot of effort. A perfect sew easy.
Not only is this easy to sew, its also very easy to put on the child and take off. And if she spills some sauce on one side just put it on from the other side. No wonder the first name that came to my mind was Zen Dress.

So lets get started.

Supplies:
Two coordinating fabrics half yard each
Two set of closures of some kind ( snaps, Velcro, buttons etc)

For measurement: An A line dress that fits the child.

Cutting:

Lets lay out the fabrics first ( lets call fabric 1 - F1, fabric 2 - F2 )

Fold F1 lengthwise in half.


Fold it again lengthwise in half.

how to draft a jumper pattern
Fold F2 similarly and place it over the F1. Also fold the dress in half lengthwise and place it on fold.
jumper pattern and tutorial

Mark the neck front.
how to sew a jumper

Draw an outline around the dress with some margins at the side seams for seams. I have kept the margins more because I wanted the dress to be wider than the original.
 When you reach shoulders just extend the neck and armhole such that it extends 2.5 to 3 inches above shoulders and then round it towards the end.

drafting jumper pattern
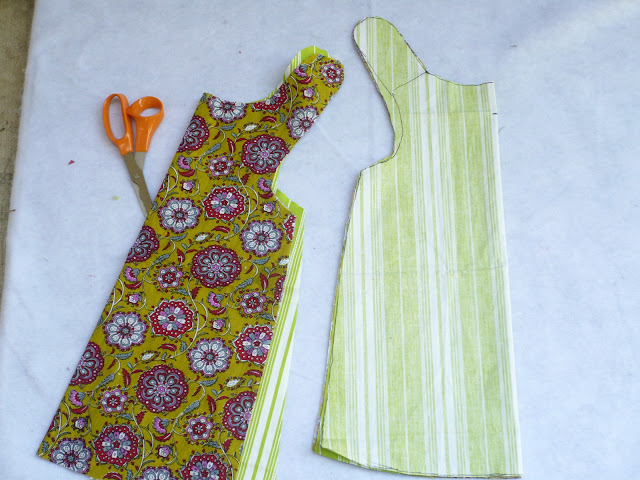
Cut across all the layers.

how to sew a reversible dress
Pull out one layer of F1 and one layer of F2. This is the back of the dress.

reversible jumper tutorial
To cut the front, draw a curve between the points that we had marked earlier, between the front neck and shoulder.
Also draw a line 1 inch above the shoulder as shown in the pic above.
jumper sewing tutorial

Cut the deeper front neck and the line above the shoulder that we just marked. In the above pic the back pieces are on the left and the front pieces are on the right.

how to sew a jumper
Now take both F1 pieces and place one on top of other right sides together. Similarly take both F2 pieces and place one on top of other right sides together. Make sure both pieces are aligned at the sides.

reversible jumper sewing tutorial
Sew the side seams. The seams are not visible in the above pic so I have marked the seams with a blue line. Its still a little hard to see though.

sewing reversible jumper
Turn F2 inside out.

Slide the whole dress inside F1 such that F1 and F2 right sides are together.

Now sew joining F1 and F2 starting at front of neckline


and continue on shoulder, armholes, back shoulders, neckline etc until you are back at the starting point. Go easy and take your time aligning F1 and F2. This is a very simple dress with just 4-5 seams total, but if you mess up the alignment of the two fabrics, you will be left with a wonky garment where one fabric will be doing a peek-a-boo on the other side.

Cut small notches throughout the seam you have just sewn. Don't forget to snip the corners of squares at the front shoulders. These notches make it easy to turn out curvy seams and help fabric lie smoothly. Just take care of not cutting into the seams while making these notches.

turning out a reversible dress
Turn the dress inside out. Use a pencil to turn out all the corners of the dress.

hemming a reversible dress
Iron the dress to smooth out any misalignment while turning. Also iron the hemline inside about half inch on both F1 and F2 as shown above. Make sure that the hemlines are exactly equal for F1 and F2 and iron them well so that they don't show on the other side.
 Top-stitch the hemline with both F1 and F2 together.

I also recommend top-stitching the neckline ( which here means neckline, shoulder, armholes) though its not necessary.
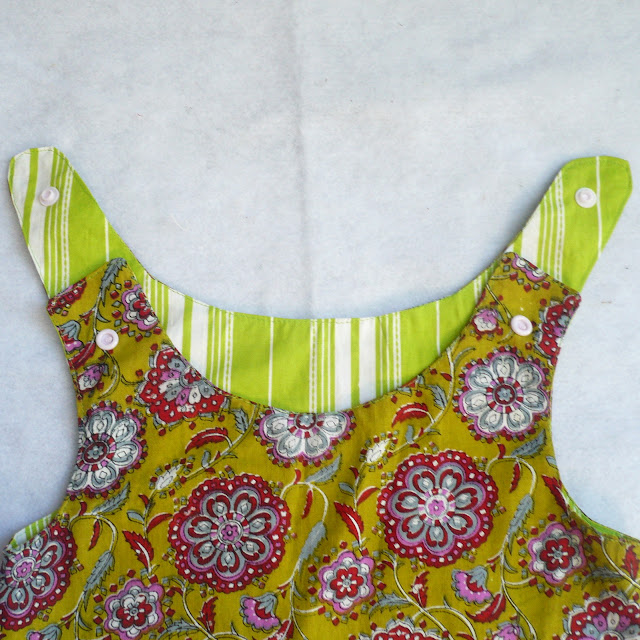
adding snaps to the dress
Add closures on both shoulders. I have used snaps because I had the snap pliers and they take the least amount of time. But you can add velcro or buttons as well.

reversible tunic diy
And Done! Enjoy the dress, Right side..

.
how to sew reversible tunic
Or Wrong!

Here are the links to more editions of the Sew Easy sewing tutorials.

Sew Easy Part 7: Knotted Fringe Dress Sewing Tutorial
Sew Easy Part 8: Circular Bodice Dress Sewing Pattern
Sew Easy Part 9: Layered Knit Skirt Sewing Tutorial
Sew Easy Part 10: Striped Knit Jumper Dress Sewing Tutorial
Sew Easy Part 11: Nordic Prince Tuxedo Tshirt Tutorial
Sew Easy Part 12: Layered Skirt with pickups sewing tutorial
Sew Easy Part 13: Box Pleated Skirt Sewing Tutorial
Sew Easy Part 14: Nautical Dress Sewing Pattern