Monday, July 30, 2012

Kitchen Wall Art Tutorial

DIY Home Decor: Easy Kitchen Art

I'm guest posting at Clothworks blog today to show how to whip up this cute wall art(s) in less than 30 minutes. Its very easy and fun to make. Go here to check out my tutorial for Kitchen Wall Art


These would also make a great hostess gift for a cooking enthusiast.

Pin It

Saturday, July 28, 2012

Ten new dress sewing patterns

Top ten Dress sewing patterns

Photo credit: iCandy Handmade for Kojo Designs
I have realized that all of us really really need some new sewing dress patterns to sew for our chikadees. So I took a stock of my overflowing bookmarks and pins and rounded up a new batch of dress sewing patterns and tutorials. Checkout my hubpage for some fun, cute and gorgeous dresses to sew for little girls.

Pin It

Tuesday, July 24, 2012

Sewing Room Wall Art Tutorial and Giveaway

sewing machine wall art DIY

I have been thinking about sprucing up my sewing/crafting area for a while now. It's walls have been a random collection of patterns, pictures, completed projects and other miscellaneous things that are there not because I like them, but because I didn't get a chance to remove/update them. However, all that changed when Nathan of Easy Canvas Prints contacted me. He offered to send me a free canvas for review and also one to giveaway to one lucky reader.

I immediately knew that I wanted something made for my crafting area. I looked around for what to make and here's what I came up with.

vintage sewing machine from graphics fairy
I found this vintage sewing machine clipart over at The Graphics Fairy. It was just perfect.

So I downloaded it and modified the color into a rusty red. I used free image editing software called gimp to do it.

image editing with GIMP

Modifying the color was actually pretty easy. Open the file in gimp and then from the menu select Tools -> Color Tools -> Color Balance
The picture above shows my settings for the color:

In "Select Range to Modify" pick "Shadows "
In "Modify Selected Range's color levels" pick
Cyan - Red = 33
Magenta - Green = 6
Yellow - Blue = -59

Easy Canvas PrintsEasy Canvas Prints

Once I had the picture in my preferred color, I simply went to Easy Canvas Print Website and uploaded it to be printed.

sewing room wall art DIY


I received my stretched and ready to hang canvas in about a week. I couldn't have been more pleased with the wall art. I just love it.

Easy canvas prints has a lot of other websites for all your signs and printing needs. Check them out here


Giveaway

Easy canvas prints has generously offered one lucky reader a free printed and stretched canvas of their choice. You could print anything you like on it - travel pics, wedding pics, children's pics or a sewing machine. How does that sound?

The contest is open to only US residents living within the contiguous states. ( Hawaii and Alaska residents not valid)

All you have to do is comment on the post and tell us what you will print on your canvas if you win it, along with a valid email id. You can use spaces or braces to modify your email id if you are worried about spam, but the comments without an email id will be deleted and disregarded.

 Contest is open until August 5th, 2012. I'll pick a winner using random.org and announce it here.

Pin It

Monday, July 23, 2012

Sprinkles Tee Tutorial

Embellish with puffy paints: Sprinkles Tshirt Tutorial
sprinkles tshirt tutorial

Ok, I seem to have gone a little crazy with my Boden Knock Offs, but if the monkey is asking for something I just can't help making it. She set her eyes on this Spotty Dotty Tshirt. The Tshirt is adorable but those little things scream choking hazard at me. So I resorted to my trusted tool again - Tulip Puffy Fabric Paints.
Its so easy to make this Tshirt using those colors, I think if you have older kids - like 7 years or above, they can totally make this shirt ( in supervision of course)


Here's a mini tutorial for you (or the kids) :

Supplies:
Tulip puffy paints
Tshirt -washed and dried

Construction:
prepping the tshirt for painting


1. Insert a paper between front and back of Tshirt to prevent the color from seeping through.

draw a motif for 3D painting
2. Draw the motif.


3. Start with one color. Shake the bottle well. Using the nozzle draw dots some
distance apart on the outlines of the motif. Make sure you completely flatten the dot with the nozzle. There should not be any visible peaks of color.
Note: The color coming out of bottle should have some consistency, if its runny- then it won't puff. Shake the bottle again and try.

painting with puffy paints


4. Now take the next color and draw dots about 2 mm away from the first dots. You don't have to be precise, but the dots shouldn't touch each other and shouldn't be too far either. Take another color and repeat. Keep going until you have used all the colors

sprinkles motif - 3 D painting

5. Once all the colors are used, go back to the first color and repeat the above steps. This would ensure that all the colors are distributed evenly. Once you reach towards the end of the process, you will find out that in some areas there's not enough space for a color , while other areas have more space, this is ok. Just make sure you don't repeat the same color dots side-by-side and its fine.

6. Now just set the Tshirt aside for four hours to dry.

7. Once the paint is almost dry to touch, hold a steam iron right above the paint on highest setting. Make sure the iron is close but not touching the paint. The steam helps the paint puff.

Mini boden inspired - sprinkles tee

8. Let the paint dry completely for 24 hours after its puffed. Put it on the toddler waiting eagerly. Smile!

Pin It

Friday, July 20, 2012

Easy Fabric Flowers Tutorial

DIY Fabric Flowers
gathered fabric flower tutorial


Fabric flowers are a great way to embellish woman's clothing. you can usually whip them up quickly, easily and from your scraps box ( don't tell me you don't have one! Everyone sewist has them)
There are dozens of ways to make them, here's one of the ways I use to make flowers. I'm sharing here because I haven't seen any other tutorial using this method. If you have already known about it or don't need it, feel free to skip.

Materials:

Knit scraps
Matching thread
Needle for hand sewing ( optional)

Construction:

cutting a fabric strip for sewing flowers

cutting a fabric strip for sewing flowers


1. Cut a knit strip 3 inches X 15 inches. This will make pretty big flowers of about 5 inches diameter. These are fine for adult clothing, but if you're sewing for kids keep the strip width between 1.5 inches - 2 inches.

gathering a knit fabric strip
2. Set your stitch length to longest and sew a seam along one longer side .

sewing a flower fabric
3. Pull the bobbin thread to gather the fabric tightly.  It will take the circular shape.

sewing two small sides
4. Sew the shorter sides with right sides together.

embellishing with fabric flowers
5. You can see that there is a ruffle in the center of the flower. Now place the flower wherever you want to sew it and sew a seam all around the ruffle in the center. The flower is actually ready at this point but below are a few optional steps and I tell you why I prefer to do them.

fabric flowers after laundary
6. What I found is that if you leave the flowers after step 5, they will get crumpled in wash and then you have to iron them to get them back in the right shape. So I used the following method to keep them blooming.


sewing small tacks along the flower edge
7. Thread a needle with matching thread and sew small tacks along the circumference of the flowers.

embellishing with a fabric flower - inside seams
Here's how it looked on the inside.

embellishing with a flower

8. Enjoy the flower!

Here's a pointer to other kinds of flowers, just in case this one is not your type.

sewing poppy fields dress
Not sure where to use these flowers? I think I can show you a couple of ways..wink, wink.


Pin It

Wednesday, July 11, 2012

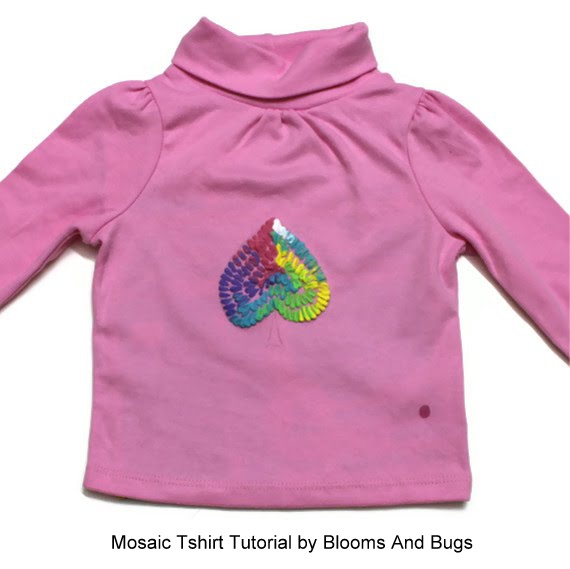
Mosaic Tee Tutorial

Puffy Paints Tutorial: Mosaic Tee
mosaic Tshirt painting tutorial

So we did it again. Munchkin kept staring at these tees from Boden catalog...finally making me make her tee inspired by the idea. "Inspired" is the keyword, because the Boden shirts are made with sequins, however, I don't think the munchkin is ready for sequins yet. She doesn't put everything in mouth now...but I wouldn't bet on that yet. So I used Tulip puffy paints to get a similar effect, sans sequins. These were actually pretty easy to make and I'm happy with the way it turned out. More importantly, munchkin seems to be pleased!

Supplies:
Tshirt in desired size ( washed and dried)  - 1
Tulip puffy fabric paints - I bought a set with 6 colors but you can also buy individual colors
A sheet of sturdy paper - I used camera advertising inserts from newspaper

Construction:

Note: I have included the instructions on the color bottle as part of the tutorial, but I would still urge you to read the instruction on your color bottle carefully and following them. The use instructions may change later and they are the final word on how they should be used. So when in doubt follow whatever the label says even if its different from what I did.

prep Tshirt for painting, insert a paper
1. Place the Tshirt on a flat surface. Insert the paper between front and back of the Tshirt. This will prevent the colors from seeping to the back of the Tee.

draw the pattern on tshirt
2. Draw the desired shape with a pencil.

nib painting on tshirts
3. Shake the color bottle before using. Now start from the edge/corner of the shape and use the bottle nozzle to make tiny brushstrokes perpendicular to the edge. Use the nozzle to spread out color a bit. To get a  transitioning effect between colors after 4 strokes, stop spreading the color and leave the strokes more linear. See the yellow color above.

fabric painting motif
4. Now using the next color spread the earlier color a bit, so it gets partly colored with both colors. Then again do 4 strokes of current color and 2-3 lines of current color. Use the next color to spread these lines. Keep going until you fill the shape outline. Now start the second layer, right below the first one. Repeat the colors in the same order as earlier. 


brush strokes painting
5. Keep going...


painting with tulip puffy paints
6. Until the whole shape is filled


let the fabric paints dry
7. Now the hardest part...let it dry for four hours.


puffed fabric paints
8. Once the paint is dry to touch, use a steam iron on the highest setting. Hold the iron very close to the paint but not touching it.  The steam will make the paint pop. (The colors will also become little less brighter once they pop, so keep that in mind if you're going for some particular shade)


Let dry for 24 hours.


The mosaic shirt is ready.


Pin It

Monday, July 9, 2012

Poppy Fields Dress - I could probably make it myself

Sewing Project: Poppy Fields Maxi Dress

It seems like everywhere I look people are sewing/fixing/wearing maxi dresses these days. I looked at some of the designs available and had a thought I usually have while shopping "That doesn't look too hard, I can probably make it myself."
See thats the side effect of being a sewing enthusiast, you can never shop for clothing without getting this nagging thought... "I could probably make this myself". If you're just starting to sew, promise yourself never to give up shopping for clothes...because it gets harder and harder as you get better and better at sewing.

Anyway, back to my thoughts, so I went home, took an inventory of what I had in my stash and finally decided that three of the XL size garments I was hoarding needed to be hacked. After a lot of hacks and 'flying by the seat of my pants' design elements, finally I'm happy with the results.


Say hello to my Poppy Fields Maxi Dress!
I actually love the way it turned out, but what really sold me was how comfortable it was ( very!). Quoting another blogger on maxi dresses "Its like wearing your PJs in public." I agree.
I have taken pictures of construction so I'll do a sort of mini tutorial on what I did one of these days.
Pin It

Friday, July 6, 2012

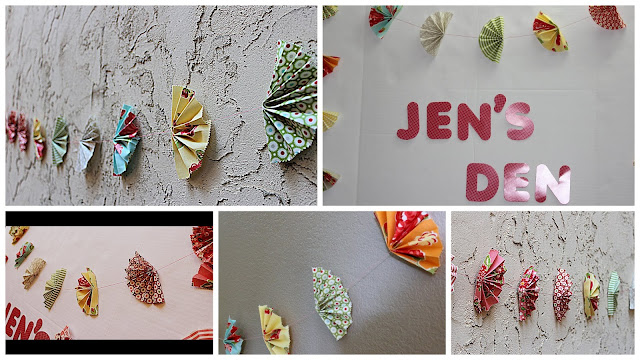
Garland for Summer

Charm pack fans garland
orgami fans garland

Moda Fabrics recently asked me to send my Lucky Layers Dress and Grow and Gather Dress to show off in their booth at the quilting Market. When they returned the dresses they sent a cheerful charm pack of Bonnie and Camille's Marmalade my way.

charm pack fans garland
Since I don't really quilt I wasn't sure how I'll use it...until I thought about these fans!

party decoration idea
I had a lot of fun making them and even more fun coming up with ways to photograph them.

origami butterfly


I even made a couple of butterflies to go with them. ( At least that's what I was trying to make when I started). I'm thinking that these will make a great decoration and the best part is that you could always reuse the fabric after you take them down.


Pin It