
Read the story behind this series and the first part of the series here. The second part is Flutter Sleeves Dress Tutorial is here.

So we have worked on a skirt and a dress so far, now lets keep working on the little girl's wardrobe and make a butterfly shrug (I know, what is it with me and butterflies?). I have used some new techniques here, that haven't been used so far but I have still tried to keep it simple so that anyone with the basic skills can make it.
Supplies:
Knit fabric : 1yd ( I actually used the upper half of the Tshirt that we used in part 1 here, but I actually would advise against doing it, I'll explain more ...later)
Satin Ribbon: 1/2 yd
matching thread, scissor, marker
A top or another shrug that fits the child
Cutting:
1.

Fold the top in half lengthwise and place on the fold of the fabric. Adjust the length, e.g. the top is regular length but I wanted shrug to be smaller than the top so I measured only part of its length. Add no more than half inch for seams and hem. Mark around the edges of the top adding about half inch of seam allowance. Make sure you fold the arms to mark the armhole. Cut. This is the back of shrug.
2.

Now place the back part on another folded fabric. Ideally, I wanted the fabric to be large enough to get
the whole back on the fold, but I was working with half the Tshirt, so I didn't have enough fabric. I could just get three quarters of my back piece on the fold. That's why I recommend that you use the fabric or at least a whole Tshirt.
3.
 Mark the length about 5 inches longer than the back like above pic.
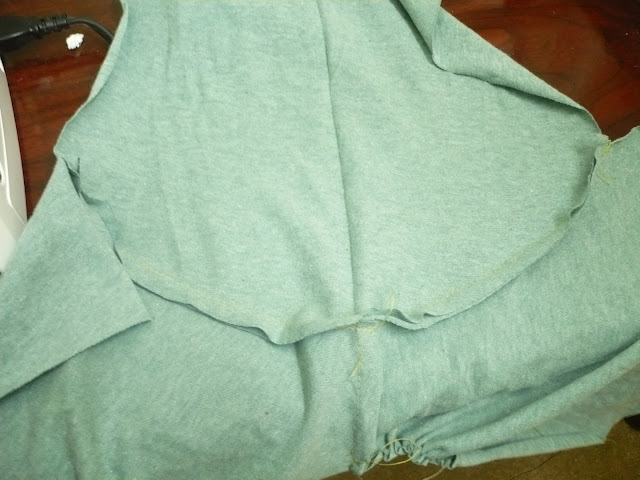
4. Now lets shape the front in the butterfly shape.

Fold the back piece in half lengthwise, now mark along the armholes, shouders and neckline, when you reach the end of neckline just extend it further upto the fold, as shown in picture. At the hemline, instead of cutting it straight like the back piece, cut it triangular the way I have shown in the picture. If I had enough fabric I would have both the neckline and hemline meet into another triangle. Like the picture below.

Anyhow, dont fuss cutting this too much because a little difference in shape doesn't really matter.
5.

For the sleeves, I just measured the width and length using the top, and marked along with some seam allowance.
6. To make the curve at the armhole
 I just placed the back piece and followed its curve. Then joined the end point of this curve with the mark for the length of the sleeve.
 Cut two of these.
Sew Easy Tip: For small children we dont need to cut front and back armholes differently.
 These are the pieces that we just cut.
7. Now lets put these together
 Sew along the neckline of a front piece and pull the bobbin thread of this seam to gather. You want to gather it such that its width becomes a little over half of back piece. Do the same for the other
front piece.

8. Join the shoulders of back and front pieces, right sides together.
 9.
9.
 Now join the sleeves to the main body of shrug, right sides together.
Sew Easy Tip: Start from the middle of sleeve ( Shoulder tip and work your way to one end first, then start from the center and attach upto the other end)
9.

Now turn the whole shrug inside out and sew the sides along with the sleeves on either side.
Sew Easy Tip: Start from the armhole seam and sew the sleeve seam first and then start from the armhole seam and work your way down to the side of the shrug. We do this because the armhole has to line up perfectly, and if you start with one end, when you reach the armhole, you may find that the two ends are not lining up properly because of small difference in cutting or seam allowance. To avoid this start with the most important seam, i.e. the armhole and sew the rest from there. If the hemline is uneven, you can always trim it, same goes for the end sleeve.
At this point you can try it on the child.
10. Now lets work on the neckline:
 Cut about 3 inch wide strip which is equal to the (length of neckline+2)
 Now fold it in 1/2 inch from one end, wrong sides together.
 Now fold it again length wise.
11. Now sew this strip along the neckline, with raw ends lining up with the neckline. Try to stretch the strip as you sew, this will make it easier to turn.
 When you reach another end of neckline (actually about 4 inch before the neckline), open the strip's lengthwise fold, now fold another half inch from the width at the end and fold it back lengthwise.
Sew it up to the end.
12.
 Now fold the strip in half lengthwise and turn it over the raw edge of neckline, sew from the right side as
close to the strip as possible and making sure you're cathing the strip on the other side. Go easy in this step, because its critical that you finish it as nicely as possible.
13. Now cut the ribbon into two parts and sew each of these to the ends of the neckline.

 15. I highly recommend that you take the time to finish the hems and sleeves using rolled hems. Here's a great tutorial on how to do rolled hems
Optional: Adding ruffles on the neckline:
1.
 Cut two strips of fabric, about 2 inches wide and twice the length of neckline
2.
 Fold in quarter like above. Fold one more time, in eighth.
3.
 Cut scallops
 4. Do the same for the other strip
 5.
5.
You will have these:
 6.
6.
 Lay the strips one over the other.
7.
 Set your stitch length to longest stitch and se a seam in the center of this strip.
8.
 Pull the bobbin thread to ruffle these strips such that the length become equal to the length of neckline.
 Sew this ruffled strip along the neckline using zig-zag stitch. And Done!

Supplies:
Knit fabric : 1yd ( I actually used the upper half of the Tshirt that we used in part 1 here, but I actually would advise against doing it, I'll explain more ...later)
Satin Ribbon: 1/2 yd
matching thread, scissor, marker
A top or another shrug that fits the child
Cutting:
1.

Fold the top in half lengthwise and place on the fold of the fabric. Adjust the length, e.g. the top is regular length but I wanted shrug to be smaller than the top so I measured only part of its length. Add no more than half inch for seams and hem. Mark around the edges of the top adding about half inch of seam allowance. Make sure you fold the arms to mark the armhole. Cut. This is the back of shrug.
2.

Now place the back part on another folded fabric. Ideally, I wanted the fabric to be large enough to get
the whole back on the fold, but I was working with half the Tshirt, so I didn't have enough fabric. I could just get three quarters of my back piece on the fold. That's why I recommend that you use the fabric or at least a whole Tshirt.
3.

4. Now lets shape the front in the butterfly shape.

Fold the back piece in half lengthwise, now mark along the armholes, shouders and neckline, when you reach the end of neckline just extend it further upto the fold, as shown in picture. At the hemline, instead of cutting it straight like the back piece, cut it triangular the way I have shown in the picture. If I had enough fabric I would have both the neckline and hemline meet into another triangle. Like the picture below.

Anyhow, dont fuss cutting this too much because a little difference in shape doesn't really matter.
5.

For the sleeves, I just measured the width and length using the top, and marked along with some seam allowance.
6. To make the curve at the armhole


Sew Easy Tip: For small children we dont need to cut front and back armholes differently.

7. Now lets put these together

front piece.

8. Join the shoulders of back and front pieces, right sides together.


Sew Easy Tip: Start from the middle of sleeve ( Shoulder tip and work your way to one end first, then start from the center and attach upto the other end)
9.

Now turn the whole shrug inside out and sew the sides along with the sleeves on either side.
Sew Easy Tip: Start from the armhole seam and sew the sleeve seam first and then start from the armhole seam and work your way down to the side of the shrug. We do this because the armhole has to line up perfectly, and if you start with one end, when you reach the armhole, you may find that the two ends are not lining up properly because of small difference in cutting or seam allowance. To avoid this start with the most important seam, i.e. the armhole and sew the rest from there. If the hemline is uneven, you can always trim it, same goes for the end sleeve.
At this point you can try it on the child.
10. Now lets work on the neckline:


11. Now sew this strip along the neckline, with raw ends lining up with the neckline. Try to stretch the strip as you sew, this will make it easier to turn.

Sew it up to the end.
12.

close to the strip as possible and making sure you're cathing the strip on the other side. Go easy in this step, because its critical that you finish it as nicely as possible.
13. Now cut the ribbon into two parts and sew each of these to the ends of the neckline.

14. Shrug is ready:

Optional: Adding ruffles on the neckline:
1.

2.

3.


You will have these:


7.

8.


Isn't it cute?
That is a darling little shrug and such a great tutorial, I love it
ReplyDeleteSuch a cute little shrug! I love the ruffle around the neckline too!
ReplyDeleteThanks for linking to a Round Tuit!
Hope you have a great weekend!
Jill @ Creating my way to Success
http://www.jembellish.blogspot.com/
I love the ruffle accent at the top.
ReplyDeletehttp://asouthernladysramblings.blogspot.com
Love the collar details!
ReplyDeleteLooks cute and comfy!
ReplyDeleteSo cute! Love it!
ReplyDeleteThank you for the tutorial.
ReplyDeleteWow this is impressive!! It came out great, thanks for the tutorial!! I am visiting from Someday Crafts and I am a new follower!! Hope you have a great week and that I see you around soon!!
ReplyDeleteMichelle
www.delicateconstruction.blogspot.com
This is really cute. I think it would be an adorable addition to a fairy Halloween costume (besides being a nice everyday shrug!).
ReplyDelete--Jill
JillMadeIt.blogspot.com
This is "sew" darling! Thank you for linking up last week at Sew Woodsy! Please come back tomorrow and link up your most recent project!
ReplyDeleteThis is the most adorable idea! Thank you so much for the tutorial ;) SO CREATIVE!
ReplyDelete