Thursday, August 9, 2012

Fix your neckline - Guest post at Prudent Baby

Sewing Tutorial: Fix your neckline
fix a plunging neckline

I'm guest posting over at Prudent Baby today. There I show you how to fix a plunging neckline. Never pass up on beautiful dresses or tops just because the neckline is a wee bit too low.
Here's another very easy way to fix the neckline on tank tops from our archives.

Pin It

Monday, August 6, 2012

Color blocked Dress

Sewing Project: Color-blocked dress for baby


Every once in a while you come across an awesome sewing tutorial in the blogosphere. It is usually a) Super cute and b) Super Easy.
When that happens I just can't help but raid my stash and whip it up to check it out myself.
The color-blocked dress above is a result of one such gem of a sewing tutorial. Shared by Abby of Sew Much Ado over at Family Ever After. Check it out! Really cool.
Now I just need to embellish the dress a bit and then it will be ready to join all the other clothes waiting to meet my niece. I'm planning to try something really new for embellishing this...lets see how that goes. Will keep you posted, ok.


Pin It

Wednesday, August 1, 2012

Poppy Fields Maxi Dress Sewing Tutorial

Dress Sewing Tutorial: Poppy Field Maxi Dress

I made this maxi dress for myself a few weeks back and have been wondering why I didn't make more of these ever since. This is just so comfortable ( like PJs), and feels so stylish and trendy ( unlike PJS). So I have been wearing this often and  really enjoying it. Since it was refashioned from three ready-to-wear clothes from my stash, I guess there's no point giving the exact tutorial - because you may/may not have the exact pieces in your stash. Instead, I have decided to write some basic construction notes, so you can create a maxi dress with whatever you have on hand, or sew one from scratch. Going by the fact that I have updated almost every thing in the clothes I used, it won't be too hard to sew one from scratch.

Supplies:

One Tshirt - your size or upto two size larger than you.
One Tiered Dress - Your size or larger
co-ordinating knit fabric - I used the flutter sleeves and body of a top.

Construction:


This is the spaghetti dress I started out with. It was two sizes too big, but the jersey fabric and the tiered skirt seemed so comfortable. So I cut off the bodice part of the dress and used the skirt.


I cut off the bottom of another two sizes big Tshirt so that it sat just below my bust. I also chopped off the sleeves to make it half sleeved. I also took in about an inch from both sides to get the fit better on my chest.

sewing a maxi with tshirt and skirt

Gather the top of the skirt such that it becomes equal to the bottom of the shirt. Sew with right sides together.
I tried the dress on and found out the following issues with the fit:
1. The neck was looking too..well..tshirty. I needed to perk it up a bit.
2. The sleeves were too long and looking matronly
3. Needed a better fit at the waistline too.


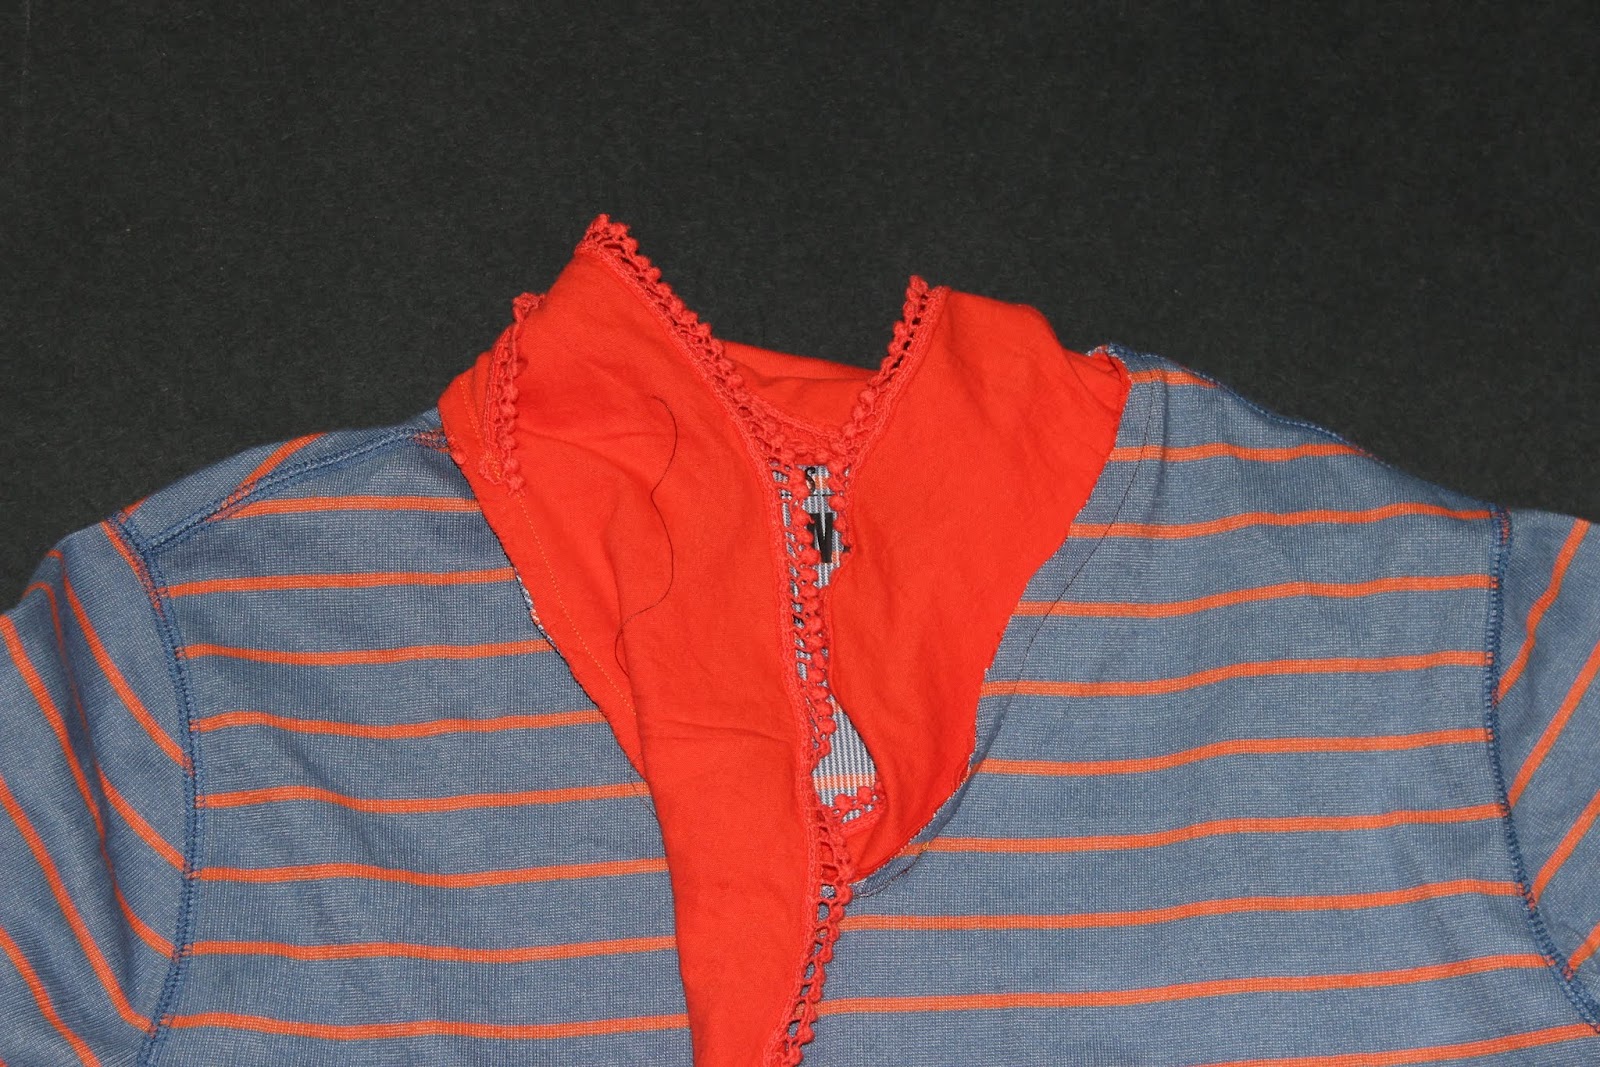
Cut the neck off to make it V-shaped and get rid of the Tshirty feel.


To finish the neckline. I sewed along these flutter sleeves from another top. These double layered sleeves had a beautiful trim. I think they are the one detail that really made the dress.Sew them along the neckline ( wrong side of neck with right side of sleeves), when one sleeve ended, I just overlapped the other one a bit and kept going. Once the neckline was done, I kept sewing the sleeves( now collar) on the bodice to give a faux kimono bodice look.


Turned the collar outside, topstitched close to the edge. I was actually going for a kimono bodice look, but the final neckline looks like I have wrapped a scarf around..but I like it even more this way. A very cool and laid back vibe. Very me, I think.


To help define the waistline better, I added a grosgrain ribbon at the front. I sewed along the upper and lower edges of the ribbon only in the front. And left a good amount of it at the back to be used as waist ties.

Also hemmed the sleeves, they are now about as short as they can be without making the dress sleeveless.


Tried the dress, one more time. Fit was great, The new neckline - check! The only issue. The upper and lower patterns were too distinct, they looked like they had nothing to do with each other - which they actually didn't until a few hours ago - but we can't let that knowledge become public, right? Right!

So I added a cheerful wide orange polka dot ribbon at the hem.

There! Much better! but needs just a little more cheer. Nothing that a bouquet of blazing, blooming poppies can't fix. Here's how I made these fabric flowers


I tacked on some big, bold fabric flowers. Tried the thing on one more time. And oh! its perfect.


Poppy Fields Maxi Dress. Done!


Pin It

Monday, July 30, 2012

Kitchen Wall Art Tutorial

DIY Home Decor: Easy Kitchen Art

I'm guest posting at Clothworks blog today to show how to whip up this cute wall art(s) in less than 30 minutes. Its very easy and fun to make. Go here to check out my tutorial for Kitchen Wall Art


These would also make a great hostess gift for a cooking enthusiast.

Pin It

Saturday, July 28, 2012

Ten new dress sewing patterns

Top ten Dress sewing patterns

Photo credit: iCandy Handmade for Kojo Designs
I have realized that all of us really really need some new sewing dress patterns to sew for our chikadees. So I took a stock of my overflowing bookmarks and pins and rounded up a new batch of dress sewing patterns and tutorials. Checkout my hubpage for some fun, cute and gorgeous dresses to sew for little girls.

Pin It

Tuesday, July 24, 2012

Sewing Room Wall Art Tutorial and Giveaway

sewing machine wall art DIY

I have been thinking about sprucing up my sewing/crafting area for a while now. It's walls have been a random collection of patterns, pictures, completed projects and other miscellaneous things that are there not because I like them, but because I didn't get a chance to remove/update them. However, all that changed when Nathan of Easy Canvas Prints contacted me. He offered to send me a free canvas for review and also one to giveaway to one lucky reader.

I immediately knew that I wanted something made for my crafting area. I looked around for what to make and here's what I came up with.

vintage sewing machine from graphics fairy
I found this vintage sewing machine clipart over at The Graphics Fairy. It was just perfect.

So I downloaded it and modified the color into a rusty red. I used free image editing software called gimp to do it.

image editing with GIMP

Modifying the color was actually pretty easy. Open the file in gimp and then from the menu select Tools -> Color Tools -> Color Balance
The picture above shows my settings for the color:

In "Select Range to Modify" pick "Shadows "
In "Modify Selected Range's color levels" pick
Cyan - Red = 33
Magenta - Green = 6
Yellow - Blue = -59

Easy Canvas PrintsEasy Canvas Prints

Once I had the picture in my preferred color, I simply went to Easy Canvas Print Website and uploaded it to be printed.

sewing room wall art DIY


I received my stretched and ready to hang canvas in about a week. I couldn't have been more pleased with the wall art. I just love it.

Easy canvas prints has a lot of other websites for all your signs and printing needs. Check them out here


Giveaway

Easy canvas prints has generously offered one lucky reader a free printed and stretched canvas of their choice. You could print anything you like on it - travel pics, wedding pics, children's pics or a sewing machine. How does that sound?

The contest is open to only US residents living within the contiguous states. ( Hawaii and Alaska residents not valid)

All you have to do is comment on the post and tell us what you will print on your canvas if you win it, along with a valid email id. You can use spaces or braces to modify your email id if you are worried about spam, but the comments without an email id will be deleted and disregarded.

 Contest is open until August 5th, 2012. I'll pick a winner using random.org and announce it here.

Pin It

Monday, July 23, 2012

Sprinkles Tee Tutorial

Embellish with puffy paints: Sprinkles Tshirt Tutorial
sprinkles tshirt tutorial

Ok, I seem to have gone a little crazy with my Boden Knock Offs, but if the monkey is asking for something I just can't help making it. She set her eyes on this Spotty Dotty Tshirt. The Tshirt is adorable but those little things scream choking hazard at me. So I resorted to my trusted tool again - Tulip Puffy Fabric Paints.
Its so easy to make this Tshirt using those colors, I think if you have older kids - like 7 years or above, they can totally make this shirt ( in supervision of course)


Here's a mini tutorial for you (or the kids) :

Supplies:
Tulip puffy paints
Tshirt -washed and dried

Construction:
prepping the tshirt for painting


1. Insert a paper between front and back of Tshirt to prevent the color from seeping through.

draw a motif for 3D painting
2. Draw the motif.


3. Start with one color. Shake the bottle well. Using the nozzle draw dots some
distance apart on the outlines of the motif. Make sure you completely flatten the dot with the nozzle. There should not be any visible peaks of color.
Note: The color coming out of bottle should have some consistency, if its runny- then it won't puff. Shake the bottle again and try.

painting with puffy paints


4. Now take the next color and draw dots about 2 mm away from the first dots. You don't have to be precise, but the dots shouldn't touch each other and shouldn't be too far either. Take another color and repeat. Keep going until you have used all the colors

sprinkles motif - 3 D painting

5. Once all the colors are used, go back to the first color and repeat the above steps. This would ensure that all the colors are distributed evenly. Once you reach towards the end of the process, you will find out that in some areas there's not enough space for a color , while other areas have more space, this is ok. Just make sure you don't repeat the same color dots side-by-side and its fine.

6. Now just set the Tshirt aside for four hours to dry.

7. Once the paint is almost dry to touch, hold a steam iron right above the paint on highest setting. Make sure the iron is close but not touching the paint. The steam helps the paint puff.

Mini boden inspired - sprinkles tee

8. Let the paint dry completely for 24 hours after its puffed. Put it on the toddler waiting eagerly. Smile!

Pin It