Showing posts with label flower. Show all posts

Monday, November 7, 2011

Giveaway and Snow-blossom Hairband tutorial

Headband tutorial: Snowblossom Headband This giveaway is closed now


Didn't she just stole your heart with her toothless grin ...
Now that I have lured you in with this pic, let me point out that she is wearing a headband I made. Do you have a cutie pie for whom you would like to make this hairband? Read on and I will show you how to make one...but before that I will show you how to WIN supplies to make one( or a hundred), how about that?

So I was looking for a vendor to buy the elastic to make these headbands...and when I shop I have to have a great deal on whatever I am buying. So I searched high and low....I even looked at crafter's forums, for people destashing their supplies but nothing that I would call a great deal surfaced, that is, until I came across Elastic by the yard. I just went ahead and ordered mine, and soon got 5 yards of quality white foldover elastic in the mail.
Elastic by the yard sells a vast selection of elastics and other crafting supplies.

You would find skinny elastic


Printed Elastics


Different kinds of flowers and so much more over there.

They even have helpful tutorials to make hairbands etc with these supplies.


My experience went so well that I asked Kristin, who runs this shop if she would be interested in sponsoring a giveaway on my blog. She responded back saying that she would give away...listen carefully....this is big..
3 lucky readers grab bags of 60 yards of elastics each! How freaking awesome is that? Just so you know Elastic by the yard occasionally offers these grab bags for sale on their facebook page and these guys sell like hot cakes. So you should definitely try winning one of these.

To enter this giveaway,
     1. Leave a comment on this post with your email.id.
     2.  For another chance, Like Elastic By the Yard on facebook and leave a separate comment here saying that you did so.
     3. For one more entry tweet about the giveaway and leave a separate comment here saying you did so.


The giveaway is open until next Monday, Nov 14, 2011.
I'll let random.org pick a winner from all the comments on Nov 15, 2011. Winner will be announced on Nov 16, 2011.


If you don't win and would like to buy elastics from them, Kristin has generously offered a discount of 15%  of your total order with code BNBDSC.

Snow-Blossom Headband Tutorial


I love hair accessories. Hairbows, Clippies, hairbands...you name it. For the Mom of a toddler who keeps them on her head for a whopping...15 seconds at a time, I make an awful lot of them. Since I make so many of these, I thought it would be fun to share a tutorial for one of these here. So I brought you this snow-blossom hairband. Not sure, if you like it in the pic above but it looks super-cute on a tiny little head. I think it will work great with Christmas outfits.
Here's how I made these.

Cut 15 circles from Tulle. Mine were about ................inches.


Make a stack of 5 circles. Fold the whole stack in half.


Fold into quarter

Fold into eigth


Cut out a triangle from the edge.

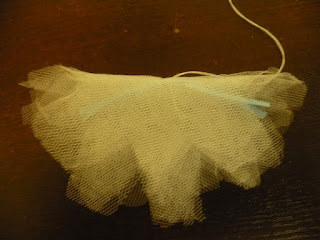
Open the circles and gently turn the circles such that 
the petals become unaligned instead of nicely lining up in the stack.


Now cut two satin ribbon strips about 4 inches long. Place them in an 'X' position on the flower.

Now thread a needle and tie a knot at one end of thread. Insert this needle at the center of the 'X' all the way through all the Tulle layers. Bring it back up, insert it down. Repeat 3-4 times to secure the ribbon and petals together.
 
Now fold the flower into half.


Now fold a third of this half from one side. Sorry I didn't get good pics of the above flower, so I'm using pics from another flower I made. Hence there's no ribbon or needle in this one.


Now fold another third over itself.

Now secure this flower by inserting needle back and forth a couple times.

Cut a 13 inch long piece from foldover elastic

Sew the ends down using zig zag stitch. Go over the elastic 2-3 times to give it extra strength.


Now your flowers and your headband are ready to be assembled.


Place one flower over the place where you sew the seam on the headband. Secure it to the band by inserting needle up and down 2-3 times. Once this flower is sewn in bring back the needle up on the band about half inch away from the center of this flower
Place another flower facing sideways on the band.Secure it with needle and thread too.

Repeat above step for the third flower.


Snow Blossom headband is ready. Put it on the cutest little girl around you!


Adore!


Go click, click click!


Pin It

Tuesday, October 18, 2011

Guest Tutorial: Suede Flower with Rikka

How to sew a suede flower
Today I am doing a Blog Swap with Rikka from Ricochet and Away! Here she is showing us how to make a Suede Flower. Welcome Rikka!


      Hello!  My name is Rikka J. and I am visiting from the blog Ricochet and Away!  I am a small town girl from rural Montana who loves to sew handbags.  I first met Anshu when I came across her cute Military and Lace Dress.  Anshu has a real handle on sewing knits--something I've always shied away from.  But she was very helpful and suggested a using a walking foot on my sewing machine.  I'm going to try it out.  Fingers crossed because my last attempts at sewing jersey were abysmal!  Anshu and I are swapping blogs for a day.  How exciting!  So be sure to head over to Ricochet and Away! and check out what she is posting today.   


     For my post today, I tried to come up with an idea that would compliment and not duplicate any of the terrific projects Anshu has already created.  So I thought I'd share with you all a simple flower embellishment tutorial.  I placed the flower on a purse, but I think it would be great as a broach or added to a headband. I hope you like it!  (Remember you can click on any photo to see it larger.)


     My cousin was married last month in a beautiful outdoor ceremony in rural Montana.  I bought this obnoxious fun zebra print dress to wear, but didn't have the right purse to go with it.  Some ladies fret over what shoes to wear, but I'm not one of them.  I'm a bag lady through and through!  To solve my handbag dilemma, I headed over to my local thrift store and found a purple leather purse with a thin shoulder strap.  Perfect!


     Here's a look at the thrifted purse "before". It was in perfect condition.  I loved the structured design, and the size was just right.  I could fit my wallet, keys, cell, lip gloss, AND a pair of those disposable slippers for my aching feet.  (I've never conditioned my body for wearing heels so every time I dress up, I pay for it!)  The price on the purse was $2.99, but I dickered it down to $1.25.  Well, the dickering consisted of me saying I'd take 4 purses for $5.  Another example of how buying in bulk saves you money!


     Problems with the purse?  Well, upon bringing it home, I discovered it's not the correct shade of purple to match my dress.  And of course, there was the ugly interesting button on the flap that needed to be dealt with.  


     Leather is so expensive, but I love to use it in my crafts. To make
it more affordable, I turn to thrift stores and garage sales.  For this
project I used some green suede that came from a garage sale, a 
lavender suede that was from a thrifted skirt, and some darker purple 
suede that came from a pair of thrifted trousers.  Now who would give up a perfectly decent pair of purple suede pants to a charity shop?
LOL, lucky for me they did!  If leather isn't an option for you, 
I suggest felt or vinyl because they have a stiff quality and
 you won't have to worry about fraying.


List of Supplies:
  • Suede, micro-suede,  felt, or vinyl       
  • Fabric glue
  • Clothes pins
  • Scissors
  • Button(s) or beads
  • Thin wire and pliers or needle and thread


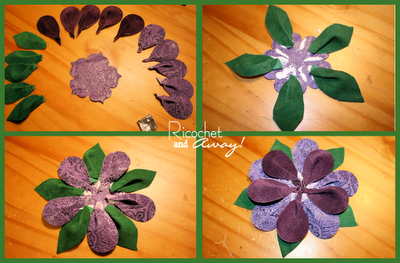
  • The first step was to cut out 5 pf each color of suede teardrops.  I did this by using my die cutter, but scissors would work just as well.  
  • The next step was to glue a little fold or pleat into the pointed end of each teardrop.  I held the pleat down with a clothes pin while the glue dried.  
  • Then, I used a piece of suede as a base and glued the leaves/petals to it.  I used Tacky Glue. It dries clear and is still holding very well.  


  • I used my die cutter again to cut out a small daisy-like shape to cover all the pleated points of the teardrops.  The die cutter made this pretty easy, but again I think scissors would work just as well.
  • I found this shiny faceted button in my stash to use for the center of my flower.  Suede is hard to push a needle through so I opted to sew the button onto this daisy shape rather than through all the layers of the entire flower.  
  • Actually, I didn't technically "sew" it on.  I used one of my sturdy upholstery needles to poke a couple of holes in the center of the daisy.  Then, I used a length of craft wire to attach the button.

The next step was to glue the daisy onto the rest of the flower.  Here's a good look at the front and back.


The original button popped right off and I glued the suede flower right on the flap.


And here it is all finished.  I love it!
     I hope you all were inspired to try out this simple technique.  And while I'm here, I hope you don't mind if I shamelessly plug the Retro Pillow Challenge.  The challenge is in it's voting stage this month and I'm sure all 12 of the participants would love for you to check out their creations and vote for your favorite:  


Happy Crafting and Big Hugs from Montana,


Pin It

Monday, June 6, 2011

Hair bows and such

Lace and flower headband DIY
What crafty mom of a little girl worth her salt  doesn't dip her toe in hair bow making every now and then. So indulge me while I share these accessories.
lace hair band

They were my perfect companion during the many hours road trip we took last week. I just made some plain hair bands with FOE,  tossed scraps of ribbons, trims and laces in a ziploc.
DIY lace headband
What do you think? Not bad for a first time bow maker..eh?

handmade lace hairbow

And now I have found just perfect blog with tons of ideas and inspiration. I must have been living under a rock to not stumble upon Fabric Bows and More yet.
Now if I could only get my little one to let me put these on her...

Wednesday, May 25, 2011

A bouquet of flowers: My way and then some

DIy fabric flowers tutorials I know! I know! another blogger yapping about fabric flowers.
Who doesn't know how to make fabric flowers? What seamstress worth her needle, hasn't already added them to the clothing she made?
Well, I have seen a lot of fabric flower tutorials and have made many of those as well. However, I haven't come across this technique,yet and I read. a. lot. So either this is too simple to write a tutorial or nobody has thought about it yet. I thought I'll just put it out there in case somebody doesn't know.  So here we go.

For making two fabric flowers you will need a rectangle of 5inchesX 7 inches. Sew it into a tube with right sides together, only across the length.


Now turn the tube inside out. Once you have tube ready, push back one end of the tube, back inside, about 1.5 inches. Pinch the tube with your fingers at one inch from this end. Does it look like a flower?


Secure the flower by hand-stitching the flower at the place where you pinched the tube. Cut the remaining tube hanging at the bottom of the flower.
Your flower is ready sew it on to a pretty dress:

Sorry! The flower I used to show the tutorial and the flowers on the dress are different in color, but they are made the same way.
Don't like this flower, well, you can try making these, these, these, these, these, these, these, these, these or these. Blogsphere is blooming with pretty little flowers in all the seasons. What is your favorite way of making flowers? Let me know in the comments

Saturday, May 14, 2011

Coral Reef Dress - Tutorial

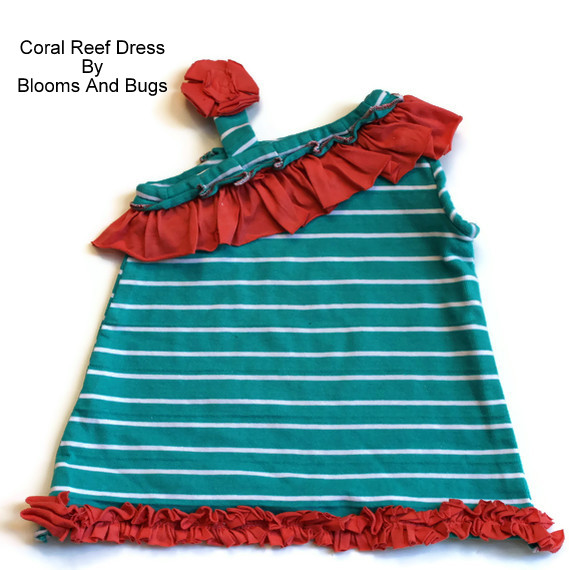
Dress Sewing Tutorial : One shoulder coral reef dress
one shoulder dress sewing pattern

Would you like to make one of these. Come on, lets do it together.

First take any dress pattern ( only body) that fits the little girl you are sewing for and fold it such that one shoulder ( including sleeve opening) gets hidden. Now place this on two layers of fabric ( right sides together). Trace and cut.

Now lets make ruffles and shoulder strap.
Cut a 4 inch wide strip for the ruffle and the length should be twice the measurement of the neckline. Note that since this is off shoulder dress, the neck line means neck+ one shoulder.
Note that the width of my ruffle strip is much smaller than 4 inches ( and I deeply regretted it). If you want the dress to look exactly like mine, you can keep the width 2.5 inches but I strongly feel that you should go with a wider ruffle.
For the shoulder strap cut a strip about 3 inches wide and 10 inches long. You probably won't need all 10 inches but I usually keep some allowance to adjust it once I try it on the child.
Now on to sewing:

Sew the one shoulder seam, and both side seams of the main body, set it aside:


Now pleat or ruffle the ruffle piece such that the final length is close ( just a little bit more) to the neck-line.


For the shoulder strap just sew the strip across the 10 inches length, right sides together, turn inside out to make a tube.

Now join the shoulder strap to the main body.
Turn the main body inside out, so the right side is outside. Mark the place ( front and back) where you want to put your straps, and decide how long you want it to be. Mine are 7 inches for a one and half year old.
Now pin one end of shoulder strap to the wrong side of body such that the wrong side of the strap is touching the wrong side of the main piece front. Now pin the other end of shoulder strap to the wrong side of
 back again make sure that the wrong side of the shoulder strap is touching the wrong side of back piece.

Sew over the straps to attach them, do not snip the hanging part of shoulder strap yet, It will help you adjust the fit later on and you can snip it at any point.
Now add the ruffles: pin the ruffle at the wrong of neckline such that right side of ruffle is with wrong side of main  fabric. Sew the ends closed and sew along the neckline to join ruffles to the main body.

Now turn the ruffles over to the right side. The dress is ready to try on.
If you feel that the shoulder strap is big or small, you can adjust it now by picking out stitches from one of the ends where it has the extra tail and increase or decrease the length. Snip the tail once you're done. If you don't want to add another ruffle, topstitch along the neck line.

Most of the dresses I saw at Gymboree or Gap had only one ruffle, so this tutorial is enough if you want to get that look. For me however it was not working because my ruffle strip wasn't wide enough so I had to add one more ruffle. I'll get to how I did it in a bit, but before that I will show you how to finish the armhole.

Cut a strip of about 15 inches at the bias:

Sew it along the armhole ( right sides together).


Now turn it out, and turn it over the seam into the wrong side of armhole. Topstitch.

Since the knits don't fray I didn't worry about tucking the raw edges in. you may want to do it if you're working with wovens instead of knits.

Now giving the dress some pizzazz:
Cut two strips

S1: 3 inches wides X 40 inches
S2: 2 inches wide X 40 inches

Sew S1 at the longest stitch setting along one side of the strip, do not backstitch. After sewing, pull the bobbin thread from one end, to create a ruffle. Spread the ruffles to evenly space them. Sew this ruffle beneath the ruffle that is already there along the neckline. Make sure that the top ruffle completely covers the seams on this one. Now topstitch the top ruffle along the neckline.


For the ruffle at the hemline, take strip S2 and run a stitch along the center of the length, again at the longest stitch setting. Again pull the bobbin thread to make a ruffle but this time the ruffle has to be only as long as the front hemline. Evenly space the ruffles by hand. Now sew it over the hemline. Since it is a knit fabric, I didn't bother finishing the hems, you may have to do it if you're working with wovens.

If you want you can add a flower at the shoulder strap, I'm still debating whether it is too much.
Make It and Love It has a flower tutorial here at the end.
coral reef dress pattern

Enjoy your new dress.