You can read the story behind this series and the first part
10 min skirt sewing tutorial here. Here are the earlier tutorials - the second part
20 min dress from Tshirt, third part
Butterfly Shrug Sewing Tutorial, fourth part
Kaftan Sewing Tutorial for women and fifth edition
Strawberry Vanilla Dress of the series.
This week lets make an A-line reversible dress. When I thought about doing this tutorial, I was surprised at why didn't this idea came to me earlier. This dress has very simple cutting, and very simple sewing and yet the finished garment looks something that would take a lot of effort. A perfect sew easy.
Not only is this easy to sew, its also very easy to put on the child and take off. And if she spills some sauce on one side just put it on from the other side. No wonder the first name that came to my mind was Zen Dress.
So lets get started.
Supplies:
Two coordinating fabrics half yard each
Two set of closures of some kind ( snaps, Velcro, buttons etc)
For measurement: An A line dress that fits the child.
Cutting:
Lets lay out the fabrics first ( lets call fabric 1 - F1, fabric 2 - F2 )
Fold F1 lengthwise in half.
Fold it again lengthwise in half.
Fold F2 similarly and place it over the F1. Also fold the dress in half lengthwise and place it on fold.
Mark the neck front.
Draw an outline around the dress with some margins at the side seams for seams. I have kept the margins more because I wanted the dress to be wider than the original.
When you reach shoulders just extend the neck and armhole such that it extends 2.5 to 3 inches above shoulders and then round it towards the end.
Cut across all the layers.
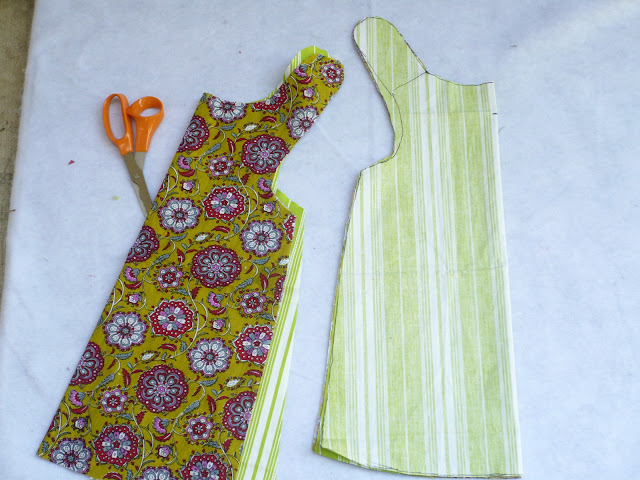
Pull out one layer of F1 and one layer of F2. This is the back of the dress.
To cut the front, draw a curve between the points that we had marked earlier, between the front neck and shoulder.
Also draw a line 1 inch above the shoulder as shown in the pic above.
Cut the deeper front neck and the line above the shoulder that we just marked. In the above pic the back pieces are on the left and the front pieces are on the right.
Now take both F1 pieces and place one on top of other right sides together. Similarly take both F2 pieces and place one on top of other right sides together. Make sure both pieces are aligned at the sides.
Sew the side seams. The seams are not visible in the above pic so I have marked the seams with a blue line. Its still a little hard to see though.
Turn F2 inside out.
Slide the whole dress inside F1 such that F1 and F2 right sides are together.
Now sew joining F1 and F2 starting at front of neckline
and continue on shoulder, armholes, back shoulders, neckline etc until you are back at the starting point. Go easy and take your time aligning F1 and F2. This is a very simple dress with just 4-5 seams total, but if you mess up the alignment of the two fabrics, you will be left with a wonky garment where one fabric will be doing a peek-a-boo on the other side.
Cut small notches throughout the seam you have just sewn. Don't forget to snip the corners of squares at the front shoulders. These notches make it easy to turn out curvy seams and help fabric lie smoothly. Just take care of not cutting into the seams while making these notches.
Turn the dress inside out. Use a pencil to turn out all the corners of the dress.
Iron the dress to smooth out any misalignment while turning. Also iron the hemline inside about half inch on both F1 and F2 as shown above. Make sure that the hemlines are exactly equal for F1 and F2 and iron them well so that they don't show on the other side.
Top-stitch the hemline with both F1 and F2 together.
I also recommend top-stitching the neckline ( which here means neckline, shoulder, armholes) though its not necessary.
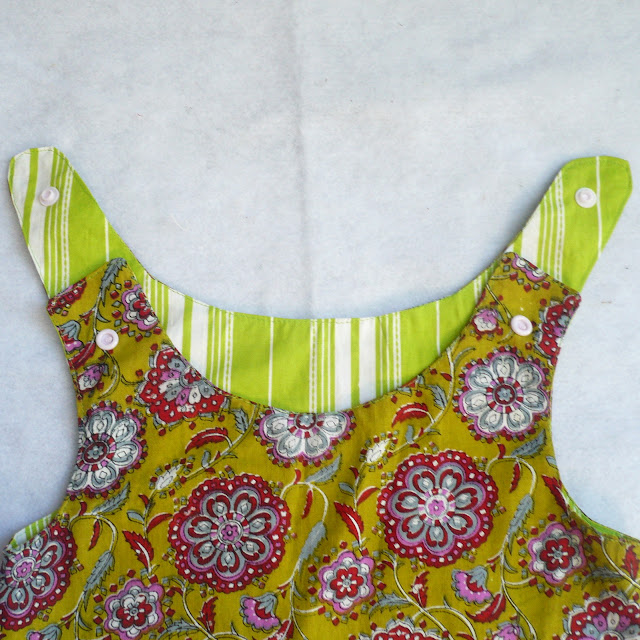
Add closures on both shoulders. I have used snaps because I had the snap pliers and they take the least amount of time. But you can add velcro or buttons as well.
And Done! Enjoy the dress, Right side..
.
Or Wrong!
Here are the links to more editions of the Sew Easy sewing tutorials.
Sew Easy Part 7: Knotted Fringe Dress Sewing Tutorial
Sew Easy Part 8: Circular Bodice Dress Sewing Pattern
Sew Easy Part 9: Layered Knit Skirt Sewing Tutorial
Sew Easy Part 10: Striped Knit Jumper Dress Sewing Tutorial
Sew Easy Part 11: Nordic Prince Tuxedo Tshirt Tutorial
Sew Easy Part 12: Layered Skirt with pickups sewing tutorial
Sew Easy Part 13: Box Pleated Skirt Sewing Tutorial
Sew Easy Part 14: Nautical Dress Sewing Pattern


