Showing posts with label sew easy. Show all posts

Tuesday, September 6, 2011

Sew Easy - Part 9 - Rosita Layered Skirt


Layered skirt sewing tutorial

You can read the story behind this series and the first part here. Click here to read the secondthirdfourth, fifth, sixth, seventh and eighth edition of this series.
 

Here's a skirt that I made this week. I think its a great fit for Sew Easy series because it takes just 4 straight seams to finish the basic structure of the skirt, and the resulting garment looks really good. These are also a good staple for back to school wardrobe.

Supplies: 
2 Adult size Tshirts of co-ordinating colors
Elastic - 1 inch elastic
Embellishments:
Narrow satin Ribbon - 20 inches
Felt piece of matching color - 2X2 inches


Measurements:
Measure the length you want the skirt to be, add half inch. Lets call it L1
Measure the desired length of the smaller layer, a 3-5 inch smaller layer should work L2.
Measure a comfortable elastic length by tying it around the child's waist.If you can't measure the child,
a good rule of thumb is 3 inches less than waist measurement.


Instructions:


1.
sew a skirt with two tshirts


Lay the Tshirt1 flat and cut length L1 from the bottom.
Lay Tshirt2 flat and cut length L2 from the bottom.


You will get two tubes, one of length L2 and another length L2.


Note: In most cases it would be ok to cut through the entire width of TShirt, A good rule of thumb is that
the Tshirt should be at least 7 inch wider and at most twice the waist of child. If it is too narrow, the skirt
would be tight at the butt and even though Tshirt material is stretchy and it will stretch, it wouldn't look good.
If it is too wide, it will gather too much at the waist and look odd. If your Tshirt width doesn't look right, consider cutting off a portion of it and sewing it on one side with right sides together, or piecing it with another Tshirt.

2.


sewing layers together


Now place L2 tube inside L1 tube, with L2 right side together with L1 wrong side.


3.
rosita layered skirt pattern


Sew along the raw edge.


4.
insert elastic in a skirt


Turn L2 out. Top-stitch as close to the edge as possible.


Now sew another seam 1.5 inches below the top-stitching, leave a 1.5 inch opening.


Now insert an elastic through this opening. Join both ends of elastic. Sew the opening shut.


5.
sewing a rossette on a skirt


Make a fabric flower with Tshirt1 fabric. I made a rolled fabric rosette with a felt circle underneath. Hand-sew it to the skirt, near the elastic casing. If you need instructions on making flowers, this post has a bunch of pointers to make different kinds of flowers.
Cut  the ribbon into 2 strips of 10 inches. Fold the strips into two and hand-sew near the flower.


7.
rosita skirt with headband tutorial


While you're making the flowers, make a couple more with both Tshirt1 and Tshirt2. You can make a nifty coordinated hairband with them.
Rosita Layered skirt tutorial


Your skirt is ready.

Friday, August 19, 2011

Sew Easy - Part 7: Carnival Dress

Sew Easy tutorial: Knotted knit dress

You can read the story behind this series and the first part here. Click here to read the secondthirdfourth , fifth  and sixth edition of this series.

After having many tutorials with woven fabrics, I think its time we go back to knits and up-cycle some more T-shirts. With that in mind, I made this Carnival Dress. I named it so, because all the strips reminded me of the buntings and other festive decorations. I love how blue and yellow look so happy together. It is mostly a cut easy project, instead of sew easy. Interested in making one of your own? Lets do it.

Supplies:
2 T shirts in co-ordinating colors, same colors will also work
Basic sewing supplies - scissor, thread matching with the Tshirts

Measurements - Measure your child from shoulder to the desired length of the dress, lets call it L
               Measure your child all around the chest and add 4 inches to it, then divide it all by 2. Lets call it W.


1. First cut one of the shirts to L length, measuring from hem upwards.  Basically we want to reuse the Tshirt hem as our dress hem. Ok?


2. Now place this on top of the other and decide how much overlap do you want between the two. And starting from bottom cut that much. So we can reuse the hem from second T as well.

3. Now insert one Tshirt into another such that their raw sides align. Look at the picture.


4 . Now start cutting 3 inches long slits, one inches apart from raw ends on all four layers.

Keep cutting until you reach W width from one end.

When you reach W, instead of cutting a slit, keep cutting upto the hem. To get a Four layered piece of length L and width W.


5.


Now start Knotting these slits with one strip from Tshirt 1 and one strip from Tshirt 2 right behind it. Pull the strips a bit while tying the knot, this will cause the fabric to bunch up a little, which will give us a little gathered look. Tie the knot one more time to secure. 
Just leave 4 sets of strips 2-3 inches apart in the center. Dont tie them, because they will become the shoulder straps of the dress.
 Keep tying the knots with the other strips at the back as well, when you reach near the center of the back, leave 2 sets of strips then tie the center strips and then again leave 2 sets of strips.


6.
This is how it will look after tying all the knots. I have knotted the front and back shoulder ties together, but I recommend doing it at the very end.


7.


Now lets sew together the side of the dress thats still open.


Pull apart both the layers, taking care not to stretch the knots too much. Now sew each layer, right sides together.
Settle them back in place.


8.
Now take a look at all the hanging strips and see if you like them as is. Maybe they need a haircut. Cut them to a length you like.
At the end, mine were about 1.5 - 2 inches long.


Neckline at the front...and the reason why I shouldn't cut my toddler's hair :D


This is how mine looked from the back, after cutting the strips to a smaller length.


9. Now sew a seam along the neckline ( and back) as close to the knots as you can get. This will help the strips stay in place.


10.


Now slip it on the child and tie the shoulder ties. This may take a couple minutes, so bribe with candy.

Enjoy your carnival dress!

Saturday, August 6, 2011

Sew Easy - Part 6: Reversible Zen Dress

Sew Easy Tutorial: Reversible Zen Dress Pattern
Reversible Dress Sewing Tutorial

Reversible Dress Sewing pattern

You can read the story behind this series and the first part 10 min skirt sewing tutorial here. Here are the earlier tutorials - the second part 20 min dress from Tshirt, third part Butterfly Shrug Sewing Tutorial, fourth part  Kaftan Sewing Tutorial for women and fifth edition Strawberry Vanilla Dress of the series.

This week lets make an A-line reversible dress. When I thought about doing this tutorial, I was surprised at why didn't this idea came to me earlier. This dress has very simple cutting, and very simple sewing and yet the finished garment looks something that would take a lot of effort. A perfect sew easy.
Not only is this easy to sew, its also very easy to put on the child and take off. And if she spills some sauce on one side just put it on from the other side. No wonder the first name that came to my mind was Zen Dress.

So lets get started.

Supplies:
Two coordinating fabrics half yard each
Two set of closures of some kind ( snaps, Velcro, buttons etc)

For measurement: An A line dress that fits the child.

Cutting:

Lets lay out the fabrics first ( lets call fabric 1 - F1, fabric 2 - F2 )

Fold F1 lengthwise in half.


Fold it again lengthwise in half.

how to draft a jumper pattern
Fold F2 similarly and place it over the F1. Also fold the dress in half lengthwise and place it on fold.
jumper pattern and tutorial

Mark the neck front.
how to sew a jumper

Draw an outline around the dress with some margins at the side seams for seams. I have kept the margins more because I wanted the dress to be wider than the original.
 When you reach shoulders just extend the neck and armhole such that it extends 2.5 to 3 inches above shoulders and then round it towards the end.

drafting jumper pattern
Cut across all the layers.

how to sew a reversible dress
Pull out one layer of F1 and one layer of F2. This is the back of the dress.

reversible jumper tutorial
To cut the front, draw a curve between the points that we had marked earlier, between the front neck and shoulder.
Also draw a line 1 inch above the shoulder as shown in the pic above.
jumper sewing tutorial

Cut the deeper front neck and the line above the shoulder that we just marked. In the above pic the back pieces are on the left and the front pieces are on the right.

how to sew a jumper
Now take both F1 pieces and place one on top of other right sides together. Similarly take both F2 pieces and place one on top of other right sides together. Make sure both pieces are aligned at the sides.

reversible jumper sewing tutorial
Sew the side seams. The seams are not visible in the above pic so I have marked the seams with a blue line. Its still a little hard to see though.

sewing reversible jumper
Turn F2 inside out.

Slide the whole dress inside F1 such that F1 and F2 right sides are together.

Now sew joining F1 and F2 starting at front of neckline


and continue on shoulder, armholes, back shoulders, neckline etc until you are back at the starting point. Go easy and take your time aligning F1 and F2. This is a very simple dress with just 4-5 seams total, but if you mess up the alignment of the two fabrics, you will be left with a wonky garment where one fabric will be doing a peek-a-boo on the other side.

Cut small notches throughout the seam you have just sewn. Don't forget to snip the corners of squares at the front shoulders. These notches make it easy to turn out curvy seams and help fabric lie smoothly. Just take care of not cutting into the seams while making these notches.

turning out a reversible dress
Turn the dress inside out. Use a pencil to turn out all the corners of the dress.

hemming a reversible dress
Iron the dress to smooth out any misalignment while turning. Also iron the hemline inside about half inch on both F1 and F2 as shown above. Make sure that the hemlines are exactly equal for F1 and F2 and iron them well so that they don't show on the other side.
 Top-stitch the hemline with both F1 and F2 together.

I also recommend top-stitching the neckline ( which here means neckline, shoulder, armholes) though its not necessary.
adding snaps to the dress
Add closures on both shoulders. I have used snaps because I had the snap pliers and they take the least amount of time. But you can add velcro or buttons as well.

reversible tunic diy
And Done! Enjoy the dress, Right side..

.
how to sew reversible tunic
Or Wrong!

Here are the links to more editions of the Sew Easy sewing tutorials.

Sew Easy Part 7: Knotted Fringe Dress Sewing Tutorial
Sew Easy Part 8: Circular Bodice Dress Sewing Pattern
Sew Easy Part 9: Layered Knit Skirt Sewing Tutorial
Sew Easy Part 10: Striped Knit Jumper Dress Sewing Tutorial
Sew Easy Part 11: Nordic Prince Tuxedo Tshirt Tutorial
Sew Easy Part 12: Layered Skirt with pickups sewing tutorial
Sew Easy Part 13: Box Pleated Skirt Sewing Tutorial
Sew Easy Part 14: Nautical Dress Sewing Pattern   

Saturday, July 23, 2011

Sew Easy - Part 4 - Lets get a little selfish

Sew Easy Tutorial: How to sew a Kaftan Top
sewing kaftan poncho

You can read the story behind this series and the first part here. The second and third edition of this series are here and here.

So we have made a couple of things for wee ones so far, now lets get a little selfish and make something for ourselves. The inspiration of this garment came during a recent party I attended. I couldn't help but notice the disproportionate number of women wearing some sort of poncho dress/tunic/top. 

After coming home I researched a bit - I looked around at various stores selling clothes for what was in vogue...and I was surprised by how many variations of this dress came up in my search. They're all over the place from Target to Anthropologie. They are called different things like Kaftan, poncho, kimono sleeves, but the basic idea is same.
They are so easy to make and they are trendy. So why not make one for ourselves.

So without further ado - I give you Kaftan dress tutorial.

Supplies:

1. Fabric - For this project you will need a fabric which is  60 inches wide instead of the regular 36. Also quilting cottons/linen may not be the best the options. Try to go with a printed sheer fabric, or a soft silken fabric. The flowy the fabric, the better drape you will get because the dress/top in itself is not really close fit. - 60 inches 

2. Bias Tape: Matching or contrast to the fabric. Depending on the fabric, you may want to get a satin/silk bias tape instead of regular cotton ones: ~ 1yds

3. Trim - Matching the fabric - Or you could also use the bias tape ~ 10 yds

4. Safety pins - 10

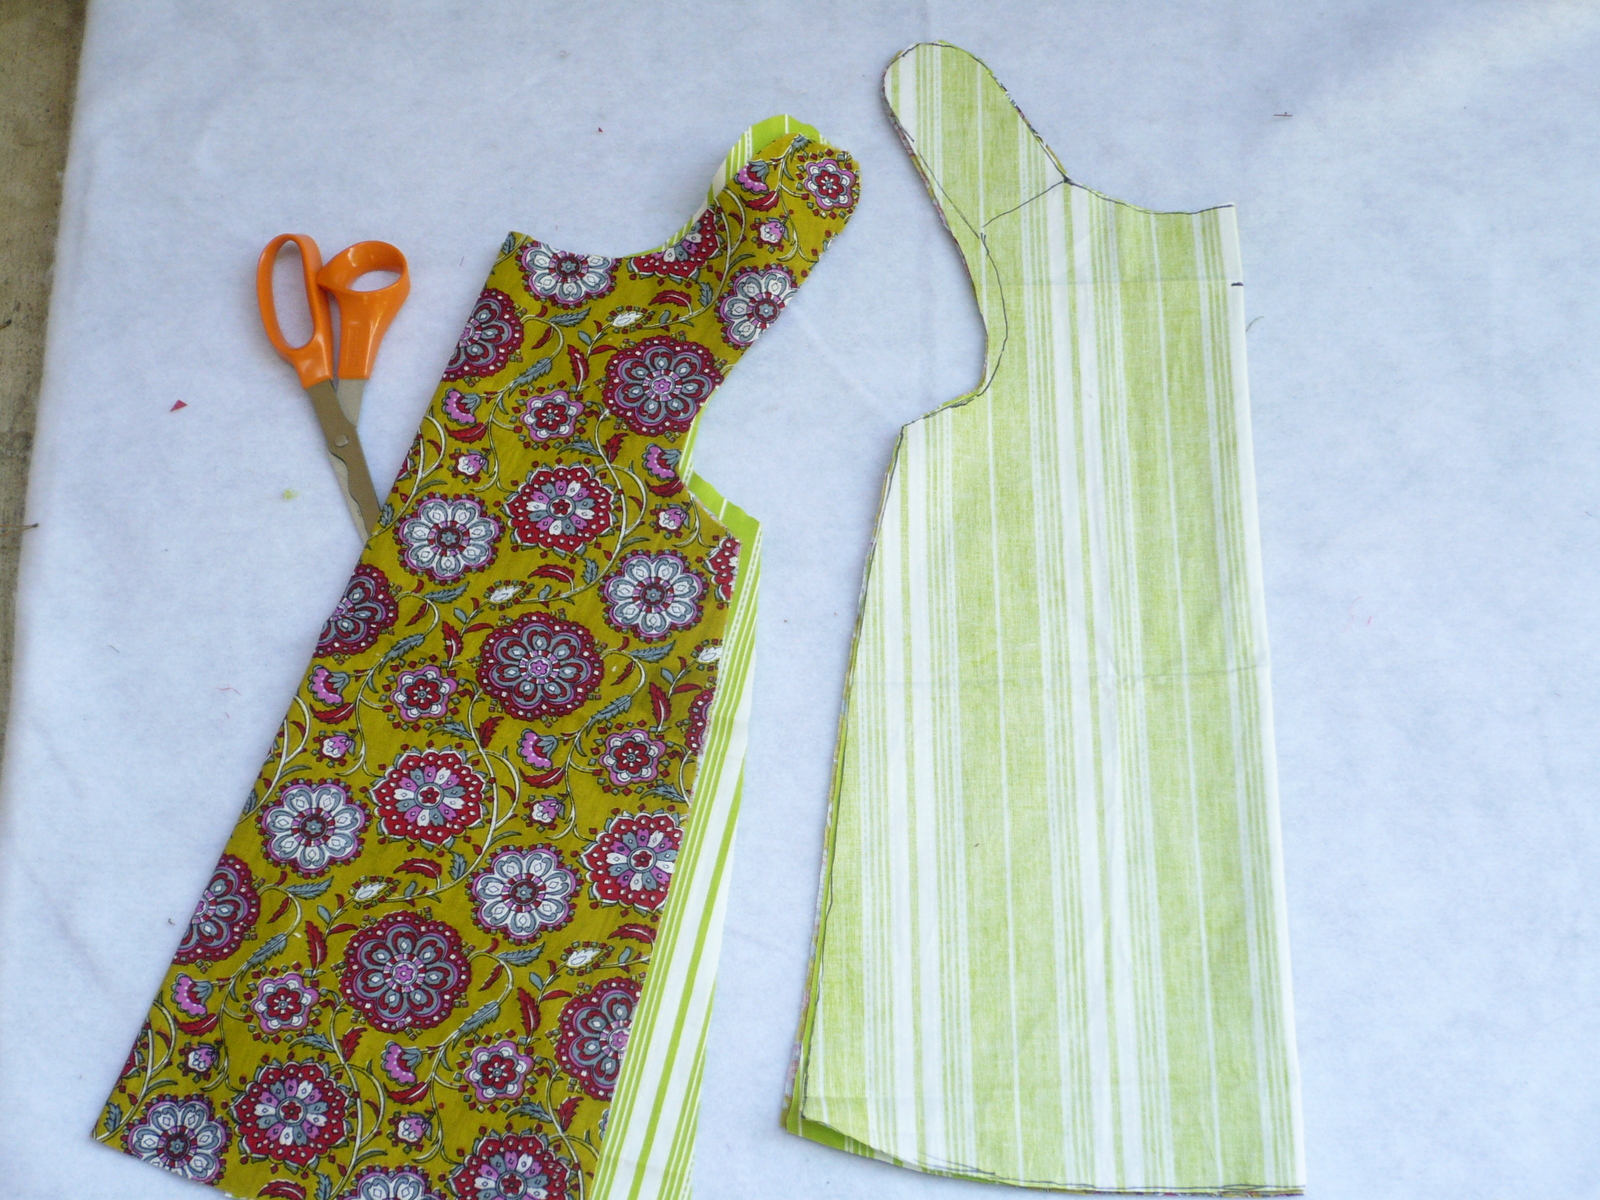
Now lets take it to the cutting board:

1.
kaftan top sewing tutorial

how to sew a kaftan

Spread the fabric evenly on a flat surface. Now Fold it diagonally such that you get the biggest square possible. Cut where this triangle ends ( shown in the pic). You're basically making as big a square out of this
fabric as possible.

2.
kaftan sewing tutorial
Now fold this triangle into half again to get a smaller triangle.
3.
how to draft a kaftan


 Now get a top whose back neck is the shape you're comfortable with ( and smaller than front). Fold it in half lengthwise, mark the center of the back neck. For the top I had, the center of back neck was already known because of the opening. Just use it as a guide and cut the neck at the fold of triangle you just made.

Now cut it on the fold. Make some small marking where the shoulders of this neck are.
This is how it will look like when you open it. Look at the small marks for shoulders.
Now fold the whole fabric lengthwise and make sure the shoulder marks are meeting. Now measure a front neck depth you're comfortable with and mark it below the shoulder marks you have from the back neck. Also make another mark on the fold at the same depth, by making a horizontal line from the earlier mark Now draw a diagonal line from shoulder marks to the depth mark you just made on the fold and cut along this line.
This will be your front neck.  You can totally cut any other shape of neck but I felt V looks better in this style and its also easier to finish.
Sew Easy Tip 1: while determining the depth of neck, err on the side of caution. If you're not comfortable with plunging necklines, take the depth a little less than desired. This is because its a loose fit and shoulder are not defined so the neck may shift a bit while you're wearing it, resulting in a plunging neckline.


4.
Now gently slip it over you head and try it in front of a mirror. Don't worry if it looks gigantic at this point. We'll work on that next. Right now just find out the right points where you want your armholes to end and pin it on both layers. Also get a point closer to the bust-line and mark it with a safety pin also. You don't want it to fit too closely, just keep it a little loose but shapely. Do the same on the other side. You may want a friend to help you with this step, because the fabric is slippery it may be difficult to find the right points while still maintaining the symmetry.

5. 
Now carefully slip out of the fabric and spread it on an even surface.
See these arrows? That is where we have our safety pins. As you can see they are not symmetrical, thats ok.
We'll fix that now. Start with the side that is farther from the neck. In this case, left side. First mark all four points with a vanishing/washable marker and take out the pins. Now even out fabric, make sure that the shoulder markings we made are on the fold, the fabric is lying symmetrically and then safety-pin left side marks again on both layers. Now we have ensured that on left side the placement of pins is nice and even on both layers.

6.

Now add one more pins towards the bottom such that it follows your body shape and a little flaired at the bottom. Dont sweat it too much because we have already measured ourselves at the widest part of our torso
so as long as you mark the last point outer than first one it will be ok. The pic above sort of shows my placement of pins, It just isn't very clear. You can also use a loose fitting A line dress/top to mark these.

7. Now fold this lengthwise such that the pins are sandwiched between the folds. Make sure the fabric is symmetrical. Now just feel the pins with your hand and mark the points where they are located, what we're doing is transferring the markings of th left side to the right side to make both sides even. Now open the fold and put safety pins on these marks. 

8.

 Now just connect the pins on each side into a curvy line with a washable marker or tailor's chalk and sew along both lines Wrong sides together. Yes the seams are exposed in this style because seam allowance becomes sleeves. Its difficult to see the seam in the above pic because of matching thread but if you look carefully, you will see a curvy line at the center of the pic.

9.

Lets give it some more definition now:
Spread your favorite top ( best results with a kimono sleeved top ). Now try to follow the curve of this top 
while still staying 3-4 inches away from the top. this would mean that your sleeves will be longer than this 
top and there will be ruffles hanging near the waist, but don't worry , we will try it again and trim it before we commit to anything. Just try to get closer to the seam towards the bottom but still with a 1.5-2 inch margin
Also shape the hemline if you want it to be more rounded than triangular as it is right now.

10.
Here's your top after cutting. Now try it and see if you like the fit, length of sleeves, depth of neck etc. Now, is the time to speak ( and adjust). If you would prefer to wear it with a belt, try that too now.

11. So you like the basic structure of the top by now. Now lets finish it. 
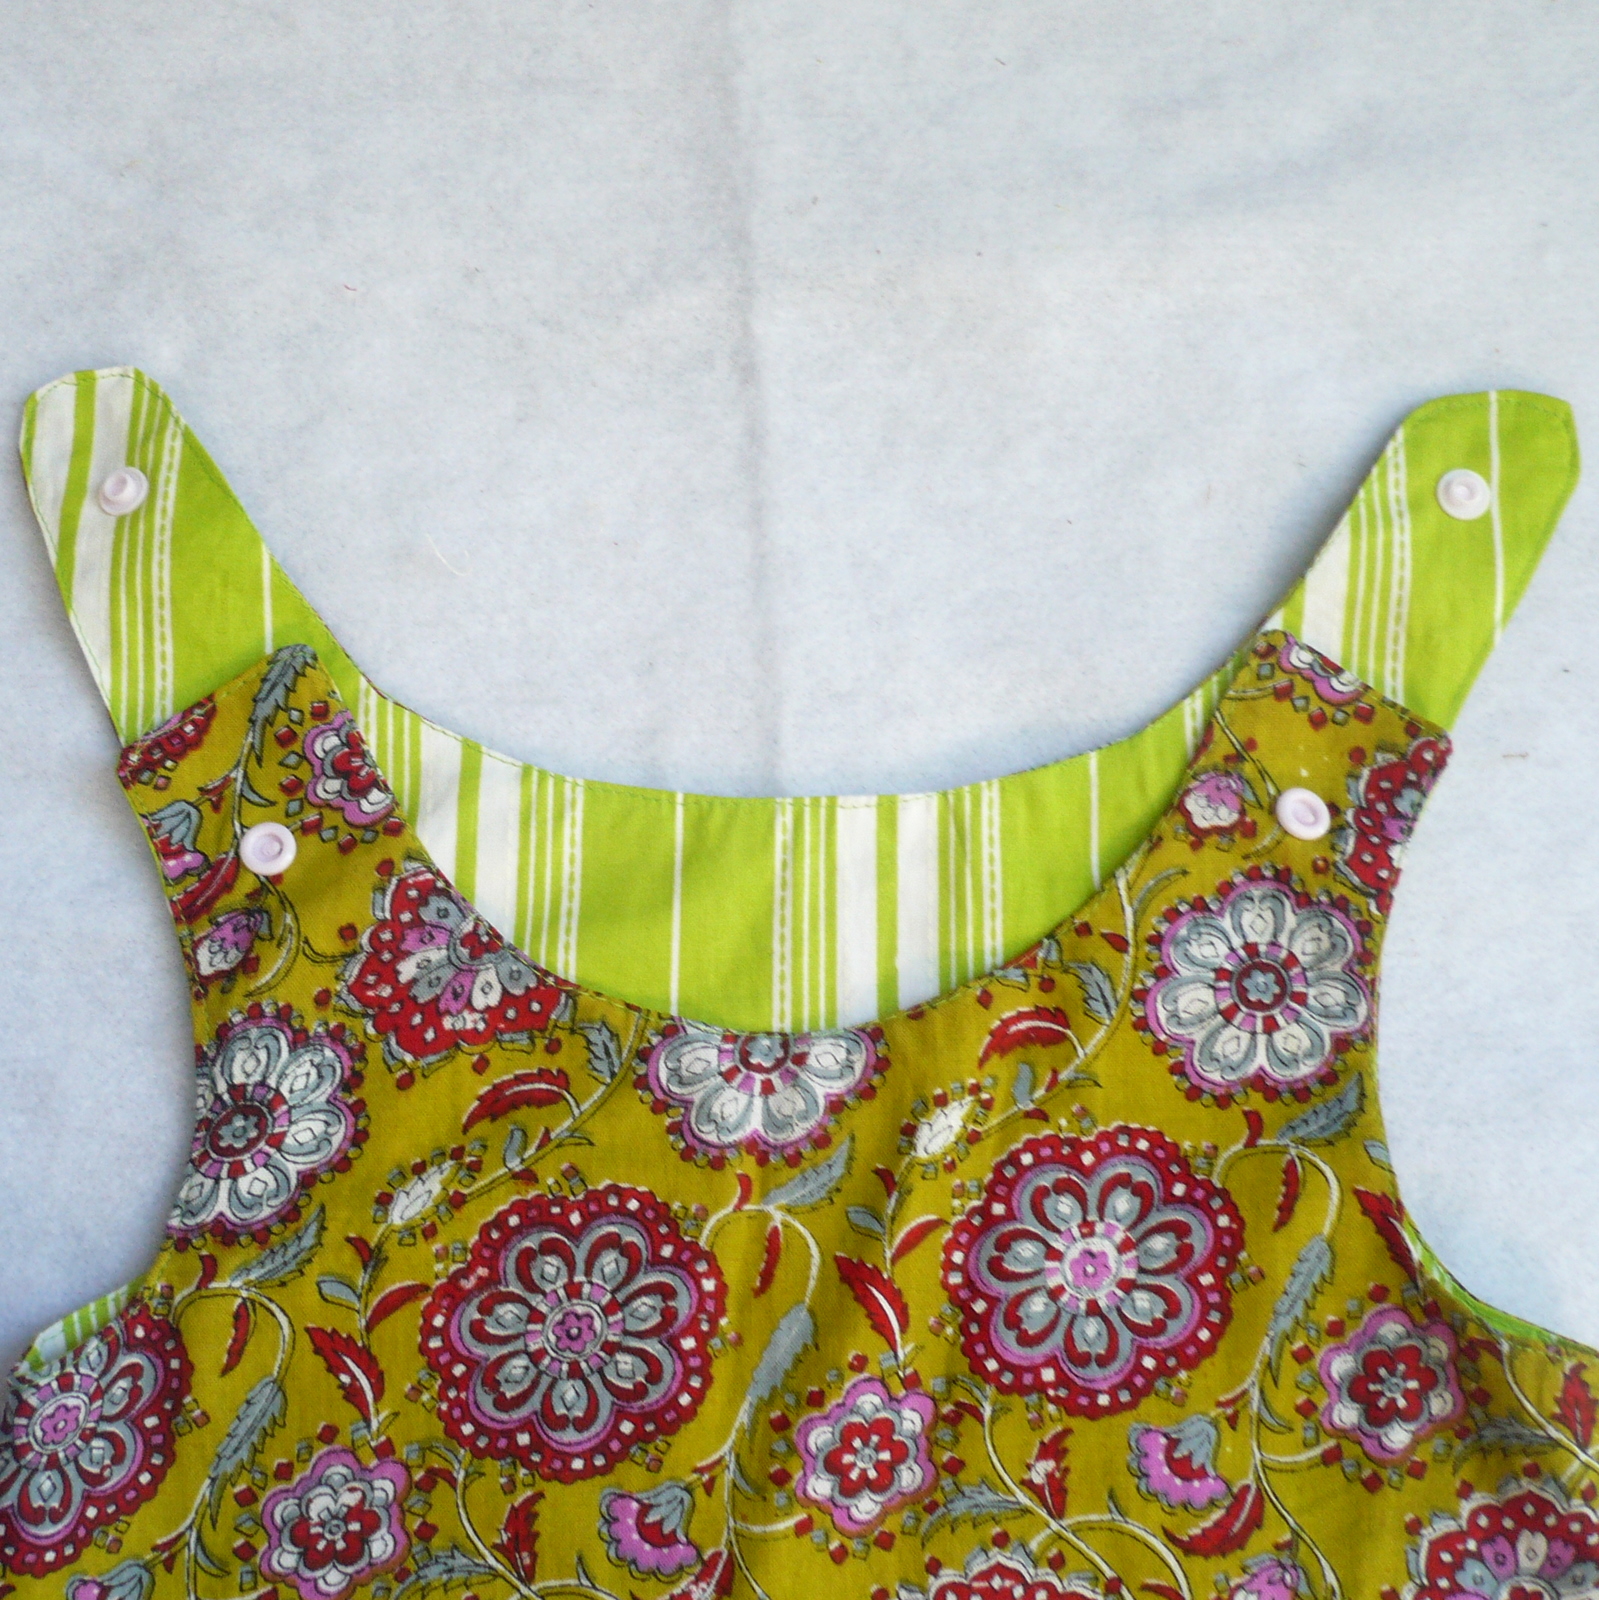
First the neckline:
Turn the top inside out  - start from the bottom of the V in front and sew it around the neckline leave some extra tape at the ends. Turn the top inside out again

Topstitch as close to the edges as possible. Now snip one en of the bias tape such that it just finishes under the other end. for the other end, just keep enough so it can be folded back and still maintains the shape of neckline. It will be clearer when you are doing it.

Now fold the raw end of bias tape and secure with a running hand-stitch. Please don't rush this step, we're working with difficult to handle fabric and the neckline is the most important part of this particular top. So I highly recommend doing a running stitch top secure the bias tape in its place. Here's a close-up of mine.
Now slowly top-stitch over this hand-stitching. Once you are done you can pick out the hand-stitch by pulling the thread.
Note: I usually avoid sewing pins until it is absolutely necessary, but you can choose them if you think they are more efficient.  I usually  hand-stitch to hold things in place while I sew.

11. We're almost there. Now just take a cup of coffee/tea and get ready for a looooooooong round of  hemming. What we're going to do is hem all the way around sleeves and hemline. Start at the bottom corner of one hem and make your way across the whole length and width o the garment. If you do it right you will get back to the place where you started.
I dont have pics for this step because I was using knit fabric and I skipped this step because knits dont fray.

12. Now sew on a pretty trim all around the hemline ( yes! all around ). I went with a narrow satin ribbon.
Although this step is totally optional, I would still highly recommend it  because this add to the visual appeal of the top/tunic/dress. Since fit is not its biggest pro, we need to add some other visual elements which can add to its charm, unless of course you went with a print so pretty that it didn't need anything else.

Here's the top we've been working on:
Wear it with a pretty belt

or without.
Big thanks to Ashi to model the tunic for me just in time for this tutorial. Thanks a lot girl, you totally rocked the dress.
PS: If you need more inspiration I have pinned  a lot of this style clothes on pinterest. Find Bloomsnbugs on pinterest.  Look at My Style pinboard. 
Happy sewing!