Showing posts with label sewing for kids. Show all posts

Monday, March 11, 2013

Hearts Tee for the little Diva

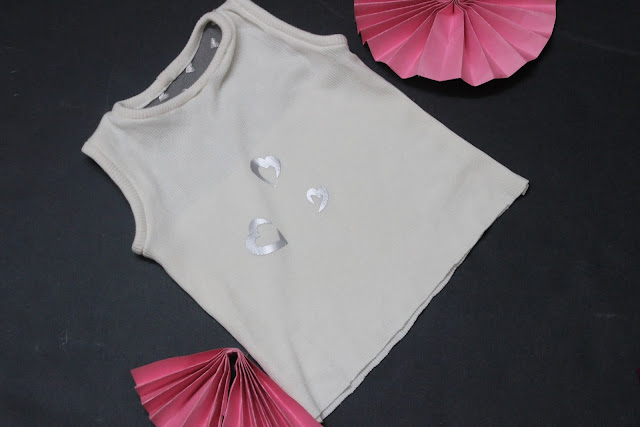
Sewing project: Lace Back Tshirt
There was some more V-day sewing that I did but couldn't share with you earlier.

I made this lace back tee which is just so popular these days. It just makes me so happy that it turned out beautiful.
The hearts at the front were added a little later. The Little Fashionista was ho-hum about the Tshirt at first. But when I added the hearts at the front and showed it her, she said ( and I quote):
Me: See your Tshirt? Do you like it?
She: "I like it Mommy. It looks much better now!"
Whew! When did my baby become such a diva?

PS: Working on the tutorial now...

Pin It

Monday, September 24, 2012

Peasant Dress Sewing Pattern and tutorial

Free Sewing Pattern: Peasant Dress

My peasant dress tutorial and free pattern ( 12- 18 months size) is now live at Clothworks blog. Check it out. This one turned out really cute! Made with Organic Cotton Picnic Pals Collection by Alyssa Thomas for Clothworks.

I also went ahead and added a pair of shorts to complete the look. My nina loves the pair! The tutorial for the shorts is work in progress.


Pin It

Monday, September 17, 2012

Tiered Tshirt Dress tutorial - Sew Easy part 16

Tiered Tshirt Dress Sewing Tutorial


Do you remember this dress I showed many months ago? Well it was part 2 of my firefly crush ( part 1 here) and I really liked it. But my daughter was not really into sleeveless dresses ( or fireflies) at the time and it languished in her dresser for a while. But these days she suddenly decided that she loves dresses, and if its sleeveless, even better. So that's how luck smiled on this dress and it became her current favorite.

One day I was trying to change her outfit and she asked me "Am I going to wear firefly dress?" I said "Sure!" and her face lit up :) And then after she put it on she said in all her 3 year old exuberance..."Mama you made it? Its very good!"

There is also this pair of shorts/bloomers that she insists on wearing everyday, and once she wears them, she insists on pointing to everyone that she is wearing some cool shorts that her Mama made.

I think those are the moments where all this become worth it. Maybe she will grow up one day and still love the clothes I make for her. We will see.

Anyhow, with that kind of customer response, it became imperative that I share a tutorial for this dress with all of you here.

I made another one for my niece ( who will be close to an year old when I will finally meet her for the first time)

Supplies:

1 Sleeveless Tshirt/top ( actually any tshirt will do). I bought mine in organic cotton from Walmart for $3.88, I think.

2. Two coordinated fabric scraps
    Fabric 1 - 3 inch X 40 inches
    Fabric 2 - 6 inches X 40 inches

Approximate time:

1.5 hours

Sewing Margin:

3/8 inch ( although it doesn't really matter much in this style)

Construction:
cut a 3 inch strip

Cut a strip of 3 inch from fabric 1


Serge along one long edge of this strip.

For this dress, I used the cheater's method of making ruffles. I cranked up the tension to 7 ( my default is 5.2). Set the stitch length to maximum and set the machine speed to maximum. Then I sewed a seam along the longer edge of the strip
You will see that the fabric is getting ruffled as the seam is sewn. Once you are done sewing the seam you can even out the ruffles by hand although the ruffles should be fairly even already with this method.

Leave about two inches hanging and sew this ruffle onto the Tshirt hemline ( wrong wide of ruffled fabric with the right side of the tshirt hem). Make sure you are taking in equal amount of Tshirt hem all around ( pin if needed). Stop about 2 inches before the starting point.

Now sew together the shorter ends of the strips ( right sides together) keep only enough fabric to cover the remaining two inches of Tshirt. Now sew the remaining ruffle on to the Tshirt. Serge the new hemline for better finish.

With the second fabric cut two strips of 3 inches X 40 inches and sew their shorter ends together to get a circular strip. Serge both raw edges.


Ruffle it using the method mentioned above. Spread the ruffles to make this new ruffle equal to the earlier ruffle length( 40 inches). 


Did you also think that the dress needed a little something on the front? Well! Me too.


I just decided on keeping things simple and do the name of my niece on the front. There! Much better! right?
You could use any technique from freezer paper stenciling, appliques to buttons, trims and what not. However, these letters were done using something else, a technique that is pretty new to me. I will tell you all about it but after a short while.
Until later!

Pin It

Tuesday, May 22, 2012

Dungaree/Shortalls for toddlers

Shortalls Sewing Project shortalls sewing

Did you take a look at summer spring catalog for Mini Boden? I like to flip through their pages for inspiration. In this edition, I was struck by their cute Dungaree/shortalls for toddlers. I made the above pair of shortalls inspired by their designs.

dungaree bodice front
A close-up of bodice front


shortalls back
Back
Here's the back. Don't you just love those back pockets. Perfect for a toddler who has just discovered the joy of pockets.

dungaree back
                                  Close up of the back bodice


I tried to go wild with embellishments on these, ric-rac, iron-ons, appliques? yes and yes!
Somehow the stripey main fabric doesn't work for me ( or my toddler) still. I didn't use my first choice in fabrics because I kind of wanted to try out the pattern first. So the pattern works ( but I still have a few more tweaks in mind) but the fabric just doesn't. Hopefully my next iteration will be much better. Oh yes, there's going to be a next iteration. These are way too cute to leave them alone after just one try.


Pin It

Monday, January 23, 2012

Sleeper to Jacket Refashion

Blooms And Bugs: Sleeper to Jacket refashion tutorial

This post was published as a guest feature at Me Sew Crazy last December. Publishing it here again in case you missed it last time around.


Ever since my daughter started walking her growth has only been vertical. That means clothes that fit well in the waist and body but are a few inches too short. Way too many of them. I found some fleece sleepers that were almost new but were at least two inches short already. Since she needed some jackets for the light California winters, I decided to try and refashion these sleepers into fleece jackets. And what do you know! It was super simple and it worked! Here's how I did it.

Supplies:

1.  Sleeper that fits well in the width but may be too short or too long
2. Fat quarter of coordinating woven fabric

Construction:

1.

 Close the zip up to the top. (This is very important, if you keep the zip open, you may not be able to close it completely after you cut. Don't ask me how I know that. Just keep that thing shut...ok.) Find the length that you think would be good for the jacket. Cut the sleeper horizontally 1 inch above that length. I chose to cut it right above the legs to get the maximum possible length. The finished jacket comes to my daughter's thighs, making it longer than the usual but I like that length. If you want a particular length for the jacket make sure you cut accordingly.

2.


 Pick out the cuffs on the sleeves using a seam ripper. This may take a few minutes so be patient. Usually if the sleeper is shorter in length than it is likely shorter at the sleeves too, I'll show you how to increase the length of sleeves a bit.

3. Measurements

Now measure the circumference of the hemline, lets call it L1. Also measure the circumference of cuffs. Lets call it L2. Now cut a 3 inch wide strip of length L1+(2xL2) + 5 inches. We will use this to finish the hem and cuffs of the coat.

4. Making the 'Bias Tape' for hemline and sleeve cuffs

I'm calling it Bias tape but actually it is cut on grain not on the bias. We can get away with this because we will be using it on the straight edges and not curves. However if you would like to use a bias tape that would work too.

Fold the strip you cut earlier in half along the length and iron.


Now fold one edge quarter inch and iron, this may take a few minutes. You may want to make a crease by hand before ironing to make it easy to iron. Quilting weight cottons retain crease well so they're easier to work with for this project.

Now fold the other raw edge a little less than quarter inch. Folding it lesser will ensure that when we sew this bias tape, it will catch the seam on the inside.
I'll explain more when we get to sewing it.

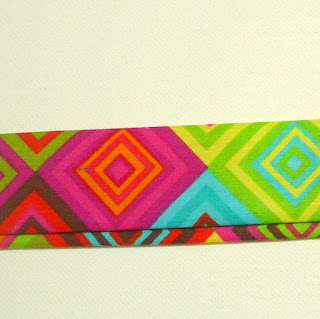
In the pic above the top edge is folded lesser than the bottom edge.


Here's the finished bias tape.


5. Finishing the hemline


Line up the raw edge that is folded more with the raw hemline of the sleeper ( right sides together). Make sure you leave one inch bias tape unsewn in the beginning. Sew along the hemline. Try to keep the seam on the crease of the fold as shown in the pic above.


When you get close to the starting point ( within 3 inches), measure the tape you will need to finish it and cut half inch longer bias tape than that.

Now line up both the raw ends of bias tape and sew with right sides together. This will ensure a very clean finish.

 Now finish sewing the remaining of the seam along the hemline.


Now fold the bias tape down and fold the part below the center crease inside.


Make sure that the bias tape is folded on the inside with no raw side visible. Since we folded that end lesser, when we fold it on the inside that edge of bias tape will go higher than the edge on the outside. Now sew a seam as close to the bias tape ( but not on) as possible. Go slowly on this seam as it will show on the outside.


The hemline is ready.

6. Adding the cuffs on the sleeves:


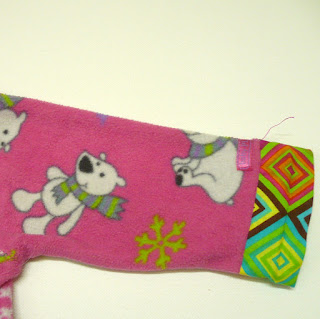
The cuffs are made the exact same way as the bias tape at the hemline. The only thing I need to mention is that you could make the cuffs a different length than the hem, so measure the length of existing sleeves and compare with the length you need and adjust the bias tape width accordingly.


So that's our easy refashion - A sleeper to a fleece jacket. Sew easy, sew fun!


Make one, make many! Enjoy!
Pin It

Friday, December 23, 2011

December sewing - pint sized accessories

Blooms and Bugs Studio: Sewing Kids Accessories


So I finally realized that its December already and whats winter without some ( a lot of ) accessories. I stumbled upon this superb tutorial from "From An Igloo" and just had to make it. The pattern is so good and it came together so easily that I made more ( for gifts).
If you're looking for a hat pattern, look no more. Make these...pronto...ok!


I finally succumbed to the bunting trend that has been over the blogosphere for a while now ( Is it too late already? No. Don't answer that question). I made some kiddie scarflets and used bunting appliques to decorate these.

The best part - Kiddo loves them. She keeps saying "Mama I'm dinosaur...lol"

Pin It