Sunday, January 29, 2012

Top 10 free dress sewing patterns and tutorials

Top Ten Free Dress Patterns

Photo credit: Sew Much Ado

The blogosphere is such a happening place, how ever many blogs I read I can never keep up with all the goodies that are being shared every minute somewhere on some or the other blog. I think many of you must be facing the same dilemma. So I have compiled a list of baby dress sewing patterns that I have always loved. I have tried some, some are the ones I have written and some are high up there on my list to try. Check it out over here.

Think I have missed some awesome tutorials?...leave a comment with the link on this post or the list page and I will include it in my next list.

Pin It

Saturday, January 28, 2012

Lucky Layers Tiered Dress

Sewing Project: Lucky Layers Tiered Dress
Tiered dress

I made this dress with Kate Spain's Good Fortune Collection. I spent a lot of time figuring out the right combinations, because all the colors and prints in this collection are so delicious. Finally, I gave up trying and thought I will just figure out as I go...or I would never complete this dress.
Shirred back dress
I should have saved my breath..Kate has already done such a great job of selecting colors and patterns for this line that whatever you select you always have a winner. You may ( or may not ) remember this layered skirt I made earlier with the same collection.
Dress from Kate Spain Good Fortune Fabric
The dress looks great on my toddler. It has great twirl factor, even though my monkey doesn't yet know what to do with it.

I'm working on the tutorial now...in case you were wondering.


Pin It

Friday, January 27, 2012

Bottoms Up - Part 7 - Aladdin pants sewing pattern and tutorial

Aladdin Pants Sewing Pattern and Tutorial
Aladdin Pants sewing tutorial
  

This tutorial is seventh in the series focusing on sewing pants for children. Here's the story behind the series, the second part of the series is reversible pants, third part of the series is rumble-tumble coveralls,  part 4 is two color pieced pants  part 5 is lilly frilly ruffle pants and part 6 is skirt leggings.  


I made these pants because I wanted something fun and a little different from the pants leggings pants routine of my daughter's wardrobe. My first attempt left something to be desired, so I tried again. This time I love how they turned out. I also love this hearts and flower baby cord that I got from Joann's. I didn't realize it at the time, but its just perfect for the Valentine's Day. I also like that this pattern is perfect for both boys and girls, just make these in a boyish print/colors and you have your Aladdin ready for the ride on the magic carpet.

Here's how you make one for your bug.

Supplies:

I made these with:
1.   1/2 yd of main fabric
2. Quarter yard each of two coordinating fabrics.

But I recommend using:

3/4 yd of main fabric 
quarter yard of a coordinating fabric for waist ties and leg cuffs
                        

Elastic - 15 inch 1 inch wide elastic for waist
Elastic - 20 inch 1/4 inch wide elastic for legs

Construction:

I recommend using slightly heavier fabrics like baby corduroy, linen or heavier cotton for these pants, but not something too heavy like denim. For the coordinating fabric also its better to use a fabric on the heavier side. I didn't have any coordinating fabric of the right weight so I had to interface the pink fabric to use it as a waistband.


drafting pattern for Aladdin pants

Cut pants using your favorite pattern along with the following modifications: Here's the one I used.( page 1 and page 2 )

  • Cut them 1.5 inch wider on each side of each leg. This would add 1.5X4 = 6 inches to their width. We need this because this pattern is for pants that are roomier than regular pants.
  • If your pattern has fabric for the waistband built into it, cut the pants 1.5 to 2 inches lower than what the pattern calls for. This is because we will make the waistband separately here.
  • You don't need the length for hemming either, If your pattern has the hemming margins built into it, cut it up half an inch because we will sew in a single sided bias tape at the hems.

2.

sew basic pants


Ok so you have cut the pants, now sew them like you would sew a PJ. First the inseams on both legs, then turn one leg right side out, insert into the other leg, line up the crotch part and sew the seam along the crotch area. Don not hem or make a waist band. ( If you want a detailed tutorial see this basic pants pattern)


3.

sew pleats on pants

Now two inches from the center seam, mark three gradual marks of 1.5 inches in both directions. Use these marks to sew three pleats. Make sure that pleats on both sides are facing each other.


4.

gathers on the pants waist

Now sew a seam along the rest of the waistline with the longest stitch on your machine, pull the bobbin thread gently to slightly gather the rest of the waistline. Don't fill in too many gathers though, the pants have to climb up your little ones bottom, so make sure you leave enough room at the waistline for that, we will anyway use elastic in the waistband to get a snug fit.

5.

drafting waistband for pants

drafting waistband for pants


Now lets work on the waistband, cut a fabric 6 inches wide and 6.5 inches long. Now measure the waist of the pants and subtract 5 inches, lets call this length W. Cut another fabric 6.5 inches long and W inches wide. This is where I ran out of main fabric and had to use the pink peace fabric...moreover since this fabric wasn't right weight, I had to use interfacing to make it stiffer. But since you're smarter than me...you would start with more fabric and cut the longer waistband piece from the main fabric.

6. Make the waist ties by cutting two strips of 2.5 inch ( length) X 42 inches ( width). Fold each strip into half ( right sides together) and sew along the longer sides. Snip the corners and turn out.

7.
sew a split waistband
Sew the waist ties on both sides of the 6x6.5 inches piece that we had cut in step
5. Sew these ties about 1 inch from the bottom of 6.5 inches long sides. Now sew together the other W inches wide fabric and 6 inches wide fabric with right sides together, such that the waist ties get sandwiched between the two fabrics. The pic show how it will look once you are done. I have just folded the waistband fabrics in half.

8.

sew waistband to pants
Now place the smaller waistband piece ( the 6 inches wide one) over the right pleats of the pants ( right sides together) leave about 1 inch from the starting point and sew along the waistline. Stop about an inch before you complete the circle.

9.
sew waistband to pants

Estimate how much waistband fabric you will need to finish the waist. Sew a seam to join the smaller piece of waistband to the bigger waistband piece. Make sure the waist tie gets sandwiched between the two. Snip off any excess fabric. Now finish the seam along the waistline. Turn out.

10.

finish pants waistband


Here's how the waistband will look after you turn it out.

11.


finish pants waistband

Now turn the waistband down again. Fold the raw edge quarter inch inside and sew basting stitch along the edge.

12.
Insert elastic in pants waistband

Fold the waistband inside such that it falls right over the seam joining waistband to the pants. Sew a seam along the waistband from the outside leaving a gap of 1 inch near the small waistband piece. Make sure you're catching the other edge of the waistband on the inside. Use pins or hand baste if needed.
The above pic shows a gap on the right side of smaller waistband piece. You have to do the same on the other side of this 6 inch piece.

13. Insert elastic in the longer waistband piece using these gaps. Sew zigzag stitch on both sides to secure the elastic.

14.

Sewing leg cuffs


For the hems, cut 2 inch long and strips with width equal to the hemline of both legs + 2 inches.


15. Fold these strips in half along the length and iron. Fold both edges in half again ( turned towards the inside) and iron. The strips should look like a bias tape now.

If you need more details, see step 4 of this sleeper to jacket refashion tutorial.


16.
finishing pants hems

Sew the strip right side to the wrong side of the hem. Try to sew on the first quarter mark of this tape.


17.


Turn out. Fold the quarter mark along the top edge and sew on the top edge, as close to the edge as possible. Leave a gap of half inch to insert elastic.

18.
Insert elastic in pants hemline

Insert an elastic using the opening. Pull it such that the leg opening becomes snug but doesn't dig into your little ones ankles. Sew both ends of elastic by overlapping on each other and slip them back into the leg cuff. Sew the opening shut.


19.


Repeat step 15 -18 for both legs

20.


Though you could always tie the waist ties into a bow. I highly recommend trying the pants on your child and tying the bow and sewing it permanently ( or semi permanently). With an energetic toddler, the waist ties may come undone very quickly and a child running around with long ties is no fun.
You could always pick out the sewing and adjust them back when the child's waist grows.
Aladdin costume DIY
Here's the view from the back


Here's the front

Now all you need is a magic carpet!


Pin It

Thursday, January 26, 2012

A little bit of India - Republic day today

A Little Bit of India: Republic Day
This is the third post of the series "A Little bit of India" read the first part of the series: A little bit of India - Diwali  and the second part: A little bit of India - Saree.


  India Gate, Delhi


Photo credit: kamagong from morguefile.com

India celebrates its 63rd Republic Day today on the 26th of January. It was the day when India finally had its own constitution more than 2 years after its independence.
Dr. Ambedkar spent a huge amount of time to draft a constitution that would serve a country as diverse as India.

I have mixed memories of celebrating Republic Day as a kid. I was in a school where being good at extra-curricular activities really counted...and alas! I wasn't very good at any of those. Every year there would be a Republic Day Gala at the school and every year I would try to get into as many of the group dances, group drills as I can and every year I would get chucked out of most of those because I couldn't sync with the rest of the group. Ouch! that hurt, I would pout and hold a grudge against the teacher who would be the in-charge of the activity. But now I realize that it wasn't their fault...I really can't sync with a group to save my life...lol! Maybe it was God's way of telling that I was destined to do my own thing. At least I like to think so.

But it wasn't totally bleak on Republic Day. Being good at studies ensured that I would play at least some key role in the whole celebration, like deliver a speech or get some prize for academic performance. After the festivities in school we will get home and watch the national celebration on TV. It was an event in itself...as we would wait for the floats of each state and try to recognize which one was ours. Our parents would come home early from work and that added to the festivities.

I didn't understand much of the significance of this day back then, but it was a good moment to recollect our accomplishments as a nation and feel proud about them. I think I did feel proud of my country even as a kid. Now as an adult I realize that India has a long way to go but its moving in the right direction, and that makes me feel proud.

Indian Flag at Red Fort Delhi
Photo Credit: think4photop / FreeDigitalPhotos.net

Happy Republic Day Dear India! and Happy republic day to my fellow Indians. Hope we celebrate the day in its true spirit for centuries!


Pin It

Tuesday, January 24, 2012

Sneak Peek: On my sewing table right now

Sneak Peek: On my sewing table
I'm dealing with oodles of yummy fabric this week. Here's a sneak peek.

And here's more...


There're some solids in there as well, but in perfect color for the season...and I have things to make it pretty yummy ( meaning pretty and yummy)


Really now, could you blame me for sneaking into the sewing room in the middle of the night? (And dozing off in the middle of the day :-/ )


Pin It

Monday, January 23, 2012

Sleeper to Jacket Refashion

Blooms And Bugs: Sleeper to Jacket refashion tutorial

This post was published as a guest feature at Me Sew Crazy last December. Publishing it here again in case you missed it last time around.


Ever since my daughter started walking her growth has only been vertical. That means clothes that fit well in the waist and body but are a few inches too short. Way too many of them. I found some fleece sleepers that were almost new but were at least two inches short already. Since she needed some jackets for the light California winters, I decided to try and refashion these sleepers into fleece jackets. And what do you know! It was super simple and it worked! Here's how I did it.

Supplies:

1.  Sleeper that fits well in the width but may be too short or too long
2. Fat quarter of coordinating woven fabric

Construction:

1.

 Close the zip up to the top. (This is very important, if you keep the zip open, you may not be able to close it completely after you cut. Don't ask me how I know that. Just keep that thing shut...ok.) Find the length that you think would be good for the jacket. Cut the sleeper horizontally 1 inch above that length. I chose to cut it right above the legs to get the maximum possible length. The finished jacket comes to my daughter's thighs, making it longer than the usual but I like that length. If you want a particular length for the jacket make sure you cut accordingly.

2.


 Pick out the cuffs on the sleeves using a seam ripper. This may take a few minutes so be patient. Usually if the sleeper is shorter in length than it is likely shorter at the sleeves too, I'll show you how to increase the length of sleeves a bit.

3. Measurements

Now measure the circumference of the hemline, lets call it L1. Also measure the circumference of cuffs. Lets call it L2. Now cut a 3 inch wide strip of length L1+(2xL2) + 5 inches. We will use this to finish the hem and cuffs of the coat.

4. Making the 'Bias Tape' for hemline and sleeve cuffs

I'm calling it Bias tape but actually it is cut on grain not on the bias. We can get away with this because we will be using it on the straight edges and not curves. However if you would like to use a bias tape that would work too.

Fold the strip you cut earlier in half along the length and iron.


Now fold one edge quarter inch and iron, this may take a few minutes. You may want to make a crease by hand before ironing to make it easy to iron. Quilting weight cottons retain crease well so they're easier to work with for this project.

Now fold the other raw edge a little less than quarter inch. Folding it lesser will ensure that when we sew this bias tape, it will catch the seam on the inside.
I'll explain more when we get to sewing it.

In the pic above the top edge is folded lesser than the bottom edge.


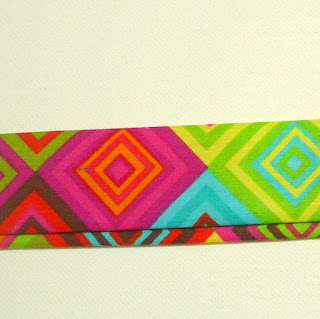
Here's the finished bias tape.


5. Finishing the hemline


Line up the raw edge that is folded more with the raw hemline of the sleeper ( right sides together). Make sure you leave one inch bias tape unsewn in the beginning. Sew along the hemline. Try to keep the seam on the crease of the fold as shown in the pic above.


When you get close to the starting point ( within 3 inches), measure the tape you will need to finish it and cut half inch longer bias tape than that.

Now line up both the raw ends of bias tape and sew with right sides together. This will ensure a very clean finish.

 Now finish sewing the remaining of the seam along the hemline.


Now fold the bias tape down and fold the part below the center crease inside.


Make sure that the bias tape is folded on the inside with no raw side visible. Since we folded that end lesser, when we fold it on the inside that edge of bias tape will go higher than the edge on the outside. Now sew a seam as close to the bias tape ( but not on) as possible. Go slowly on this seam as it will show on the outside.


The hemline is ready.

6. Adding the cuffs on the sleeves:


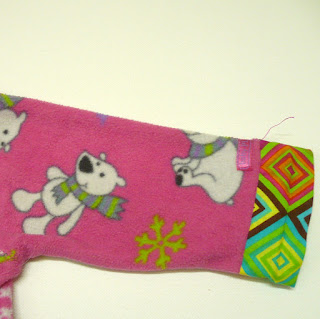
The cuffs are made the exact same way as the bias tape at the hemline. The only thing I need to mention is that you could make the cuffs a different length than the hem, so measure the length of existing sleeves and compare with the length you need and adjust the bias tape width accordingly.


So that's our easy refashion - A sleeper to a fleece jacket. Sew easy, sew fun!


Make one, make many! Enjoy!
Pin It