Saturday, August 6, 2011

Sew Easy - Part 6: Reversible Zen Dress

Sew Easy Tutorial: Reversible Zen Dress Pattern
Reversible Dress Sewing Tutorial

Reversible Dress Sewing pattern

You can read the story behind this series and the first part 10 min skirt sewing tutorial here. Here are the earlier tutorials - the second part 20 min dress from Tshirt, third part Butterfly Shrug Sewing Tutorial, fourth part  Kaftan Sewing Tutorial for women and fifth edition Strawberry Vanilla Dress of the series.

This week lets make an A-line reversible dress. When I thought about doing this tutorial, I was surprised at why didn't this idea came to me earlier. This dress has very simple cutting, and very simple sewing and yet the finished garment looks something that would take a lot of effort. A perfect sew easy.
Not only is this easy to sew, its also very easy to put on the child and take off. And if she spills some sauce on one side just put it on from the other side. No wonder the first name that came to my mind was Zen Dress.

So lets get started.

Supplies:
Two coordinating fabrics half yard each
Two set of closures of some kind ( snaps, Velcro, buttons etc)

For measurement: An A line dress that fits the child.

Cutting:

Lets lay out the fabrics first ( lets call fabric 1 - F1, fabric 2 - F2 )

Fold F1 lengthwise in half.


Fold it again lengthwise in half.

how to draft a jumper pattern
Fold F2 similarly and place it over the F1. Also fold the dress in half lengthwise and place it on fold.
jumper pattern and tutorial

Mark the neck front.
how to sew a jumper

Draw an outline around the dress with some margins at the side seams for seams. I have kept the margins more because I wanted the dress to be wider than the original.
 When you reach shoulders just extend the neck and armhole such that it extends 2.5 to 3 inches above shoulders and then round it towards the end.

drafting jumper pattern
Cut across all the layers.

how to sew a reversible dress
Pull out one layer of F1 and one layer of F2. This is the back of the dress.

reversible jumper tutorial
To cut the front, draw a curve between the points that we had marked earlier, between the front neck and shoulder.
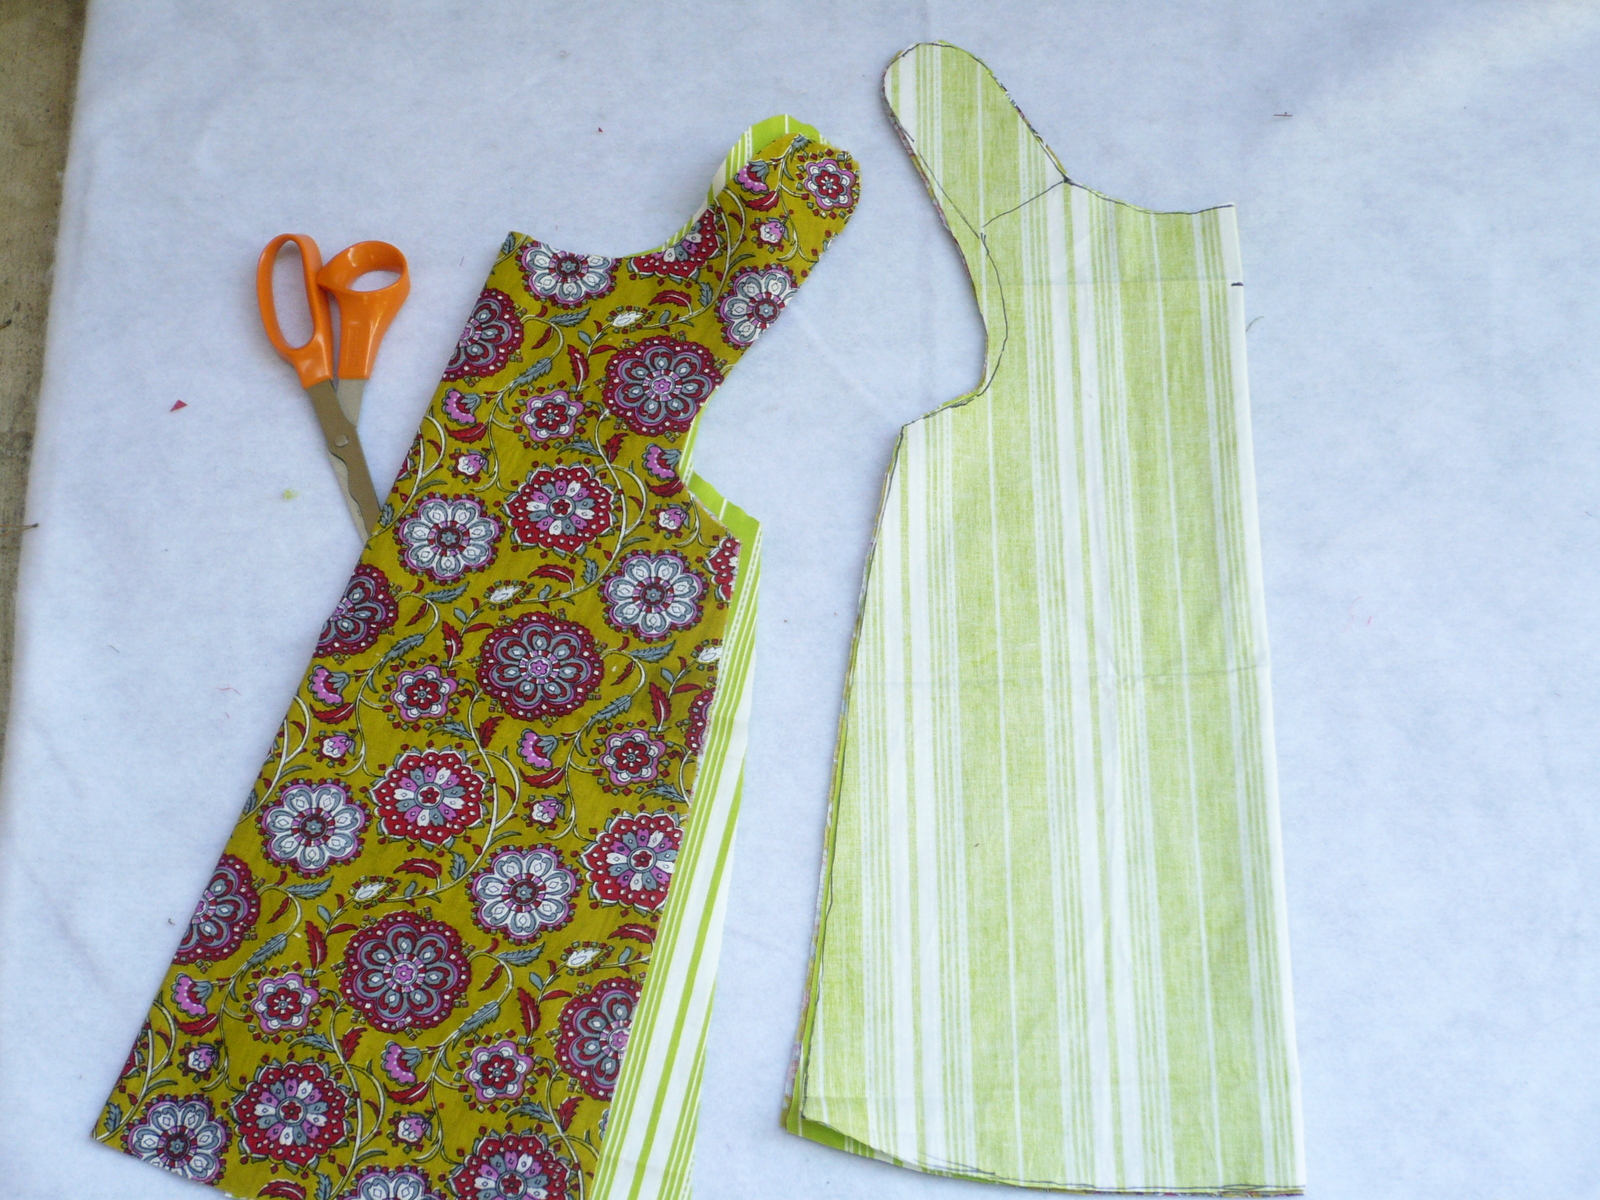
Also draw a line 1 inch above the shoulder as shown in the pic above.
jumper sewing tutorial

Cut the deeper front neck and the line above the shoulder that we just marked. In the above pic the back pieces are on the left and the front pieces are on the right.

how to sew a jumper
Now take both F1 pieces and place one on top of other right sides together. Similarly take both F2 pieces and place one on top of other right sides together. Make sure both pieces are aligned at the sides.

reversible jumper sewing tutorial
Sew the side seams. The seams are not visible in the above pic so I have marked the seams with a blue line. Its still a little hard to see though.

sewing reversible jumper
Turn F2 inside out.

Slide the whole dress inside F1 such that F1 and F2 right sides are together.

Now sew joining F1 and F2 starting at front of neckline


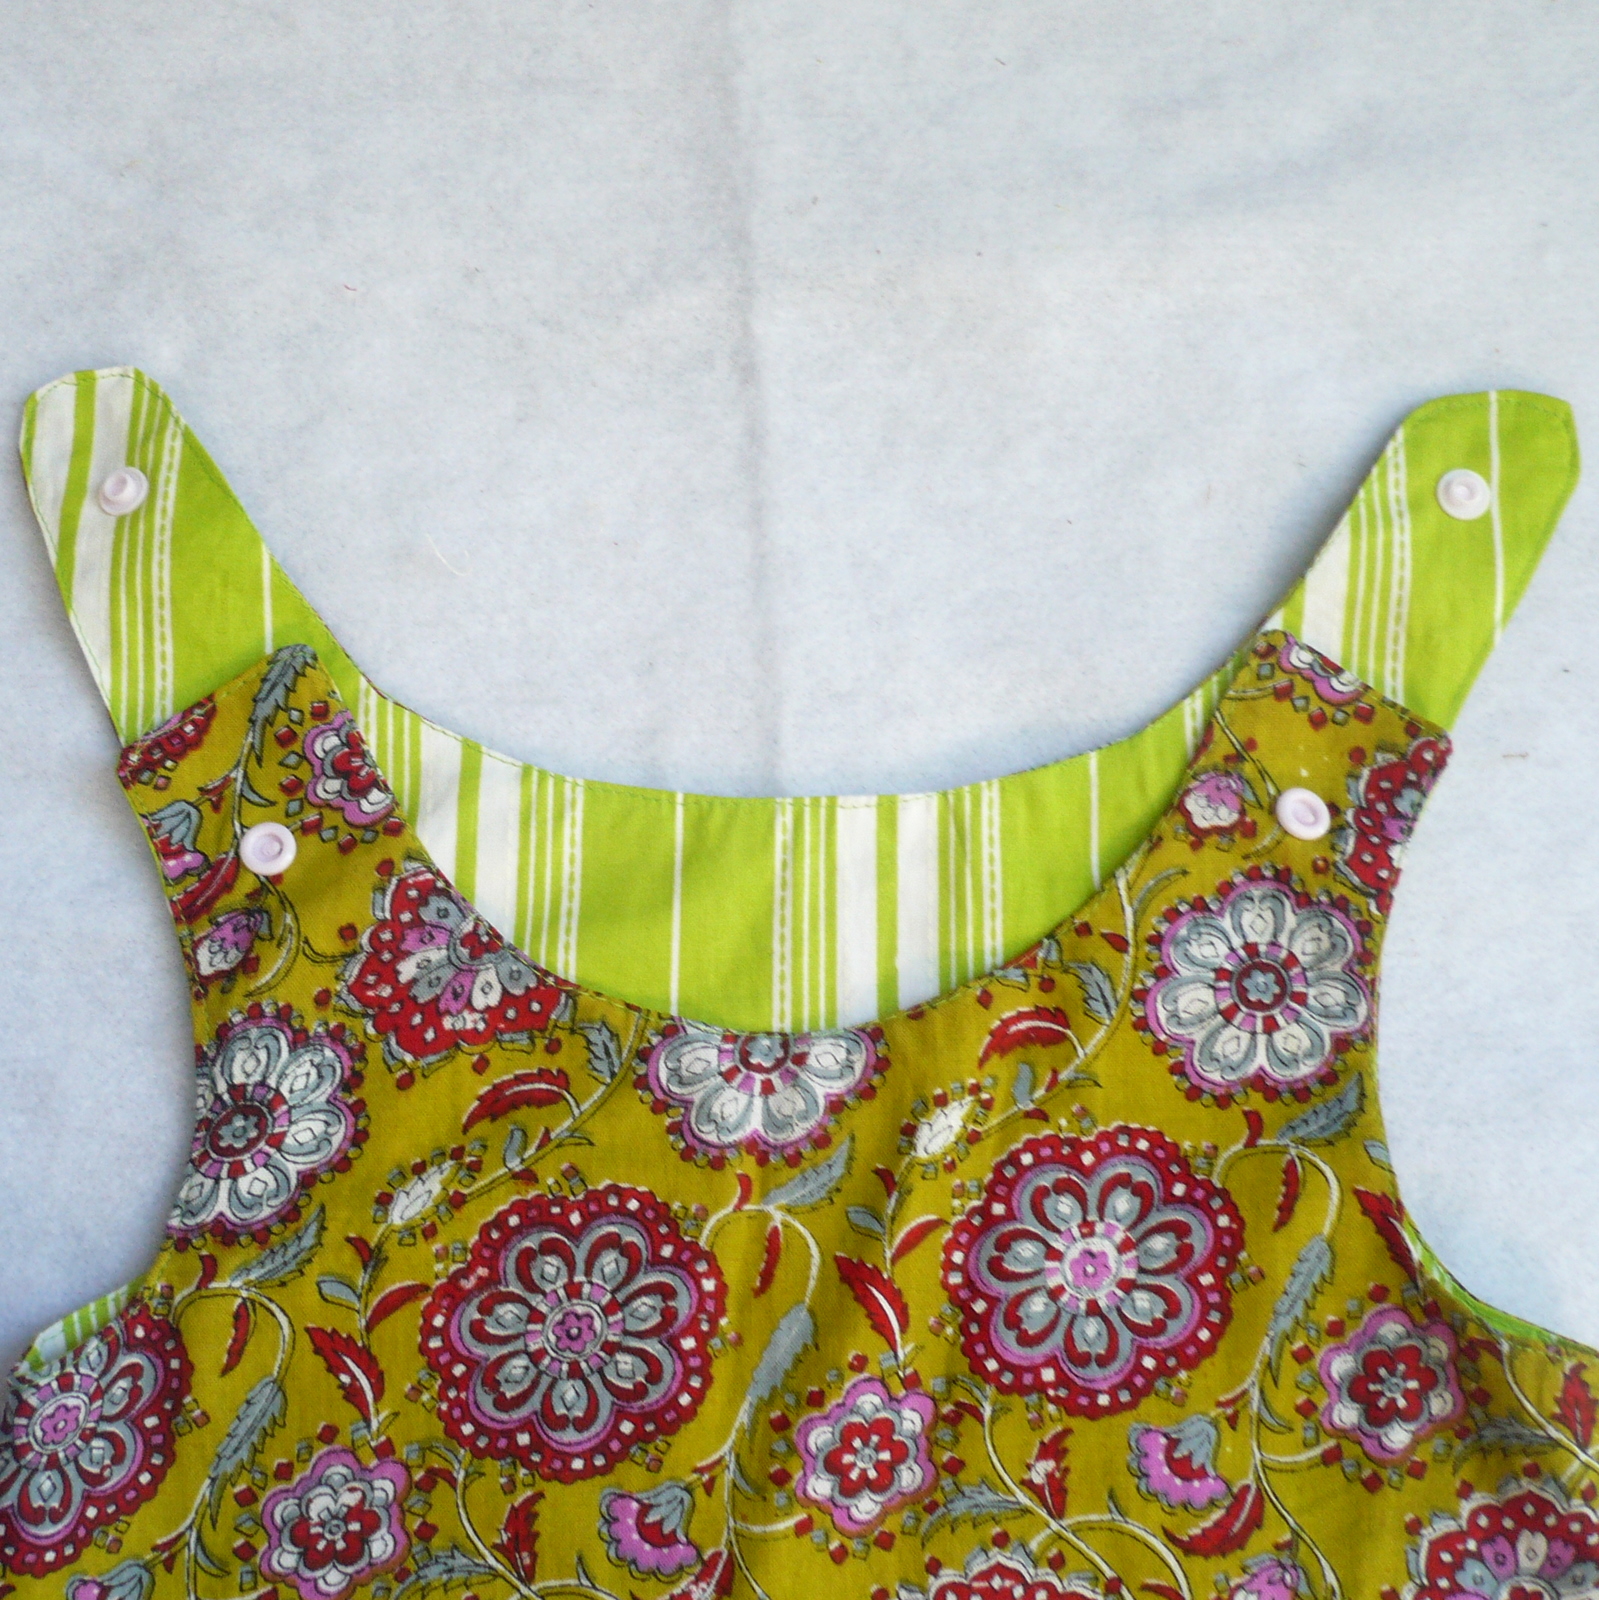
and continue on shoulder, armholes, back shoulders, neckline etc until you are back at the starting point. Go easy and take your time aligning F1 and F2. This is a very simple dress with just 4-5 seams total, but if you mess up the alignment of the two fabrics, you will be left with a wonky garment where one fabric will be doing a peek-a-boo on the other side.

Cut small notches throughout the seam you have just sewn. Don't forget to snip the corners of squares at the front shoulders. These notches make it easy to turn out curvy seams and help fabric lie smoothly. Just take care of not cutting into the seams while making these notches.

turning out a reversible dress
Turn the dress inside out. Use a pencil to turn out all the corners of the dress.

hemming a reversible dress
Iron the dress to smooth out any misalignment while turning. Also iron the hemline inside about half inch on both F1 and F2 as shown above. Make sure that the hemlines are exactly equal for F1 and F2 and iron them well so that they don't show on the other side.
 Top-stitch the hemline with both F1 and F2 together.

I also recommend top-stitching the neckline ( which here means neckline, shoulder, armholes) though its not necessary.
adding snaps to the dress
Add closures on both shoulders. I have used snaps because I had the snap pliers and they take the least amount of time. But you can add velcro or buttons as well.

reversible tunic diy
And Done! Enjoy the dress, Right side..

.
how to sew reversible tunic
Or Wrong!

Here are the links to more editions of the Sew Easy sewing tutorials.

Sew Easy Part 7: Knotted Fringe Dress Sewing Tutorial
Sew Easy Part 8: Circular Bodice Dress Sewing Pattern
Sew Easy Part 9: Layered Knit Skirt Sewing Tutorial
Sew Easy Part 10: Striped Knit Jumper Dress Sewing Tutorial
Sew Easy Part 11: Nordic Prince Tuxedo Tshirt Tutorial
Sew Easy Part 12: Layered Skirt with pickups sewing tutorial
Sew Easy Part 13: Box Pleated Skirt Sewing Tutorial
Sew Easy Part 14: Nautical Dress Sewing Pattern   

Wednesday, August 3, 2011

Flamingo Knit Dress Tutorial: New and Improved

Free Sewing tutorial: Little Knit Dress
little knit dress sewing tutorial

The Front:
how to make a dress
                                        

And the back

I did this guest post over at Momma's Kinda Crafty a few months back. Re-posting it here in case you missed it back then.
This is a very cute ruffled dress and super easy to sew. The tutorial provides the step by step instructions on how to sew this knit dress for a toddler
So what do you need to make this dress? I have made it in one year old size but a bit shorter because it just looks so much better when it is short. I did try a longer look with my earlier version, but had to resort to scissors when my little one ended up looking like a Buddhist monk. No offense of Buddhists, it just wasn't quite the look I was going for :)


Jersey Knit:

Main body : 2 rectangle pieces of 11 inches ( Length) X 13 inches ( Width)
First ruffle:  5 inches( Length) X 26 inches ( wide)
For second and third ruffles:  2 pieces of 5 inches (L) X 13 inches (W)
Elastic: 1/4 inches wide: 24 inches

Shoulder straps: 20 inches X 4inches
Elastic thread: 1 spool ( you'll have plenty left)

Contrasting colored knit fabric: Bow: 5 inches X 6 inches
                                                  Rose: 4 inches X 5 inches
Now lets first make the shoulder straps:
Sew the strip into a tube by folding it into half lengthwise, right sides together. Turn it inside out. Now
sewing a tube

Now fill the bobbin with elastic thread and sew 3 straight lines across the length of the tube to shir it.
how to sew shirred strap


how to sew shirred strap

Here's my shoulder strap all shirred up. Don't worry if your strap seems much smaller than mine.
I just see many more knit dresses in my future so I made a longer shoulder strap.

Now cut two 9 inches long shoulder straps from this strap and lets start assembling the dress.
First sew the two main dress pieces right sides together, about 2 inches from one end, joining them by a two inch stitch at their length.( Do not sew all the way just sew 2 inches from one end, on both sides)

dress free sewing tutorial
See the parts where pens are overlapping with the fabric, that's the only part you have to sew.

Now pin your shoulder straps to the main body. Mark a 2 inches from each side of the center of the width on both front and back pieces.

Now pin your straps such that the the back of the strap touches the wrong side of the main fabric. Pin the shoulder straps on the front at the 4 inches( 2 inches either side of the shoulder) gap that you had marked earlier.

attaching shoulder straps to the dress

Now cross the straps and pin their free ends to the back fabric. Again pin the straps such that back of straps touches the wrong side of the main fabric. Now sew across the width to connect the straps to the fabric.


If you bring the front and back together, this is how it will look right now:

how to attach a ruffle


Attaching the top ruffle

Take the 5 inches strip for ruffle and pin it to across the width of the dress such that right side of the fabric touches wrong side of main piece. The shoulder straps will be sandwiched between the main piece and ruffle, which is what we want.

dress sewing pattern

dress sewing pattern
Sew across the width to attach the ruffle. It was very difficult to take pics of this step so you may not get this step visually, but all you have to do is pin the ruffle on the inside such that right side of the ruffle touches wrong side of the main fabric and it will go over the ruffle fabric

Turn the ruffle inside out.

how to sew a dress
Topstitch as close to the edge as you can. Go slow and steady here, as this seam will show on the top of the garment and if uneven it won't look good.

Topstitch the ruffle with about 3/8 inch from the edge to form a casing . Leave a 1 inch gap to insert elastic.

.Good. Now you'r done with the most complicated part of the dress, rest is easy.
Pin the bottom ruffle on the front of the dress such that the ruffle bottom aligns with bottom of the dress. sew it down.

adding ruffles to dress

Now pin the middle ruffle such that all the ruffles look parallel and equally wide.Also make sure all the ruffles have 1.5-2 inch overlap.Since we are going to leave the hems unfinished( because knits dont fray), a nice overlap will ensure that even if they curl a bit, the seams wont show.

sewing a ruffled dress
Now turn the dress inside out and pin both sides. Make sure all the ruffles except the top one are getting caught in the side seam ans all the ruffles are lying flat. Sew both sides.

how to sew a dress

Now tun the dress inside out. Here you are. All ready to insert elastic:


dress sewing tutorial

Insert a 1/4 inch elastic in the casing you made earlier( between the main body and top ruffle). Keep the elastic length such that it is slightly lesser ( ~ 2 inches) than the chest measurement of the wearer. Sew the opening shut.

inserting elastic in a dress

The dress is ready:

little knit dress pattern
The elastics makes it very difficult to take good pics of final garment. Mine looks a bit wonky here, but it is parallel in real life.
The main dress is ready. Now you can embellish it as you like.
Maybe a bow:
patternless sewing
Or a rossette ( tutorial here):

knit dress sewing tutorial
Maybe both.
Now go find the cute little one who napped long enough to let you finish this. Time to try it on.

Tuesday, August 2, 2011

Summer Spring Necklace Tutorial

Ribbon and Beads Necklace Tutorial

I did this guest tutorial on Blissful and Domestic a few weeks ago, publishing it here again in case you missed it back then.

What you need:
Some beads: about 15-20 depending on the size. I used teardrop beads simply because I didn't have
any round ones in my stash. In the end though they arranged themselves in this very pretty and unique look.
You can try with whatever you have. I have seen many necklaces made using the round beads and they look beautiful too.

Ribbon: Satin or Sheer organza ( ~2 yd - there will be leftover)
I personally don't think grosgrain or satin ribbon would look as good, but you can play around with your choices and choose whatever you like.

Plastic thread: To thread beads and ribbon into a necklace. I used it because its more stable. I highly recommend it.

Some Tulle scraps. Optional

Mark 15 inches from one end of ribbon. This is where you will start adding beads to the ribbon. Now thread a needle with the plastic thread and tie a knot at the end. Now thread one bead with this thread. Once the needle is out of the bead, wrap it around and thread the same bead one more time. What we're doing here is trying to use the bead as a knot. For more stability loop your thread once through the loop over the bead as well.


Now make a 3/4 inch long running stitch on the ribbon starting at the 10 inches mark you marked earlier.


When the needle comes out at the end of this running stitch thread another bead, make another running stitch about the same length as earlier, thread another bead, make another running stitch.


What the above step will do is to get your ribbon to bunch up between your beads.
Repeat this cycle and thread about 10 beads. At this point pull your thread and gently bunch up the ribbon and beads as close as possible.Now check the whole thing against your neck to see if you are happy with
this size or you want more. If you need more keep adding the beads and making running stitches as shown earlier.

When you reach at the end pull the thread gently so the ribbon bunches up between the beads. Now you can tie a knot after wrapping around the bead again ( as we did in the beginning) and then sewing it back to ribbon.

Snip off any extra thread. Now tie the whole thing in your neck with a bow in the back. Snip off any extra length of ribbon.
If you had used tear drop beads they will arrange themselves in a fashion where one bead is up and next bead is down and the next bead is up again. If you notice a couple of stray beads just arrange them with your hand, because this is the most natural position for the beads to settle they stay in this position.

Your bead and ribbon necklace is ready.

Tie it behind your neck by making a bow and show off.
Options
You can spice it up more with these options:
1. After threading every bead make 2 running stitches instead of one. If the ribbon is pretty it will show more this way.

2. Cut some small tulle strips ( about 3 inches long and about the same width as the ribbon). Now thread the bead, make a running stitch on the ribbon and fold your tulle strip in an accordion fold  and thread the needle through it. Make another running stitch on the ribbon. If you have matching tulle this will soften the look and give the necklace a more romantic touch.
Play around with these options by using them for the middle 2-3 beads and threading the rest as the initial method.
Hang a pretty pendant in the center of the necklace by threading through it while you're making the running stitch on the ribbon.
There are so many variations here that you're limited by only your creativity!
Now go make one, make many!

Link love for new posts

Blooms And Bugs: Blog Updates

Image courtsey Sullivan via MorgueFile

Last few Sew Easy Tutorials have been featured at a lots of places. It just goes on to show that people are interested in sewing, its just that they are looking for some quick and easy projects to begin with.

Sew Easy - Part 4 (Kaftan Tunic Tutorial) was featured at One Pretty Thing,

Sew Easy - Part 5( Strawberry Vanilla Dress) was featured at Whip Up and Craft Gossip. It was also featured at Truly Lovely.

And our little shrug here has been nominated for the Best in Show award this week at Lamb Around. Could you please vote for it and help it get selected. 


Thanks a lot and welcome to the readers stopping by from Craftgossip, One Pretty Thing, Whip Up and Truly Lovely. Hope you have fun here. Don't forget to take a look at some of the popular posts listed on the sidebar. I also have a new page now, listing all the free tutorials at one place. Check it out. Happy sewing.


oneprettything


Featured at Truly Lovely


Monday, August 1, 2011

Happy Birthday Cutie!

Sewing Project: Sweetheart Shrug

I still remember the day when we met her for the first time - she was this fuzzy bundle with face of a porcelain doll...I swear, not a single wrinkle on her tiny face. How can you not fall in love?
 She is a girly girl, with a soft laughter and cutest of smiles.
She showers me with kisses sometimes and it always melts my heart.
Something tells me that I'm her favorite Aunt. (or she may just have a knack for making people feel special)
She is just months older than my munchkin and is already her role model. I always wish that they grow up to be best friends.

You would think it would be a snap to make something for her...sewing for girls...that's all I do. No such luck! You see her Mom has exquisite taste and anything less than super-cute would never see the light of the day. It better be the best.

I scoured pinterest for inspiration and here's what I finally come up with ( Based on this tutorial with some modifications). Will it pass the test? We'll know soon!


Happy birthday little one! Its a pleasure watching you grow. Love you lots.