Showing posts with label accessory. Show all posts

Thursday, December 29, 2011

Roses in December Ruffled Scarf


So we were packing for this upcoming trip and I thought it will be cool to have some accessories for myself. I had a half-baked idea of a shirred scarf in my head and a just perfect jersey fabric at hand but there were still a few kinks that I couldn't think of a way to get around..that is..until now.
Once I thought through the design and felt confident, I left the piles of clothes to be packed on the bed, handed the munchkin her favorite toy, and got to work ( sounds familiar...eh).
It was an easy-peasy scarf and if I weren't interrupted by my bunny who now wants to "Sew clothes" it would take me about 20 mins...I think.
The scarf is super soft and very ruffley...just the way I wanted. I wore it to work and what to do you know...I even got compliments :). My colleague told me the scarf looked very nice, she even asked me where I bought it. I tried my best not to look smug when I told her "I made it"...lol.
Incidents like these totally make my day...and ohh..almost forgot.. the tutorial is in the works and will be here very soon.


Pin It

Tuesday, November 15, 2011

Tutorial: Devil's advocate Hat

Sewing Tutorial: Knotted Baby Hat


This is a tutorial I did as a guest post on Bear Rabbit Bear last month. Just republishing it her in case you'd missed it earlier.

Devil's advocate baby hat:

Supplies

    * Knit fabrics: Take 2 pieces of same fabric or two different fabrics – use up those scraps that are too big to throw away but too irregular to make into a dress, top etc.

    * Print out the pattern [PDF page 1 and page 2], tape the two pages as shown and cut out both pieces of the pattern (total of 3 cuts – piece 1 spans both pages and piece 2 is on page 1. Once you cut out all the three pieces, tape both parts of Piece 1 by overlapping the small part over the bigger part, up to the line on page 2.

   1. Fold each fabric in two layers, then fold one more time. Place each pattern piece on fold and cut. So now you have two pieces of #1 and two pieces of #2.

Note: Just Ignore the joint in the center...its there because I didn't have enough fabric, but if you cut the patterns on the fold, you shouldn't have it.
2.  Sew together pieces of #1 along the cone, bunny ears side, leaving just the bottom straight side raw, right sides together. Sew together pieces of #2 along the semi-circular side, right sides together.

This is the place where my camera died and I couldn't take pics of the rest of the process, so I continued
with another hat next day.

   3. Now join #1 and #2 by sewing along the raw edge, right sides together. Leave about 2 inch opening.

   4. Using the opening, turn the whole thing inside out. Use a pencil or point turner to poke the ears out on fabric #1. Push the fabric #2 inside fabric #1.
   5. Slip-stitch the opening shut.

   6. Tie two knots with the 'ears' of Fabric #1. You may have to adjust these knots a bit to give them the right look. The knots also give you some control over the size of the hat so you can make it fit the child's head a little better.

If the hat is a little big, you can turn some of the bottom out to fit the head of the baby. The best part is that these hats don’t have a any inside seams to bother the baby skin. Enjoy your little devil's advocate...he'll soon be coming up with some tough questions.

Monday, November 7, 2011

Giveaway and Snow-blossom Hairband tutorial

Headband tutorial: Snowblossom Headband This giveaway is closed now


Didn't she just stole your heart with her toothless grin ...
Now that I have lured you in with this pic, let me point out that she is wearing a headband I made. Do you have a cutie pie for whom you would like to make this hairband? Read on and I will show you how to make one...but before that I will show you how to WIN supplies to make one( or a hundred), how about that?

So I was looking for a vendor to buy the elastic to make these headbands...and when I shop I have to have a great deal on whatever I am buying. So I searched high and low....I even looked at crafter's forums, for people destashing their supplies but nothing that I would call a great deal surfaced, that is, until I came across Elastic by the yard. I just went ahead and ordered mine, and soon got 5 yards of quality white foldover elastic in the mail.
Elastic by the yard sells a vast selection of elastics and other crafting supplies.

You would find skinny elastic


Printed Elastics


Different kinds of flowers and so much more over there.

They even have helpful tutorials to make hairbands etc with these supplies.


My experience went so well that I asked Kristin, who runs this shop if she would be interested in sponsoring a giveaway on my blog. She responded back saying that she would give away...listen carefully....this is big..
3 lucky readers grab bags of 60 yards of elastics each! How freaking awesome is that? Just so you know Elastic by the yard occasionally offers these grab bags for sale on their facebook page and these guys sell like hot cakes. So you should definitely try winning one of these.

To enter this giveaway,
     1. Leave a comment on this post with your email.id.
     2.  For another chance, Like Elastic By the Yard on facebook and leave a separate comment here saying that you did so.
     3. For one more entry tweet about the giveaway and leave a separate comment here saying you did so.


The giveaway is open until next Monday, Nov 14, 2011.
I'll let random.org pick a winner from all the comments on Nov 15, 2011. Winner will be announced on Nov 16, 2011.


If you don't win and would like to buy elastics from them, Kristin has generously offered a discount of 15%  of your total order with code BNBDSC.

Snow-Blossom Headband Tutorial


I love hair accessories. Hairbows, Clippies, hairbands...you name it. For the Mom of a toddler who keeps them on her head for a whopping...15 seconds at a time, I make an awful lot of them. Since I make so many of these, I thought it would be fun to share a tutorial for one of these here. So I brought you this snow-blossom hairband. Not sure, if you like it in the pic above but it looks super-cute on a tiny little head. I think it will work great with Christmas outfits.
Here's how I made these.

Cut 15 circles from Tulle. Mine were about ................inches.


Make a stack of 5 circles. Fold the whole stack in half.


Fold into quarter

Fold into eigth


Cut out a triangle from the edge.

Open the circles and gently turn the circles such that 
the petals become unaligned instead of nicely lining up in the stack.


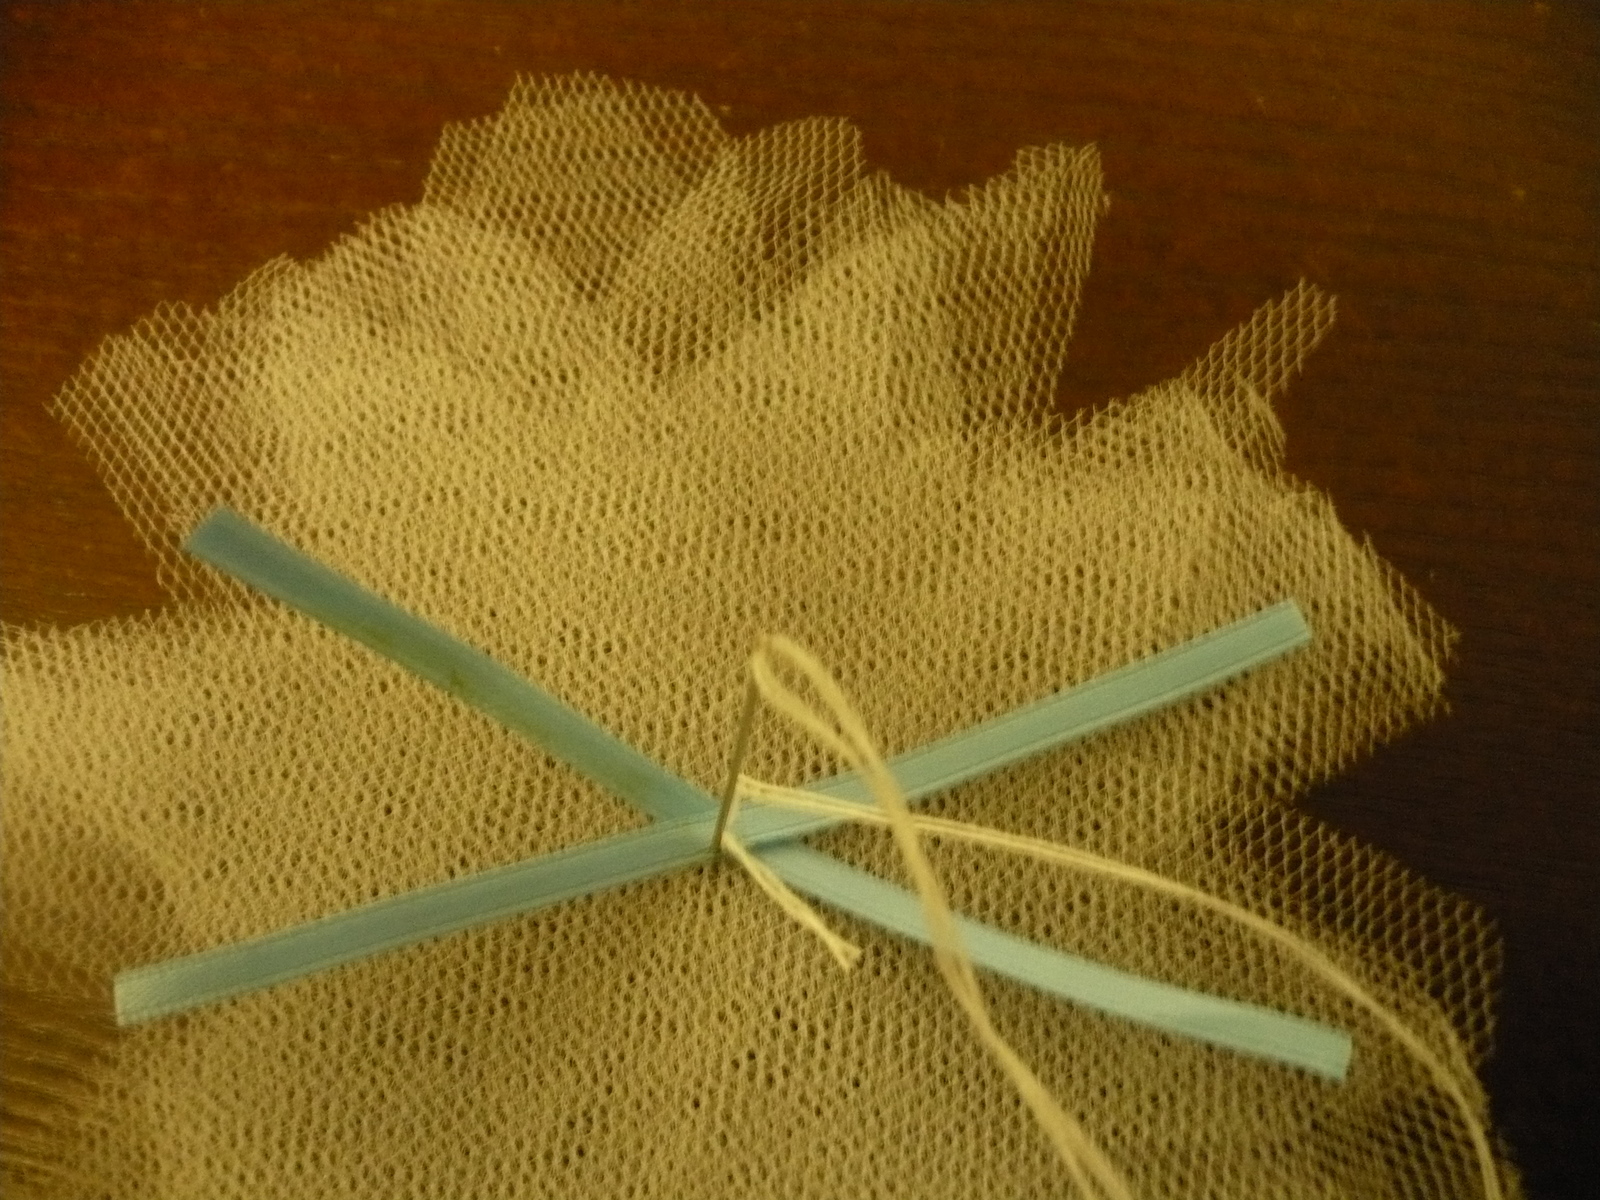
Now cut two satin ribbon strips about 4 inches long. Place them in an 'X' position on the flower.

Now thread a needle and tie a knot at one end of thread. Insert this needle at the center of the 'X' all the way through all the Tulle layers. Bring it back up, insert it down. Repeat 3-4 times to secure the ribbon and petals together.
 
Now fold the flower into half.


Now fold a third of this half from one side. Sorry I didn't get good pics of the above flower, so I'm using pics from another flower I made. Hence there's no ribbon or needle in this one.


Now fold another third over itself.

Now secure this flower by inserting needle back and forth a couple times.

Cut a 13 inch long piece from foldover elastic

Sew the ends down using zig zag stitch. Go over the elastic 2-3 times to give it extra strength.


Now your flowers and your headband are ready to be assembled.


Place one flower over the place where you sew the seam on the headband. Secure it to the band by inserting needle up and down 2-3 times. Once this flower is sewn in bring back the needle up on the band about half inch away from the center of this flower
Place another flower facing sideways on the band.Secure it with needle and thread too.

Repeat above step for the third flower.


Snow Blossom headband is ready. Put it on the cutest little girl around you!


Adore!


Go click, click click!


Pin It

Tuesday, October 4, 2011

Devil's advocate Baby Hat tutorial: Guest posting at Bear Rabbit Bear

How to sew knotted baby hat
knotted baby hat sewing tutorial


Just popped in to say that I'm over at Bear Rabbit Bear today, Guest posting my tutorial for Devil's advocate Baby Hat. Hop on over and check out this tutorial as well as other cool tutorials Melanie's guests are sharing for Fall Project Week.


Pin It

Wednesday, September 14, 2011

Knotted baby hat tutorial

Sewing for baby: Knotted hat tutorial
I did this guest post over at Whip Up a few weeks ago. Since then, I have modified the pattern a bit, so the final product looks more finished. Posting it here in case you missed it over at Whip Up and also adding the revised steps (in blue).


With the birth of my niece last month, newborn gifts are on my mind these days...Here's a tutorial for making a knotted hat for newborns. I love making and gifting these hats....because they are useful and practical?....naah...because seriously, what's cuter than a teeny-tiny hat on a teeny tiny head. The fact that hats are particularly pricey and difficult to find in ready-to-wear clothes doesn't hurt either. So without further ado...here's how to make one:

Supplies:

Knit fabrics: Take 2 pieces of same fabric or two different fabric. 

This is a great project to use up those scraps that are too big to throw away but too irregular to make into a dress, top etc.

1. Print out the pattern, tape the two pages as shown and cut both pieces of pattern ( total 3 cuts). Piece 1 spans both the pages whereas Piece 2 is only on Page 1.
Once you cut out all the three pieces, tape both parts of Piece 1 by overlapping the small part over the bigger part, up to the dash (-) mark.


2. 

Fold each fabric in two layers, then fold one more time. Place each pattern piece on fold and cut. So now you have two pieces of 1 and two pieces of 2.

3.

 Sew together pieces of 1 along the conical side, right sides together. Sew together pieces of 2 along the semi-circular side, right sides together. 

Note: Leave  a 2 inch opening while sewing piece 2 ( lining). This is an improvement from earlier version where I leave the opening at the joining seam in step 4.

4. 

Now join 1 and 2 by sewing along the raw edge, right sides together. Leave about 2 inch opening.
Note: It was only after sewing a couple of these hats, that I realized I should have left the opening in inner lining piece instead of the seam joining the two pieces. It was one of those "Duh...I'm so stupid" moment.

5. 

Using the opening, turn the whole thing inside out. Use a pencil or point turner to poke the cone out on fabric 1. 
Note: Slip-stitch the opening in fabric 2 shut. I missed this step when I wrote the guest post. 

Push the fabric 2 inside fabric 1. 

6.

Tie a knot with the cone of fabric 1. 
If the hat is a little big, you can turn some of the bottom out to fit the head of the baby. The best part is that these hats don't have a any inside seams to bother the baby skin. Enjoy your little munchkin...hats and all.

Thursday, July 7, 2011

Summer Spring necklace tutorial

Jewelry Tutorial: Spring Necklace DIY
summer spring necklace tutorial
Remember this?
When I posted pics of this necklace last month, some of you wanted to know how to make one. Well, I'm sharing the tutorial today over at Blissful and Domestic. Danielle's blog is full of crafting/decorating/sewing goodies, do check it out. She also has an etsy shop calld Blissful and Domestic Designs, if you're looking for some fun headbands, definitely browse her store.

If you're coming from Blssful and Domestic, Welcome to Blooms And Bugs. Take a look around, enjoy, and if you have some feedback, leave a comment. I read every one of those.

Tuesday, June 14, 2011

Reversible Sun Hat

Reversible Sun Hat sewing project

reversible sun hat sewing
Based on pattern Sprinkle's Sun Hat From Valerie Van Sharder's book "Sweet Booties". This pattern didn't really work out for me. For one thing I chose the Newborn size because everything else seem to fit my 18 mos old in that size :o . Apparently little one actually has the head of an 18 month old even though the rest of her body is newborn size. No idea if the sizing is off in the book or its my little one.

sewing a reversible sun hat
Also the pieces didn't line up properly for me. Again, it could just be my cutting skills ( or lack of them ).
Since I have already returned the book, I'll try to self modify the pattern. Hats are a very cute and functional accessory, so it will be good if I have a go to pattern for these.

Monday, June 6, 2011

Hair bows and such

Lace and flower headband DIY
What crafty mom of a little girl worth her salt  doesn't dip her toe in hair bow making every now and then. So indulge me while I share these accessories.
lace hair band

They were my perfect companion during the many hours road trip we took last week. I just made some plain hair bands with FOE,  tossed scraps of ribbons, trims and laces in a ziploc.
DIY lace headband
What do you think? Not bad for a first time bow maker..eh?

handmade lace hairbow

And now I have found just perfect blog with tons of ideas and inspiration. I must have been living under a rock to not stumble upon Fabric Bows and More yet.
Now if I could only get my little one to let me put these on her...

Saturday, June 4, 2011

Beach beckons!

So we spent the memorial day weekend munching junk food, lounging around, gossiping with (girl)friends, clicking pictures basically doing nothing. And it was the best long weekend in a long long time.

I wanted to make some accessories to wear on this beachy vacation ( less beach, more vacation). Here's what I came up with:
beads and ribbon necklace diy

I even got bold with my nail-color. I don't think my nails had ever seen anything that was not brown-ish.....or....red-ish so far....but this time I chose to step out of my comfort zone.
teal nails

I think I have some sort of teal-fever right now....I'm loving everything teal this summer. What is your current favorite?